There are several ways to uninstall an application, but the most effective one is to use an uninstaller software such as IObit Uninstaller.
This software will remove all files and registry entries associated with the application you’re uninstalling, ensuring that there are no leftover files that can interfere with your system.
If you need additional info on how to uninstall a program or an app in Windows 10, take a look at our useful guide.

IoBit Uninstaller 10 Pro
You can completely remove unwanted programs and Windows 10 applications with IoBit Uninstaller 10 Pro.
3. Remove old and temporary files
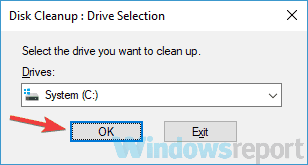
- Press Windows Key + S, and type disk.
- Select Disk Cleanup.

- Make sure that your System drive, by default C, is selected and click OK.
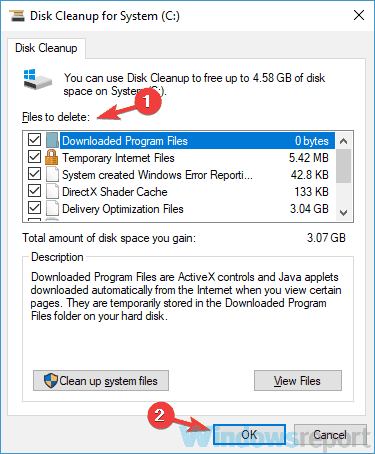
- Your PC will now scan the selected drive. This process usually takes a couple of seconds.
- Select the files you want to remove and click OK.
- If you want, you can click the Clean system files button in order to remove additional files.

If you’re having problems with explorer.exe high CPU usage, the problem might be caused by old and temporary files.
Windows creates hundreds of temporary files, and sometimes these files can interfere with your system, so it’s advised to remove them.
The best way to do that is to use the Disk Cleanup application. After removing temporary files, check if the problem is still there.
Disk Cleanup is a solid tool, but many users prefer using CCleaner over this app simply because it has some additional features available.
CCleaner allows you to remove browsing history, clean your registry, and so much more, so if you want to be sure that temporary files aren’t interfering with your system, you might want to try it out.

CCleaner
Clean temporary files, cookies, history and other files from all browsers with CCleaner.
4. Check for unordinary desktop icons
![]()
Sometimes explorer.exe high CPU usage can occur due to certain icons on your desktop. This is an unusual occurrence, but it can sometimes occur on your PC.
Apparently, the issue is caused by a file or a shortcut on your desktop that doesn’t have an icon. For some reasons, these types of files cause issues such as high CPU usage with explorer.exe.
However, to fix the problem, you just have to remove files/shortcuts without icons from the desktop and the problem will be resolved.
5. Install the latest updates
- Pres the Windows Key + I to open the Settings app.
- Go to the Update & Security section.
- Click on the Check for updates button.
- Windows will check for available updates and download them automatically in the background.
- Restart your PC to install them, and check if the problem is still there.


If you’re having issues with explorer.exe high CPU usage on your PC, the problem might be the missing updates.
Windows 10 is a solid operating system, but sometimes certain bugs can appear and cause high CPU issues.
However, you can fix this problem simply by installing the latest updates. Windows 10 usually installs the updates automatically, but you can always check for updates on your own.
Having trouble updating your Windows? Check out this guide.
6. Perform a Clean boot
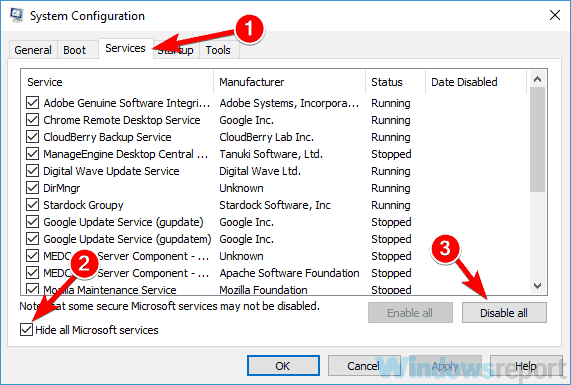
- Press Windows Key + R, type msconfig, and click OK.
- Go to the Services tab, and check the Hide all Microsoft services option.
- Click the Disable all button.
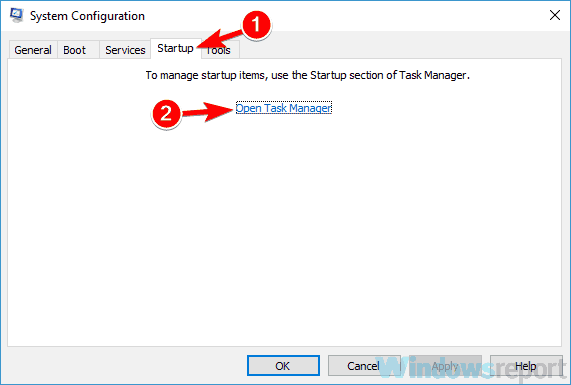
- Head over to the Startup tab and click Open Task Manager.
- Right-click the first entry on the list and choose Disable from the menu.
- Perform this step until you disable all startup applications.
- Head back to the System Configuration window.
- Click on Apply and OK to save changes, and restart your PC.


Once your PC restarts, check if the problem is still there. If not, enable services and applications one by one until you manage to recreate the problem.
Keep in mind that you’ll need to restart your PC every time after you enable a group of services or applications.
According to users, sometimes explorer.exe high CPU usage can occur due to third-party applications on your PC.
Many applications and services tend to start automatically with Windows, and that can cause this and many other problems to appear.
However, you can fix this issue simply by performing a Clean boot. In Clean boot state all startup applications and services should be disabled allowing you to troubleshoot the problem.
If you want to know how to add or remove startup apps on Windows 10, check out our simple guide.
7. Clear the contents of the Temp folder
- Navigate to the C:WindowsTemp directory.
- Delete all files inside of Temp folder.
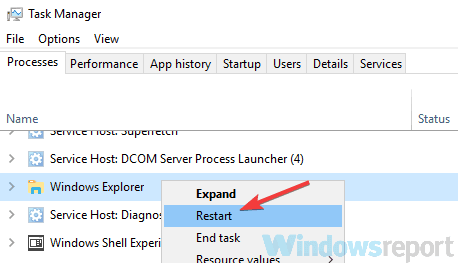
- Press Ctrl + Shift + Esc to open Task Manager.
- Locate Windows Explorer, right-click it, and choose Restart from the menu.
After restarting Windows Explorer, the problem should be completely resolved.
According to users, explorer.exe high CPU usage can sometimes be caused by files in the Temp directory.
To fix this issue, users are recommending to remove them manually and restart Windows Explorer.
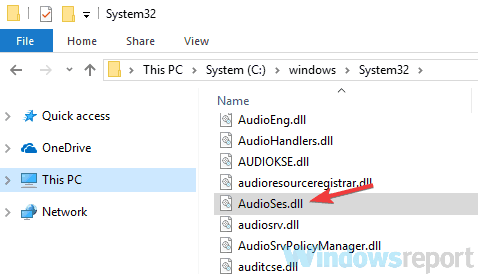
8. Delete the audioses.dll
- Go to the following directory:
C:/Windows/System32 - Locate audioses.dll and move it to your Desktop.
- Go to the following directory:
C:/Windows/Sys/WOW64 - Locate audioses.dll, and move it to a different directory.
- Go to the following directory:
If you’re having explorer.exe high CPU usage, the problem might be related to the audioses.dll file.
According to users, this file can sometimes cause this and other problems to occur, and the only way to fix this issue is to remove this file.
After doing that, the problem with high CPU usage should be resolved.
This isn’t the most reliable solution, and modifying the contents of the Windows directory is usually not advised, so be sure to use extra caution.
If any new problems occur, restore these two files to their original locations.
9. Use chkdsk scan

- In the Cortana search field, type in Command Prompt.
- Right-click the top result, and select Run as Administrator.
- Run the chkdsk /f :X command.
- Be sure to replace the X with the letter that represents your system drive. For most users, that would be C.
- You’ll be asked to schedule a scan, so press Y to do so.
Sometimes explorer.exe high CPU usage problem can occur due to corrupted files on your PC. This can be a problem, but you can fix it simply by performing a chkdsk scan.
Once you restart your PC, the chkdsk scan will automatically start and try to repair your files. This process can take about 10 minutes, or even more depending on the size of your hard drive, so be patient.
If you’re having trouble accessing Command Prompt as an admin, then you better take a closer look at our useful guide.
Explorer.exe high CPU usage can be an annoying problem, but you should be able to fix it by using our solutions.
Don’t forget to tells us whether these steps helped you deal with the problem. You can do that in the comments section below.
Editor’s Note: This post was originally published in October 2018 and has been since revamped and updated in October 2020 for freshness, accuracy, and comprehensiveness.
Thank you for viewing the article, if you find it interesting, you can support us by buying at the link:: https://officerambo.com/shop/
No comments:
Post a Comment