Monday, August 31, 2020

Windows can't find one of the files in this theme


Matthew Adams
by Matthew Adams

Windows & Software Expert


  • Looking for a way to deal with the error message that states Windows can't find one of the files in this theme?
  • You may delete the theme just to reinstall it right away or switch off the Theme Sync setting.
  • Searching the file risks turning into a waste of time. However, that’s not an option when using the Copernic Desktop Search tool.
  • For similar tutorials, don’t hesitate to quickly bookmark this Windows 10 Troubleshooting Hub.
Fix Windows can’t find one of the files in this theme

Some users have stated that a Save a Theme error message pops up on their Windows desktops.

The full error message states: Windows can’t find one of the files in this theme. Do you still want to save the theme?

That error message pops up randomly and is due to missing theme files and elements. These are a few resolutions for the Save a Theme error.

What can I do if Windows can’t find one of the theme files?

  1. Give a try to Copernic Desktop Search
  2. Change the theme
  3. Delete the theme and install it again
  4. Switch the Theme Background setting to Picture
  5. Switch off the Theme Sync setting

1. Give a try to Copernic Desktop Search

try out Copernic Desktop Search

Copernic Desktop Search file search tool for Windows 10 that can help you solve the problem that you’re dealing with in no time.

First of all, chances are to enjoy the clean program interface that supports tons of intuitive features. We are talking about simultaneous multiple drive searches, results revealed instantly, and Refine fields options for deep searches in your system.

Don’t you own a new PC? The low computer resource usage is just another box ticked by Copernic Desktop Search, so don’t hesitate to give it a try.

Copernic Desktop Search

Copernic Desktop Search

If Windows can’t find one of the files in a theme, try out Copernic Desktop Search and see how effective it is!

2. Change the theme

try to change the theme

First, try switching to another theme to see if that fixes the error message. To change the theme in Windows 10, right-click the desktop and select the Personalization option.

Then, select Themes on the left of the window, and select an alternative theme from there.

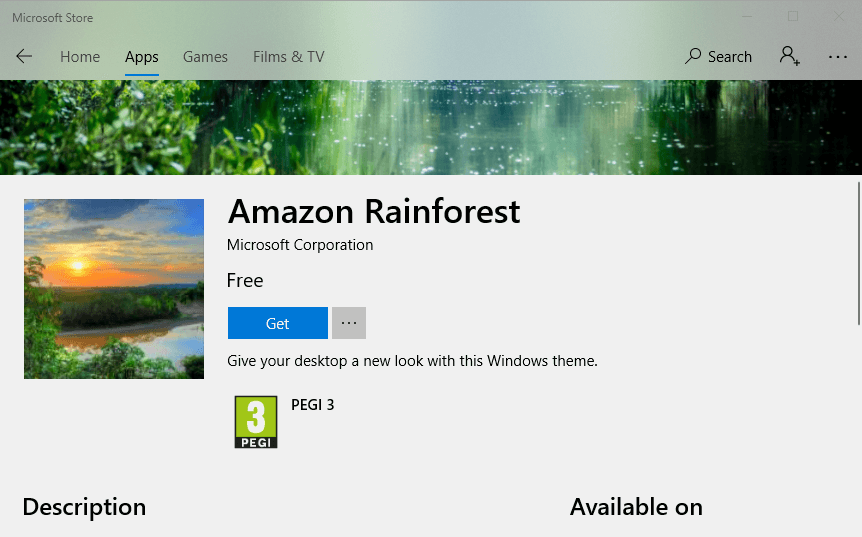
Alternatively, you can click Get more themes in Microsoft Store to download a new theme and then add that one to the desktop. This great list includes some of the best Windows 10 themes.

2. Delete the theme and install it again

  1. Right-click the Windows 10 desktop to select Personalization and open the Settings window.
  2. Click Themes on the left of the Settings window.
  3. You can’t delete the active (currently selected) theme. Thus, you’ll need to select an alternative theme first; and then right-click the theme you need to reinstall and select Delete.
  4. If you got your theme from the Microsoft Store site, click Get more themes in Microsoft Store. Then search for your theme there, select it, and click Get.
  5. Click Launch to add the theme to the theme menu on the Settings window. Then you can select to apply the theme from there.
  6. If your deleted theme came from another website, open the site you originally got it from to download it again.

If you prefer to retain your current theme, try deleting and reinstalling it instead. Downloading the theme again should ensure there are no missing elements.

Use the above procedure to reinstall a theme in Windows 10.


Need more details on how to install third-party themes on Windows 10? Count on us for that


4. Switch the Theme Background setting to Picture

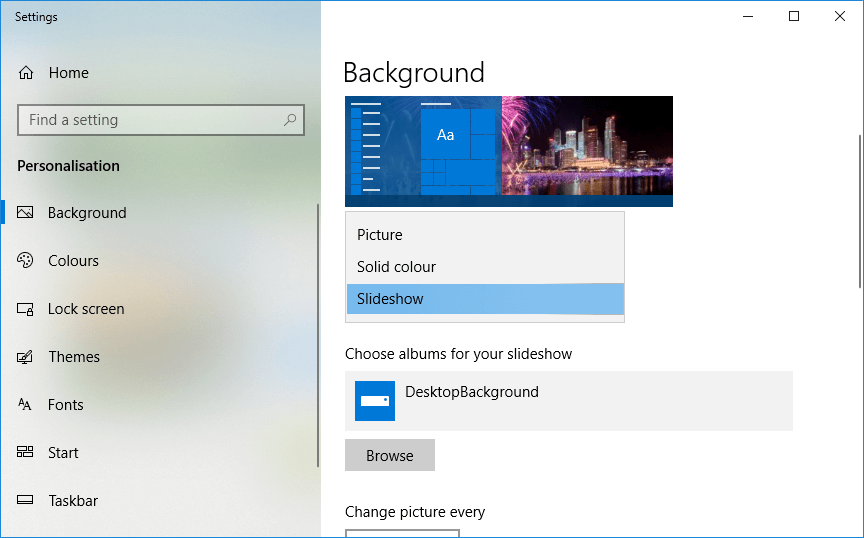
If the theme is a slideshow, and most are, switching it to one background might fix the Save a Theme error.

To do that, right-click the desktop and select Personalization > Background to open the options shown directly below.

Then, select Picture on the Background drop-down menu, and click the Browse button to select a wallpaper.

5. Switch off the Theme Sync setting

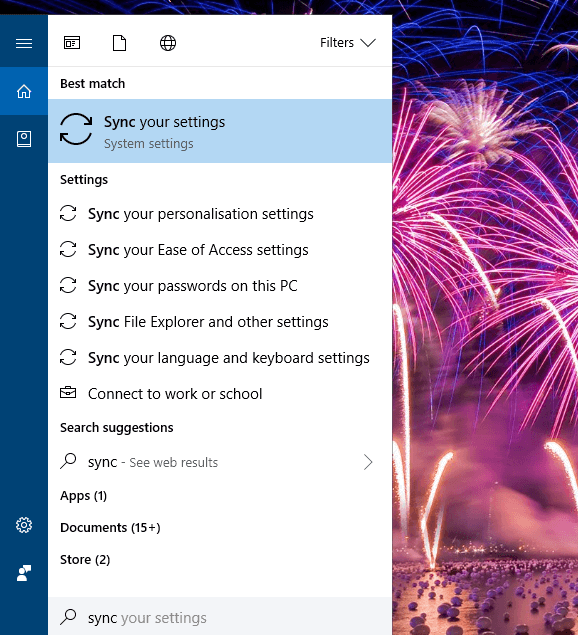
  1. Press the Type here to search taskbar button to open the Cortana app.
  2. Enter the keyword ‘sync’ in Cortana’s search box.
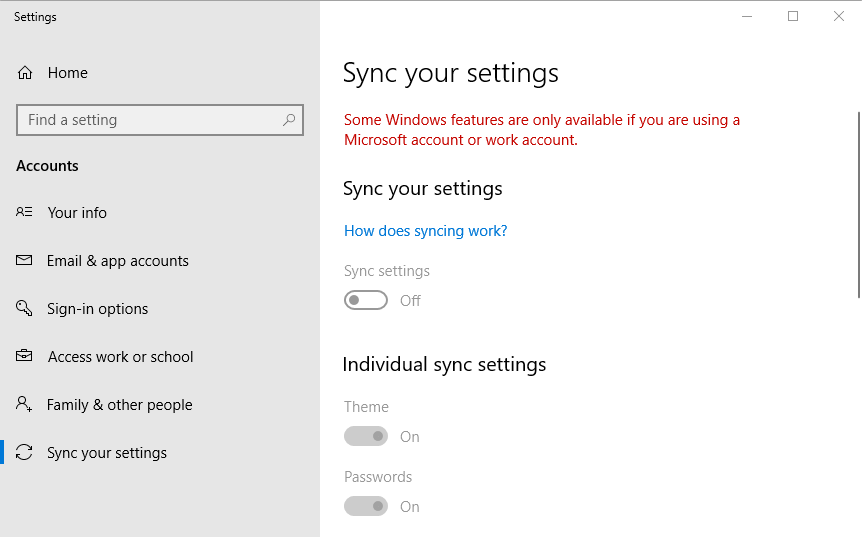
  3. Then you can select Sync your settings to open the window shown below.
  4. Toggle the Theme setting there off.
  5. Alternatively, you can toggle Sync settings off to turn off all the synchronization.
  6. Then restart Windows 10.

Windows 10 includes a Theme sync setting that’s selected by default for those signed in with Microsoft accounts.

That option synchronizes (or matches) the desktop theme across all the Windows 10 devices a user might utilize with the same Microsoft account.

Users have confirmed that switching the Theme sync option off fixes the Save a Theme error. You can toggle that setting off as described above.

Some users have also confirmed that toggling the sync option off and then back on can also fix the issue. As such, you might not need to leave syncing off.

So you can try toggling the theme syncing back on after restarting Windows to keep the device synchronization.

Those resolutions will probably fix the Save a Theme error message in Windows 10. Do you have another fix for the Save a Theme error? If so, feel free to share it below.

Editor’s Note: This post was originally published in August 2018 and has been since revamped and updated in September 2020 for freshness, accuracy, and comprehensiveness.


Thank you for viewing the article, if you find it interesting, you can support us by buying at the link:: https://officerambo.com/shop/

How to view saved WiFi passwords [Windows 10, Mac]


Milan Stanojevic
by Milan Stanojevic

Deputy Editor


  • Wireless connections are incredibly useful, and if you own a laptop, Wi-Fi is probably your connection of choice.
  • But what if you need to view saved Wi-Fi passwords? In today’s article, we’ll show you how to do that on both Mac and Windows 10.
  • Want to learn more about network connections? For more info, go to our Network & Internet section.
  • We have a wide array of similar guides, and you can find them all in our How to Hub.
view saved wifi passwords windows 10 , mac

We use Wi-Fi almost every day on our devices, and we have dozens of saved networks on our devices. But what if we need to view saved WiFi passwords for certain networks?

This is pretty easy to do, and in today’s article, we’ll show you how to do this on both Windows 10 and Mac computers.

How can I view saved WiFi passwords on Windows 10 and Mac?

1. Check your connection properties

  1. Press Windows Key + I to open the Settings app.
  2. Go to the Network & Internet section.
    network & internet view saved wifi passwords windows 10 , mac
  3. Click on Change adapter options.
    change adapter options view saved wifi passwords windows 10 , mac
  4. Double-click your Wi-Fi connection.
    wi-fi connection view saved wifi passwords windows 10 , mac
  5. Click the Wireless Properties button.
    wireless properties view saved wifi passwords windows 10 , mac
  6. Go to the Security tab and check Show characters checkbox.
    security tab view saved wifi passwords windows 10 , mac
  7. You should now see the password for this Wi-Fi connection in the Network security key field.

2. Use PowerShell or Command Prompt

  1. Press Windows Key + X and choose PowerShell (Admin).
    powershell view saved wifi passwords windows 10 , mac
  2. When the PowerShell starts, enter the following command: netsh wlan show profile WI-FI_NAME key=clear
    netsh wlan powershell view saved wifi passwords windows 10 , mac
  3. Be sure to replace WI-FI_NAME with the name of your Wi-Fi network.
  4. Scroll down to the Security settings and in the Key content field you should find the password for this Wi-Fi network.
    key content view saved wifi passwords windows 10 , mac

3. Use Keychain Access

  1. On your Mac go to Applications > Utilities section.
  2. Start Keychain Access from there.
  3. In the Keychains field select System. In the Category section select Passwords.
    keychain access view saved wifi passwords windows 10 , mac
  4. Locate the network in the right pane and double-click it.
  5. Now check the Show password checkbox.
    keychain access show password view saved wifi passwords windows 10 , mac
  6. Enter your administrative password and the Wi-Fi password will appear.

4. Use the Terminal

  1. Go to Applications > Utilities and start the Terminal.
    terminal open view saved wifi passwords windows 10 , mac
  2. Run the following command: security find-generic-password -ga WIFI_NAME | grep “password:”
  3. Replace the WIFI_NAME with the name of your network.
  4. Now enter your administrative credentials.
  5. The Wi-Fi password should now appear.

How to find WiFi password on Google Chrome?

  1. Open Google Chrome.
  2. In the address bar type 192.168.1.1 and press Enter.
    chrome address bar view saved wifi passwords windows 10 , mac
  3. Enter your router’s username and password.
  4. Go to the Wireless section.
  5. In there you should see your Wi-Fi settings.
  6. If available, check the Show password option to reveal your Wi-Fi password.

Note: Google Chrome doesn’t store saved Wi-Fi passwords, but you can use it to view your home network password.

Keep in mind that you need to know both your router’s IP address and login credentials to do so. Also, some routers won’t reveal your password, so this workaround might not work for you.

Viewing the saved password on Windows 10 and Mac is quite simple, and you can easily do it using the graphical interface.

If you’re more tech-savvy, you can easily reveal the saved password by using the command line. Did these methods work for you? Let us know in the comments below.


Thank you for viewing the article, if you find it interesting, you can support us by buying at the link:: https://officerambo.com/shop/

How to view saved WiFi passwords [Android, iPhone]


Milan Stanojevic
by Milan Stanojevic

Deputy Editor


  • Wi-Fi connection is a key component on your smartphone and you probably connect to several different Wi-Fi networks regularly.
  • Sometimes, you need to view saved WiFi passwords, and you can do that with ease on both Android and iPhone devices.
  • We covered passwords and password issues in the past, and you can read about them in this dedicated password article.
  • Looking for more in-depth guides like this one? You can find more of them in our How to Hub.
view saved wifi passwords iphone, android

Wi-Fi is the most used type of connection on your phone, and you’ve probably connected to dozens of different Wi-Fi networks.

However, sometimes you need to view saved WiFi passwords, and there’s an easy way to do that on both Android and iPhone.

How can I view saved WiFi passwords on iPhone and Android?

1. Use the Share Wi-Fi option

  1. On your Android phone go to Settings > Network & Internet.
    network & internet view saved wifi passwords iphone, android
  2. Now select Wi-Fi.
    wi-fi view saved wifi passwords iphone, android
  3. Select the Saved network option at the bottom, or tap the cogwheel icon next to the network name.
    saved networks view saved wifi passwords iphone, android
  4. Select the desired network.
  5. Select the Share option.
    share password view saved wifi passwords iphone, android
  6. Verify your identity if asked.
  7. Now you should see a QR code along with the network password.

Note: This method works for Android 10 and later. On older versions of Android, you’ll need to root your device and use third-party tools.


2. Use Keychain Sync feature and your Mac

  1. Go to Settings > iCloud > Keychain on your iPhone.
  2. Now enable the iCloud Keychain feature.
    keychain icloud view saved wifi passwords iphone, android
  3. Wait for a couple of minutes for the data to sync.
  4. Go to your Mac and navigate to Applications > Utilities and start Keychain Access from there.
  5. In Keychain Access, type the name of the Wi-Fi network whose password you want to see.
  6. Double-click the Wi-Fi network from the list of results.
    keychain access view saved wifi passwords iphone, android
  7. Now check Show password checkbox.
    show password view saved wifi passwords iphone, android
  8. If needed, enter your administrator password.
  9. After doing that, a network password will appear.

For this method to work, iCloud Keychain sync needs to be enabled on your Mac. To do that, follow these steps:

  1. Click the Apple menu and choose System Preferences.
  2. Select iCloud.
  3. Make sure that Keychain is checked. If it isn’t checked, check it and wait for a couple of minutes to sync.

Note: It’s not possible to view saved Wi-Fi passwords on iPhone without jailbreaking your phone and using third-party apps, so this is the best legitimate way to do it.

To view saved WiFi passwords on your Android, you just need to go to the Saved networks section and choose the share option for the desired network.

On the other hand, the iPhone is a more closed system, and the only way to view saved Wi-Fi passwords is to enable Keychain sync and then view them on your Mac computer.

Was this page helpful?

Thanks for letting us know! You can also help us by leaving a review on MyWOT or Trustpillot.

Get the most from your tech with our daily tips

Tell us why!


Thank you for viewing the article, if you find it interesting, you can support us by buying at the link:: https://officerambo.com/shop/

Instagram post not sharing to Facebook [Quick Fix]


Milan Stanojevic
by Milan Stanojevic

Deputy Editor


  • When it comes to social networks, Facebook and Instagram are the largest ones on the market.
  • The two networks can work together, but many reported that Instagram isn’t sharing posts to Facebook, so today we’re going to show you how to fix it.
  • We covered Instagram in the past, and for more fixes, check our other Instagram error articles.
  • Looking for more articles like this one? Our Web Apps Hub is a great place to start.
instagram not sharing to facebook

Instagram and Facebook are the largest social networks on the market, and since they are owned by the same company, they can also work together.

However, many users reported that Instagram is not sharing to Facebook for them. This can be a problem, but there’s a way to fix it, and in this article, we’ll show you how to do it.

What do I do if Instagram is not sharing to Facebook?

1. Make sure that your Facebook account is linked properly

  1. Open the Instagram app on your phone.
  2. Now tap the three-bar icon in the top right corner and choose Settings.
  3. Navigate to Linked Accounts.
  4. If Facebook isn’t selected, select it, and enter your Facebook login information.
    linked account instagram not sharing to facebook

2. Log out of Facebook and Instagram

  1. Log out of your Facebook account on your device.
    log out instagram instagram not sharing to facebook
  2. Now log out of Instagram as well.
    log out facebook instagram not sharing to facebook
  3. After logging out from both services, wait for a minute or two.
  4. Now log back into Facebook and wait for a minute.
  5. Log back to Instagram.

After doing that, the problem with Instagram posts not showing on Facebook will be resolved.


3. Unlink Facebook

  1. On the Instagram app on your phone, go to Settings > Linked Accounts.
  2. Select Facebook and tap on Unlink.
    unlink facebook instagram not sharing to facebook
  3. Wait for a minute or two.
  4. Now link your Facebook account again.

4. Clear cache and data for Instagram and Facebook apps on your phone

  1. Open the Settings app on your phone.
  2. Go to Apps.
  3. Select Facebook or Instagram.
  4. Now tap on Storage.
  5. Tap on Clear cache.
    clear cache instagram not sharing to facebook
  6. Be sure to do this for both Facebook and Instagram apps.

If Instagram posts still are not sharing to Facebook, repeat the steps from above, but this time use the Clear data option.

This will delete all saved data related to these apps, so you’ll have to log in again to both of them.

If Instagram is not sharing to Facebook, the problem is usually just a glitch with linking the two accounts.

However, you should be able to fix that by properly linking your account or by logging out of both Facebook and Instagram and logging back in.

Was this page helpful?

Thanks for letting us know! You can also help us by leaving a review on MyWOT or Trustpillot.

Get the most from your tech with our daily tips

Tell us why!


Thank you for viewing the article, if you find it interesting, you can support us by buying at the link:: https://officerambo.com/shop/

Microsoft says it will fix Windows 10 bug that causes weird errors


Microsoft has finally acknowledged an undocumented issue in Windows 10 May 2020 Update (version 2004) where weird ESENT warnings will be found under the hood in Event Viewer. Windows Event Viewer is a built-in tool that shows a log of apps and system messages, including errors and warnings with detailed information.


In Windows 10 version 2004, when you access Event Viewer tool, you’ll notice errors linked to ESENT with the error code ‘642’. ESSENT is basically a DLL component and it is used by ESE (or Extensible Storage Engine) runtime, which is a data storage technology that facilities search in Explorer and desktop.


In addition, ESE is also used for indexing media catalog on the business computers and this process should be running in the background to help Windows 10 with searches within the operating system.


Event 642 warning


The problem with ‘ESENT 642’ has been widely reported by users in several threads on Microsoft’s community forums and other platforms, including Reddit. A Microsoft support staff reportedly told one user that the warnings could be due to a problem with the Windows.old folder.


“My Windows.old file is now gone and I have noticed a considerable drop of the ESENT errors 642. I did a Disk Clean up but I am seeing only “one group”  of 6 ESENT errors containing these two below in that one group and they appear right after a restart,” one user noted.


Event errors may also indicate synchronization issues with the Extensible Storage Engine (ESE), but users fear that these errors may lead to performance issues with apps, games and the OS itself.


Fortunately, Microsoft has confirmed that they’ll fix the problem with ESE and a future release of Windows will prevent the system from logging Event ID 642.


“Based on feedback we’re turning off ESENT Warning Event ID 642,” Microsoft noted in the changelog of Build 20197, which was released on August 21, 2020.


Microsoft offers a fix for WWAN LTE modems


In a new update to the Windows release dashboard, Microsoft confirmed that they’re still blocking May 2020 Update on computers with WWAN LTE modems drivers.


If you’ve already upgraded to version 2004 and you’ve issues with your internet, Microsoft says you can enable then disable Airplane mode to address the “no internet” bug and other internet issues.


The post Microsoft says it will fix Windows 10 bug that causes weird errors appeared first on Windows Latest


Thank you for viewing the article, if you find it interesting, you can support us by buying at the link:: https://officerambo.com/shop/

How to ignore Messenger messages on Facebook [Easy Guide]


Milan Stanojevic
by Milan Stanojevic

Deputy Editor


  • When it comes to social networks, Facebook is currently the largest social network on the market.
  • Messaging is a crucial part of the Facebook experience, and today we’ll show you how to ignore Messenger messages on Facebook.
  • If you're looking for more instant messengers, be sure to check our Social & Communications section.
  • We wrote many guides like this one, and you can find them all in our How to Hub.
facebook messenger ignore messages

Facebook is one of the most popular social networks with millions of users. Just like any other social network, Facebook has its own instant messenger.

Sometimes you need to ignore certain Messenger messages on Facebook, and in today’s article, we’re going to show you how to do that.

How can I ignore Messenger messages on Facebook?

1. Use the Ignore messages option

  1. Open Facebook in your web browser.
  2. Now open the chat window with the person or group that you want to ignore.
  3. Click the down arrow next to its name and select Ignore messages.
    ignore messages facebook messenger ignore messages
  4. When the confirmation dialog appears, click on the Ignore Messages button.
    ignore conversation facebook messenger ignore messages

You can also ignore messages from the web Messenger by doing the following:

  1. Click the Messenger icon in the top right corner and click the expand button.
    messenger open facebook messenger ignore messages
  2. When the Messenger opens, click the three dots next to a chat that you want to ignore and choose Ignore Messages.
    ignore messages facebook messenger ignore messages
  3. When the confirmation dialog appears, click on Ignore Messages.

After doing that, all future messages from this person will be moved to the Filtered Requests section, so you’ll need to go there to see them.

While it’s possible to do this in any web browser, we recommend using Opera. The browser is perfect for social media because it has integrated Facebook messenger.

In addition to Facebook, there’s also WhatsApp, Telegram, and VKontakte messenger available out of the box.

Other social networks such as Twitter and Instagram are also available, so you won’t ever miss anything from social networks.

The browser also has a snapshot tool, so you can take screenshots of any website and share it with others.

Ad blocker is also available, and it will permanently block ads on all websites. For extra security, there’s a free and unlimited VPN available as well.

Opera is built on the Chromium engine, so it’s quite similar to Chrome, and it even works with Chrome extensions. If you want a fast, reliable browser that is optimized for social networks, give Opera a try.

Editor's choice

Opera-browser
  • Fast browsing technology
  • Free VPN
  • Includes Messenger Apps
  • Has Dark Mode
  • Built-in Ad-blocker

2. Use the desktop app

  1. Open the Facebook desktop app.
  2. Now right-click the conversation that you want to ignore.
  3. Select Ignore Messages.

After doing that, all your future messages from this contact or group will be ignored.

Ignoring Messenger messages on Facebook is pretty simple, and you can do it simply by selecting the contact that you want to ignore and then choosing the Ignore messages option.

After following the steps from this guide, you won’t ever have to see any unwanted messages on Facebook.

Was this page helpful?

Thanks for letting us know! You can also help us by leaving a review on MyWOT or Trustpillot.

Get the most from your tech with our daily tips

Tell us why!


Thank you for viewing the article, if you find it interesting, you can support us by buying at the link:: https://officerambo.com/shop/