- QuickTime install errors became notorious in the past few years. Ready to solve them for good?
- Before imaging the worst, install an older version or run the installer in the compatibility mode.
- Since you’re here, you may also be interested in the best software tools to turn photos into videos.
- Similar issues arise regularly. Solving them is our specialty, so don't hesitate to visit this Software Troubleshooting Hub.

There are a lot of redundant applications that, over the years, found their end on the software scrap yard. One of those is QuickTime.
That’s Apple’s multimedia framework and player for once scarce and nowadays common video formats.
If you’re not using old Adobe’s applications, there’s a chance that you don’t need it at all, especially since it’s discontinued and doesn’t support Windows 10.
On the other hand, the fact that there are still interested users and the installation on Windows 10 ends with an error, we decided to find alternative ways to obtain and utilize QuickTime on your Windows 10 PC.
If you are really keen to use it, we advise you to follow the steps below.
How can I install Apple’s QuickTime in Windows 10?
- Run the installer in the compatibility mode
- Use a reliable QuickTime alternative
- Use a customized installer to install QuickTime (third-party source)
- Try installing an older version
1. Run the installer in the compatibility mode
- Download the QuickTime installer and save it.
- Navigate to the download location.
- Right-click on the QuickTime installer and open Properties.
- Select the Compatibility tab.
- Check the Run this program in compatibility mode for box.
- Select Windows Vista from the drop-down menu.
- Check the Run this program as an administrator box.
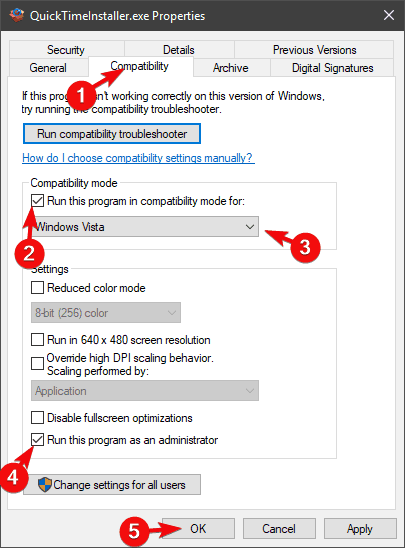
- Confirm changes and close Properties.
- Run the QuickTime installer.
As we already have said, QuickTime for Windows support is discontinued and it’s not advised to stick with this application furthermore.
However, if you’re eternally bound to this nifty player, we’ll help you use it in the safest possible way.
There are various ways to approach the incompatibility of QuickTime with the latest Windows iteration.
The first one is to try and run the installer in the compatibility mode for Windows Vista and move from there.
If you’re not certain how to run the QuickTime installer in the compatibility mode, make sure to follow the above instructions.
2. Use a reliable QuickTime alternative

If you’re in need of QuickTime but you can’t get it to work, the next thing you should do is to turn to an alternative.
Long story short, Cyberlink PowerDVD should be able to replace it just fine. It’s small and well-designed and, proverbially, there’s no current video format that can’t be played with Cyberlink PowerDVD.
Besides getting the highest quality media playback available these days, this tool is about to turn into your personal media collection that gathers all your photos, music, and video files.
They are all organized and literally one click away from being enjoyed at any hour!
Cyberlink PowerDVD
If you want to forget all about QuickTime’s install error, Cyberlink PowerDVD is a great alternative.
3. Use a customized installer to install QuickTime (third-party source)

- Download the Windows 10 installer for QuickTime.
- Remove all previous versions of QuickTime. We suggest using a third-party uninstaller and our tools of choice is none other than IObit Uninstaller. Make sure to give it a try and look for yourself.
- Run the installer and wait until the process is finished.
- Restart your PC and try running QuickTime.
There seems to be a workaround that overcomes the issue at hand and forces the installer to work. In order to use this approach, you’ll be needing a third-party uninstaller like the one above.
On the other hand, it is easy to download and designed precisely to remove any unwanted software. Previous versions of QuickTime are no exception to the rule.
On top of that, IObit Uninstaller also cleans up the leftovers. You just need to follow the above instructions to install QuickTime on your Windows 10 PC.
IObit Uninstaller
IObit Uninstaller lets you remove previous versions of QuickTime in just one click. Ready to try it out?
4. Try installing an older version

- Navigate to Apple’s support website and choose an older version of QuickTime.
- Download the QuickTime installer and run it in the compatibility mode for Vista and with the administrative permission.
- Wait until the installation is finished and check if the issue is solved.
Even though this is quite uncommon, some of the latest versions could be the ones with issues on Windows 10.
However, for some peculiar reason, users were able to install an older iteration of QuickTime and update it later on. This, of course, requires, some effort and meddling with untrusted sources.
It’s strange for the once widely acknowledged application to completely vanish from the official sites. Even though there are still formats that are related to Apple’s legacy player.
Also, due to improvements in applications once dependent on QuickTime, you won’t need it to play videos in a browser or to use Adobe’s suits.
Finally, we sometimes just need to let go, as there are probably good reasons why QuickTime for Windows is primarily neglected and then discontinued.
In case you have a better or more reliable way to install QuickTime in Windows 10, make sure to share it with us and our readers in the comments section below.
Editor’s Note: This post was originally published in March 2018 and has been since revamped and updated in August 2020 for freshness, accuracy, and comprehensiveness.
Was this page helpful?
Get the most from your tech with our daily tips
Thank you for viewing the article, if you find it interesting, you can support us by buying at the link:: https://officerambo.com/shop/
No comments:
Post a Comment