- Problems with Wi-Fi and the Internet connection are probably the most common problems in Windows 10.
- We have no less than 20 solutions to solve this problem in the article below.
- If you're facing Internet connection problems often, bookmark our Network & Connectivity section.
- The Troubleshooting Hub is the place to go if you want to fix any other Windows 10 problems.
Problems with WiFi and the internet connection are probably the most common issues Windows 10 users face. And we’ll agree that there’s nothing more annoying for an average user than Wi-Fi issues while browsing the internet.
There are various Wi-Fi errors that can eventually occur, and in this article, we’ll try to address as many as possible.
There are literally tens if not hundreds of various Wi-Fi issues you can encounter while using Windows 10. Here are some of the most common issues:
- Windows 10 won’t show available networks – This error shows up when there’s a network problem which prevents available WiFi networks from showing.
- Windows 10 no connections are available – This error shows up when there are no connections available to connect to. It tends to show up, even if you know there are actually some available connections.
- Windows 10 can’t connect to this network -This error shows up when you’re unable to connect to a certain WiFi network. We have an article dedicated to this issue, so you can combine solutions from that article with solutions from this article. Hopefully, you’ll find a proper solution.
- Windows 10 no WiFi icon – This error appears when there’s no WiFI icon in the taskbar at all.
- Windows 10 WiFI quit working – This error appears when your WiFi connection stops working suddenly.
- Windows 10 WiFI won’t turn on – This error means you can turn WiFi on from your taskbar.
- Windows 10 WiFi yellow triangle – This problem tells us there’s something wrong with the connection itself. You can connect to it, but the bandwidth is usually the problem.
- Windows 10 WiFi freeze greyed out – This problem prevents you from doing anything with your WiFi connection. You can’t turn it on, access settings, etc.
What can I do if my Wi-Fi connection isn’t working?
Table of contents:
1. Update network drivers
Another common solution for various network issues is to simply update your WiFi driver. In case you don’t know how to do that, follow these instructions:
- Right-click the Start button and open the Device Manager.
- Locate and expand Network Adapters.
- Right-click your network adapters and click Update driver software. Make sure to do it with both LAN and WLAN adapters.
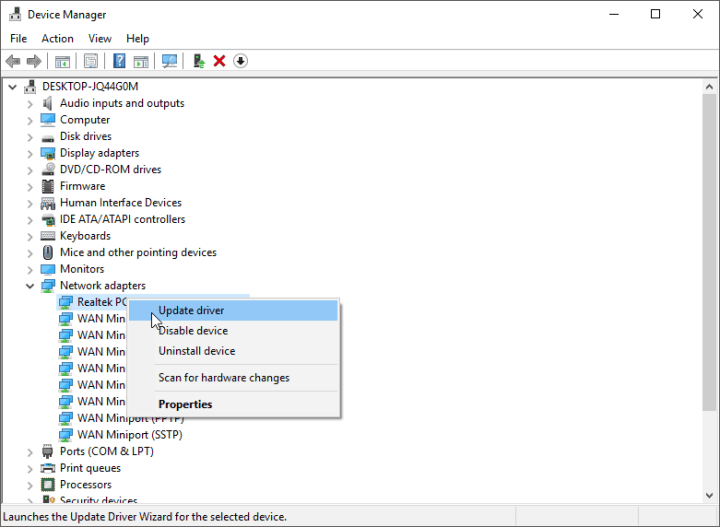
- Wait for the process to finish, restart your PC and try connecting.
If Windows can’t automatically find and download new drivers read our complete guide on how to do that manually.
If the problem is still there, go back to Device Manager > Network Adapters, and do the following:
- Right-click Network Adapters and open Properties.
- In the driver tab, click Uninstall.
- Now, open the Details tab and locate Hardware Ids in the drop-down list.
- Copy the first line and paste it into the browser.
- Find proper drivers provided by the official hardware manufacturer.
- Download and install those drivers for both LAN and WLAN respectively.
- Restart your PC and check the connection again.

You can also employ the help of a dedicated third-party driver updater like DriverFix:
- Download DriverFix
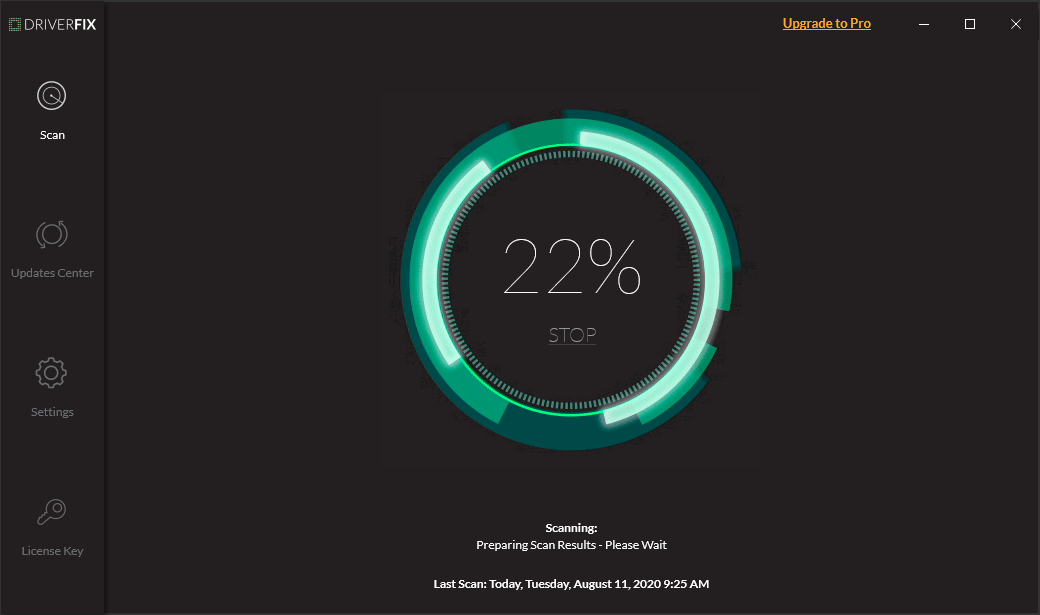
- Launch the program
- Wait for Driverfix to scan your PC for outdated, missing, or broken drivers
- Select your network drivers from the list
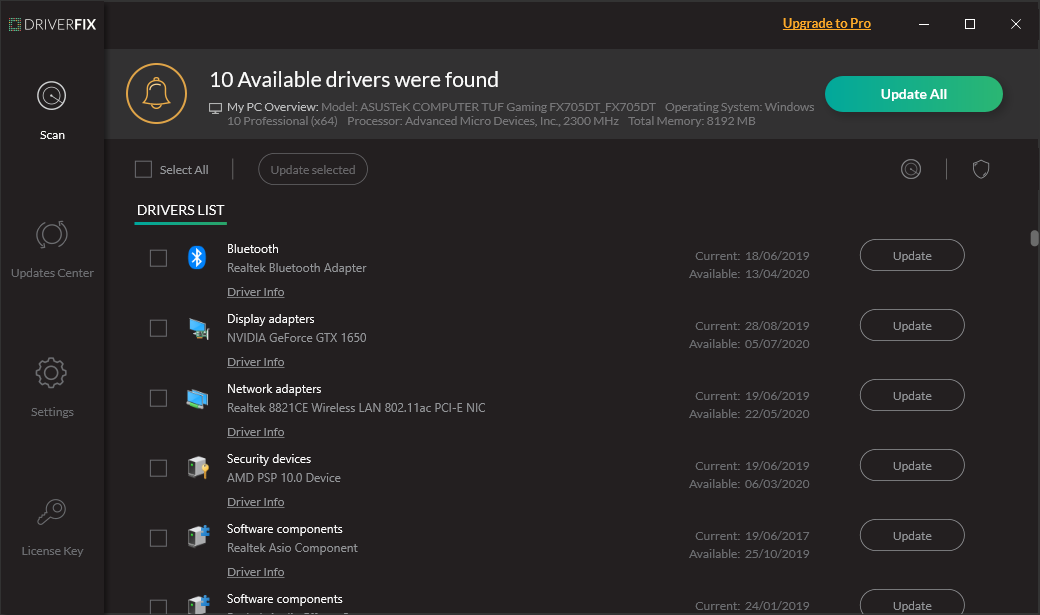
- Wait while DriverFix deals with your drivers
- Restart your PC

DriverFix
This lightweight and portable tool will detect all of your missing drivers by itself, and update them as soon as possible.
2. Check for malware

On the contrary to the previous workaround, your connection may be corrupted by some kind of malware. So, it would be a good idea to run your security scan once again.
If there’s a connection-blocking malware on your computer, your antivirus will surely eliminate it.
If you don’t have an antivirus installed, then we recommend you get the best one on the market today, and it is called Bitdefender.
While the real selling point of this product is its advanced protective features, what makes it so good for our particular problem is the lack of system interferences that it presents.
Not only will you be 100% protected from all forms of malware, but you will enjoy a smooth PC experience at the same time.
If you want to stay connected to your WI-Fi but also benefit from advanced malware protection, then Bitdefender is the way to go.
Bitdefender Antivirus
3. Reset TCP/IP
- Go to Search, type cmd, right-click it and run the Command Prompt (Admin).
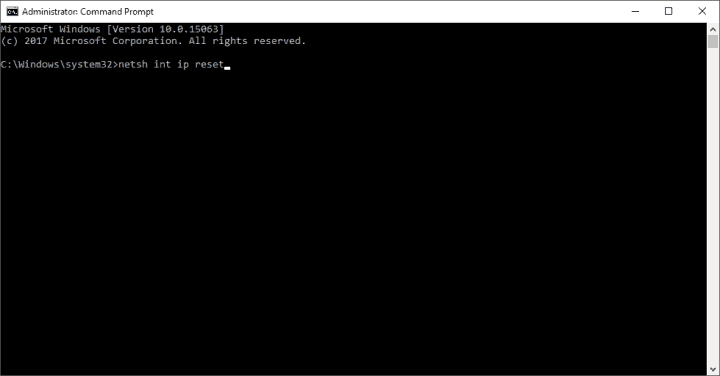
- In the command line, type the following commands and press Enter after each one:
netsh int ip resetnetsh int tcp set heuristics disablednetsh int tcp set global autotuninglevel=disablednetsh int tcp set global rss=enabled
- Reboot your PC and try to connect. If the problem is still there, make sure to try out the remaining steps below.
Can’t access TCP/IP on Windows 10? Check out this quick guide to fix the issue.
The first thing we’re going to try is resetting the TCP/IP stack. This is, indeed, one of the most common solutions for network problems in Windows, and can be helpful with other internet issues, as well.
Having trouble accessing Command Prompt as an admin? Take a closer look at this guide.
4. Change wireless SSID and password on your modem

Another solution that’s quite common when troubleshooting WiFi and network issues are changing the wireless SSID and password of your modem.
Even though we’re talking about resolving the problem with your wireless network, for this workaround you’ll have to connect your computer to the modem using the Ethernet cable.
Since the procedure of changing the SSID varies from modem to modem, we can’t tell you what to do precisely. Therefore, we recommend you checking your modem‘s manual or looking online for more info.
5. Reset your modem (and more)

Now, let’s switch to more basic solutions, which are probably the first thing you’ll do anyway. Here are some of the actions you need to do to troubleshoot your modem/router:
- Shut down your router or modem. Wait a minute and power it on.
- Disable modem/router’s built-in firewall temporarily.
- Reset the modem/router to factory settings
- Make sure your router/modem isn’t overheating. Place it far from temperature sources.
Once again, if you’re not sure how to do any of this, check your router/modem manual for more detailed instructions.
You can also try to update your router’s firmware. If you don’t know how to do that, we’ve prepared a nifty guide that will help you.
6. Use the Internet Connection troubleshooter
- Go to Settings.
- Open Update & Security.
- Navigate to Troubleshoot.
- Click on the Internet Connection Troubleshooter.
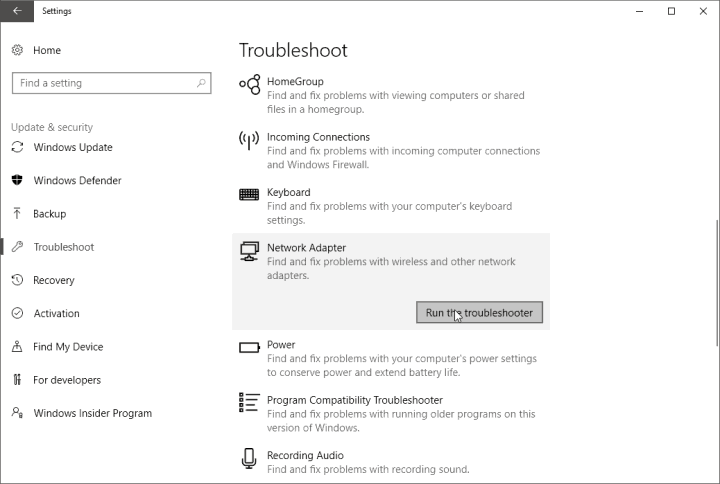
- Now, follow further on-screen instructions, and wait for the wizard to finish
- Restart your computer
If you’re on at least Windows 10 version 1703 (Creators Update), you have a new troubleshooting option on the Settings app. This Troubleshooter can be used for resolving various problems within the system, including the WiFi issue we’re talking about.
If you’re having trouble opening the Setting app, take a look at this article to solve the issue.
Troubleshooter stops before completing the process? Fix it with the help of this complete guide.
7. Make sure DHCP is on
Now, let’s talk about DHCP. In short words, DHCP is a Windows process that assigns the IP address to your computer when you connect to a network.
So, if this process is disabled, your computer won’t be able to obtain the IP address, and therefore, you won’t be able to connect to the internet using your WiFi connection.
So, the first thing we’re going to do is make sure if this process is running. And here’s how to do that:
- Open Network Connections.
- Locate your network adapter, right-click it, and choose Diagnose.
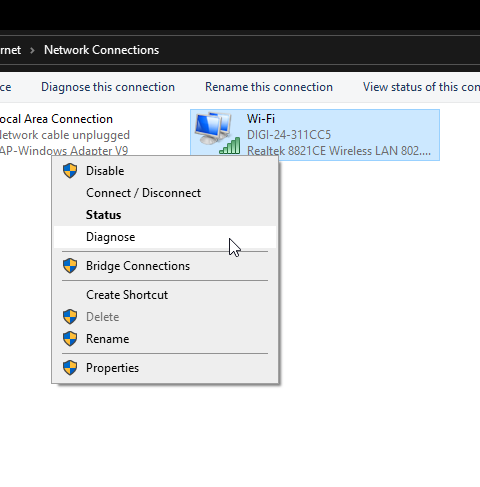
- Wait for the process to finish. If the DHCP process was disabled, this will enable it once again.
8. Set your IP address manually
- Go to Settings and choose Network Connections.
- Right-click your wireless network and choose Properties from the menu
- Select Internet Protocol Version 4 (TCP/IPv4) and go to Properties.
- Now, select the Use the following IP address option and enter the IP address, Subnet mask and Default gateway.
- We used settings that work for our configuration, but you might have to enter a different number (see the screenshot).
- In addition, you’ll have to enter the DNS server manually.
- In our example, we used Google’s Public DNS, but you can also use 192.168.1.1 as your Preferred DNS server.
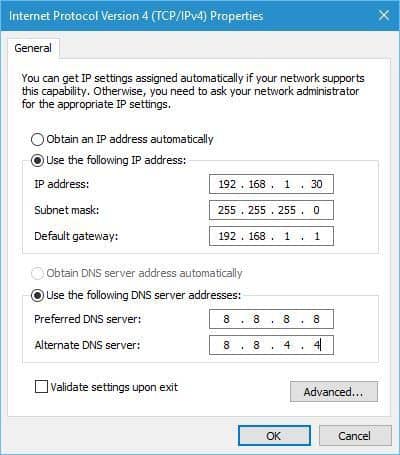
- After you’re done, click the OK button.
Can’t change your static IP manually? Check out this simple guide that will help you do just that.
9. Change the number of DHCP users
And finally, the last solution that involves the DHCP process is changing the number of DHCP users. More precisely, you’ll have to increase the number of DHCP users in your router settings. Usually, the limit is 50 DHCP users, and if you go over, WiFi issues may occur.
Once again, since the process of changing the number of DHCP users varies from router to router, it’s better to check the manual for detailed instructions.
10. Disable Windows Firewall temporarily

Even though Windows Firewall is a useful feature for the overall security of your system, it can cause issues with your network connection. Because of that, we’re going to disable Firewall temporarily and see if there are any changes. Here’s how to do that:
- Open Control Panel.
- Go to System and Security.
- Click on Windows Firewall.
- Select Turn Windows Firewall on or off from the left side.
- Turn off Windows Firewall for both Private and Public networks and confirm the selection.
- Restart your computer.
- Try connecting.
You can’t open Control Panel on Windows 10? Take a look at this step-by-step guide to find a solution.
Check if your Firewall is messing with your network connection by following this guide!
11. Disable the Airplane mode

As unlikely as it seems, many people have reported that the Airplane mode blocked their WiFi connection. So, make sure the Airplane mode is disabled.
You can find the Airplane mode icon in the Notification panel in the right corner of the taskbar. However, if the icon is missing, there’s an alternative way to disable it:
- Open Settings.
- Click the Network & Internet.
- Click Airplane mode.
- Toggle Airplane mode off.
12. Use ipconfig /release command
- Go to Search, type cmd, and open Command Prompt (Administrator)
- When Command Prompt starts, enter the following lines and after each line press Enter to run it:
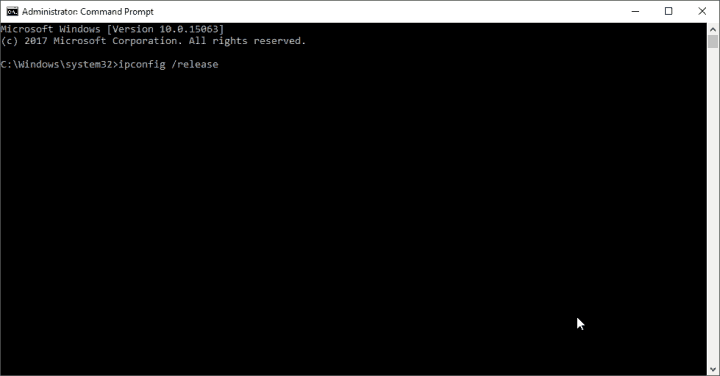
ipconfig /releaseipconfig /renew
- Restart your computer, and try to connect again.
13. Set the channel width to Auto
- Right-click the Start Menu button and select Network Connections from the menu.
- When Network Connections window opens, right click your wireless connection and choose Properties from the menu.
- Click the Configure button and go to the Advanced tab.
- Locate 802.11n Channel Width for band 2.4 and set it to Auto.
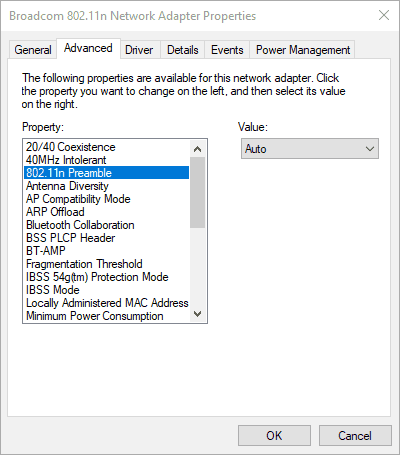
- Click OK to save changes.
14. Disable IPv6 on your computer and router
- Open Network and Sharing Center.
- Go to Connections and click your current connection.
- The connection status window will open. Click the Properties button.
- Find Internet Protocol Version 6 (TCP /IPv6) and uncheck it.
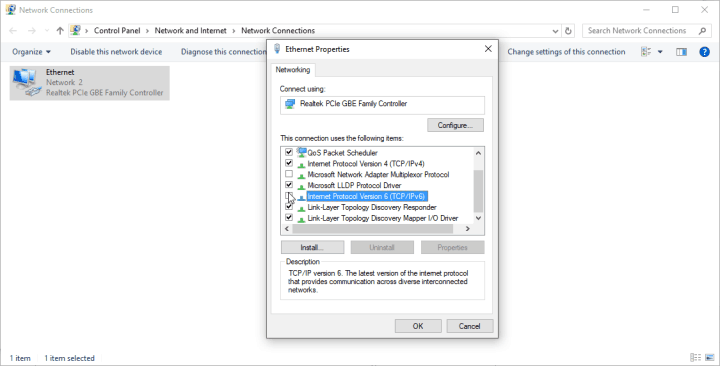
- Click OK button to save the changes.
- Restart your computer in order to apply the changes.
In some cases enabling the IPv6 protocol is a way of solving internet issues, but sometimes this very protocol can cause problems.
15. Delete your wireless profile
- Go to Search, type cmd, right-click it and run the Command Prompt (Admin).
- When Command Prompt stats enter netsh wlan delete profile name=WirelessProfileName and press Enter.
- Be sure to replace WirelessProfileName with the actual name of your wireless connection.
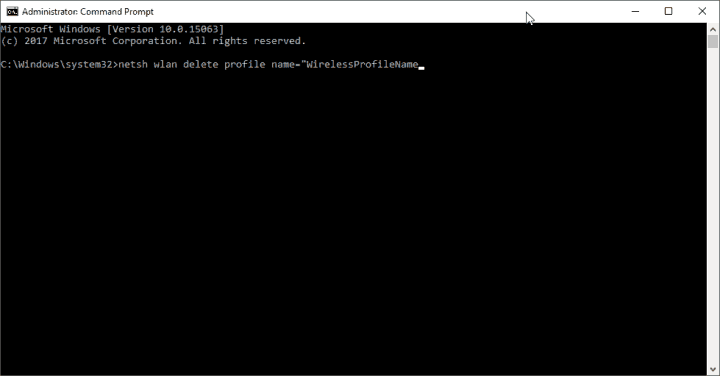
- Be sure to replace WirelessProfileName with the actual name of your wireless connection.
- When the process is finished, you need to reconnect and reconfigure your network, in order to establish the connection once again.
If you Wireless Profile got corrupted, the best way to get things back to where they used to be is to simply delete your Wireless Profile, and create it once again.
If you’re having trouble saving your new Wireless Profile, check out this complete guide to sole it.
16. Disable Family Safety feature

- Navigate to https://account.microsoft.com/family.
- Sign in with your Microsoft account.
- Locate the account that you want to remove and click the Remove button. To remove the adult account, be sure to remove all child accounts beforehand.
If there’s a need for the Family Safety feature, we don’t recommend disabling it. However, there’s a chance this very feature blocks your wireless connection. In that case, you have no other choice than to disable it.
17. Disable your antivirus software

You’ve probably heard about this one before. Windows 10 and its components and features don’t get along with third-party antivirus programs.
Because of that interference, various problems may occur. Including our problem with the WiFi network. So, go and temporarily disable your antivirus program, and check if the connection is now working.
If you’re able to normally connect to your WiFi network with your antivirus program disabled, consider changing your antivirus solution, or switch to Windows Defender completely.
If you’re worried about the lack of antivirus, read this article to find out why Windows Defender is the only malware protection you’ll ever need.
18. Change the wireless network mode
- Open Network and Sharing Center.
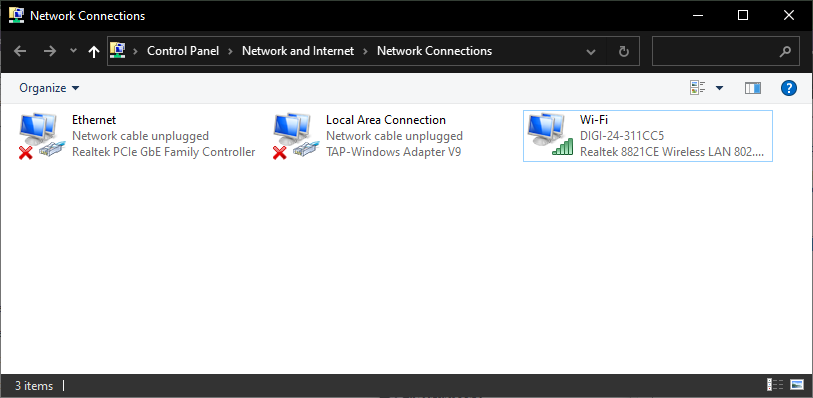
- Click Change adapter settings, locate your wireless network adapter, right-click it and choose Properties from the menu.
- When the Properties window opens, click the Configure button.
- Go to Advanced tab and from the list select Wireless mode.
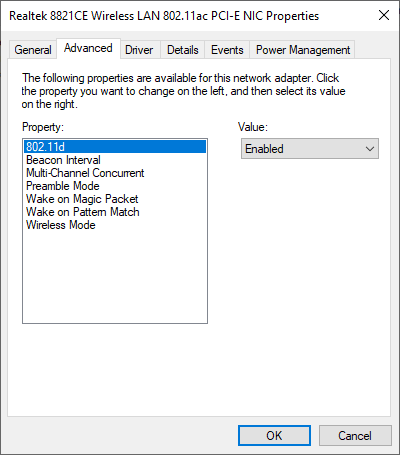
- Now change the value of Wireless mode so it matches the value of Wireless mode on your router. In most cases, 802.11b (or 802.11g) should work, but if it doesn’t, try experimenting with different options.
Your router and wireless adapter need to be on the same network mode to work seamlessly. If that’s not the case, you’ll experience problems with your WiFi connection.
So, you should check the wireless networking mode on your computer, in order to make the connection work again.
19. Change Fiddler settings

This one, obviously, only applies to Fiddler users. Some users suggest that changing Fiddler settings can also resolve this issue. Here’s how to do that:
- Click Tools > Fiddler Options.
- Navigate to the HTTPS tab.
- Make sure that the text says Certificates generated by CertEnroll engine.
- Click on Actions > Reset Certificates. Wait for the process to complete.
- Accept all prompts.
20. Check that all required services for Internet connection sharing are Enabled
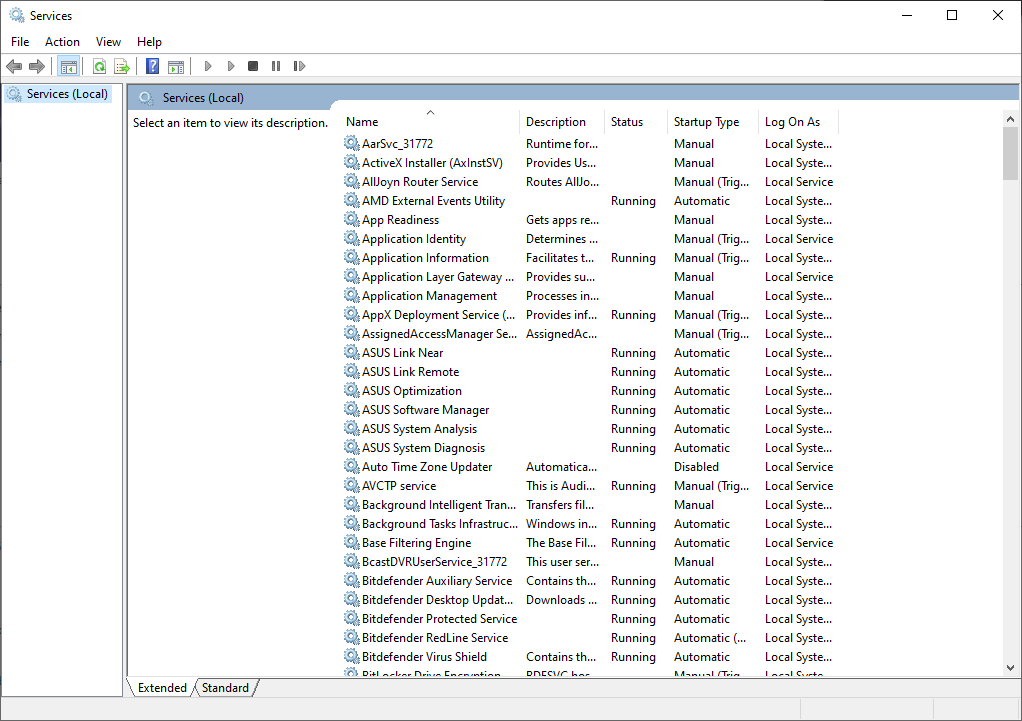
To do so, go to Search > type services.msc > open Services. And now, just make sure these services are running:
- Plug And Play
- Application Layer Gateway Service
- Remote Procedure Call (RPC)
- Network Connections
- Network Location Awareness (NLA)
- Telephony
- Remote Access Connection Manager
- Remote Access Auto Connection Manager
- Windows Firewall
As we already mentioned in some of the previous solutions, the WiFi network requires certain services to work properly. So, you need to make sure each one of these services is running.
That’s about it. We certainly hope at least one of these solutions helped you resolve the problem with your WiFi connection. If you have any additional comments, questions, or suggestions, please let us know in the comments below!
FAQ: Learn more about Wi-Fi problems
- Can’t find my WiFi network on my phone?
Verify if your router/modem is working properly and make sure you’re within its range. See if you can find your network with another device. If you still can’t, probably your router is hiding the network name (SSID).
Editor’s Note: This post was originally published in March 2020 and has been since revamped and updated in August 2020 for freshness, accuracy, and comprehensiveness.
Thank you for viewing the article, if you find it interesting, you can support us by buying at the link:: https://officerambo.com/shop/
No comments:
Post a Comment