- Installing programs and saving data all require that you allocate partition space.
- However, an error can occur stating that a partition is unavailable, and that is what we will be covering today.
- For more helpful fix guides, go to our website's Troubleshooting section.
- Need more help with your OS? Read all about it on our Windows 10 page.
I know that many of you tried to roll back to a previous Windows version at one point or another. In this case, we are going to talk a bit about rolling back from Windows 10 to Windows 7 or Windows 8.1.
In this article, your will learn what you can do in order to fix Windows 10 and get rid of the error message “Setup was unable to use the existing partition because it does not contain the required free space”.
Usually, the error message Setup was unable to use the existing partition because it does not contain the required free space appears when you have additional hard drivers connected to your device or the partition you are trying to install Windows 10 on is not completely blank.
How do I fix an existing partition that cannot be used?
- Format the problematic partition
- Unplug all peripherals
- Remove all partitions
- Create a new boot partition
First of all and most importantly, you will need to create a backup copy of your current files, folders, and any other important documents to prevent any future issues before attempting the steps below.
1. Format the problematic partition
As explained, after you made the necessary backup copy of your important data, you will need to completely format the partition you wish to install Windows 10 on.
- Turn on your Windows 10 device.
- After the device started, insert your Windows 10 Installation Media into the CD or DVD ROM.
- Reboot your Windows device with the installation media inserted.
- It will ask you to press any key to boot from the CD or DVD.
- Follow the instructions and press any key on the keyboard to boot from the CD or DVD.
- In the first window that appears from the installation media, select your language.
- After you are done, click on the Next button.
- Select the Install Windows button.
- In the Enter the product key to activate Windows window, type the Windows 10 product key.
- The next page will be Please read the license terms
- Simply need to check the I accept the license terms box and then hit Next.
- The system will now ask you which type of installation you prefer.
- Click on the “Custom” button.
- The Where do you want to install Windows? window will now appear on the screen.
- Select the Drive options (advanced) feature.
- Select the partition where you want to install Windows 10.
- Click on the Format feature and keep following the on-screen instructions.
- After you are done, select the Next button.
- Follow the on-screen instructions and finish your Windows 10 install process.
- Reboot your device once more and you are done.

You can also use dedicated software to format your partition, a tool like Aomei Partition Assistant.
Using this tool will be far much easier than following all of the steps mentioned above.
- Launch the program
- Choose the troublesome partition and select Format Partition
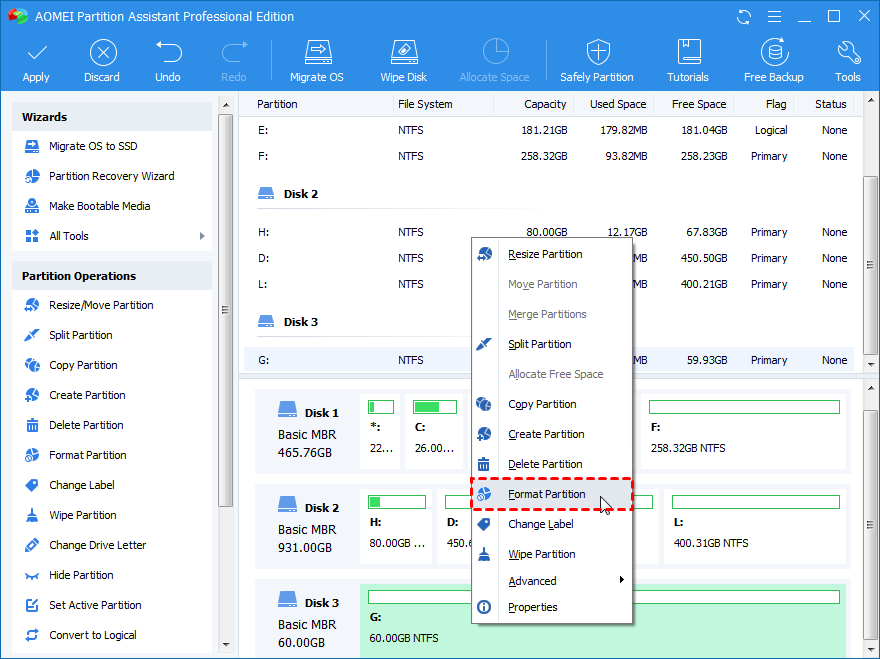
- Select the partition settings that include:
- Label
- File system
- The cluster size
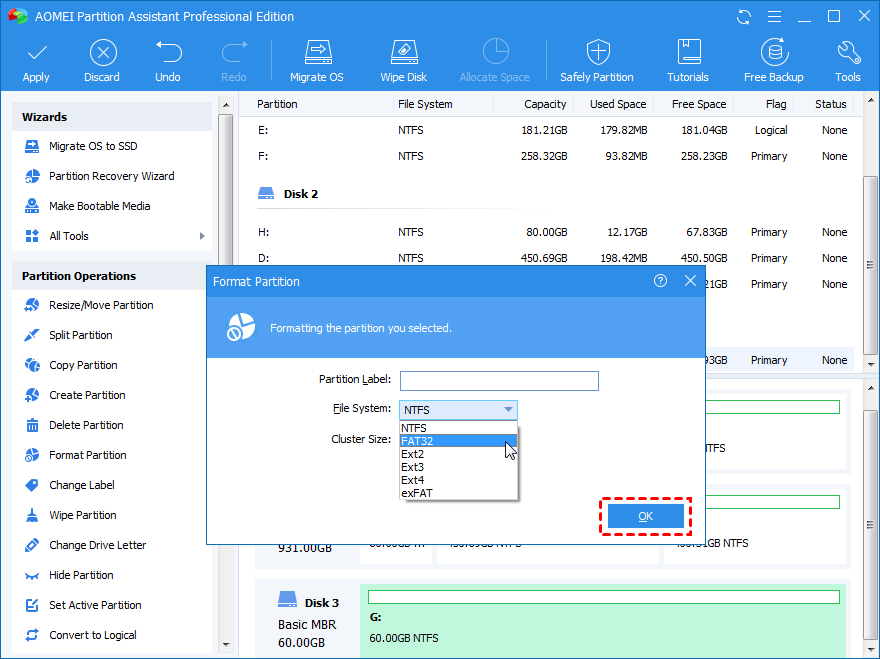
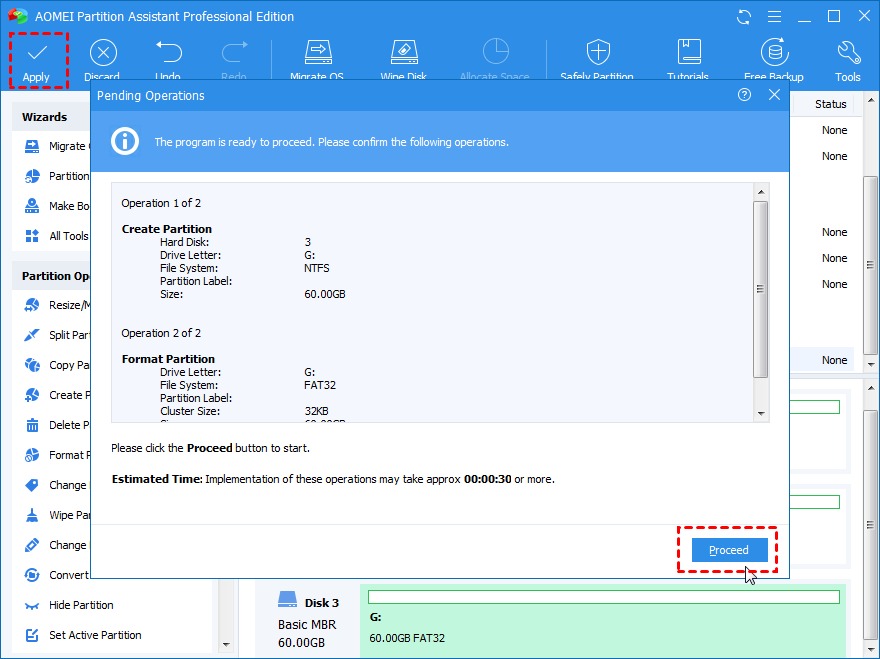
- Confirm your choices, and then select Proceed.

AOMEI Partition Assistant Profesisonal
Format your troublesome partitions and avoid future errors thanks to this amazing tool that simplifies partition management.
For more information on the best tools that can help you quickly format your computer partitions, check out this guide.
2. Unplug all peripherals

- Unplug any USB sticks and peripherals that might be connected to your device.
- Reboot your Windows 10 operating system without plugging in any of them.
- Try running the setup process again and see if you still get the same message telling you that you do not have enough free space.
3. Remove all partitions
Some users confirmed they quickly solved this problem by removing all partitions on the drive and unplugging the USB drive.
- So, open the partition selection screen > disconnect the USB drive > select Next
- The error message Windows is unable to install to the selected location should appear on the screen.
- Now, simply plug your USB drive back in and click Refresh and then Next.
- The process should resume.
4. Create a new boot partition
If nothing worked, try creating a new boot partition manually. Although this method may seem a bit complicated, follow the instruction below and you should be able to solve the problem in just a few minutes.
- When the setup error pop-up appear on the screen, go to Start and enter diskpart.exe and press enter.
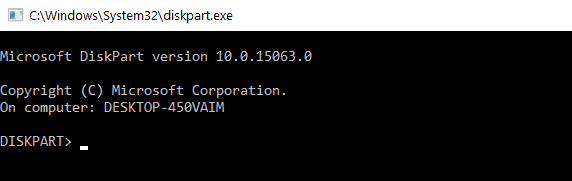
- In the diskpart window, type the follow commands:
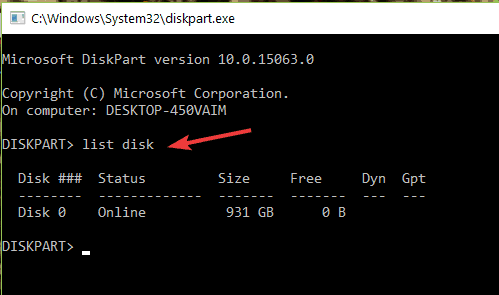
- list disk – – this will list all the disks available on your computer
- select disk=0 — keep in mind that disk 0 is your destination drive and all data stored on this drive will be deleted
- create partition primary size=x — Replace ‘x’ with the actual size of new partition.
- select partition=1
- active
- format fs=ntfs quick
- assign
- exit
- list disk – – this will list all the disks available on your computer
- Open your USB flash drive > copy the files from your USB drive to your C:
- Run the following commands to make your C: drive bootable:
- bootsect /nt60 c:
- bootsect /nt60 c: /mbr
- You can now remove the USB drive from your PC
- Restart your machine and go to Windows Setup > click on the “Install Now” option.
That’s it, the error message “Setup was unable to use the existing partition because it does not contain the required free space” should no longer appear on the screen.
If you need additional help, you can use the comments section below and we will help you further as soon as possible.
Editor’s Note: This post was originally published in February 2018 and has been since revamped and updated in August 2020 for freshness, accuracy, and comprehensiveness.
Was this page helpful?
Get the most from your tech with our daily tips
Thank you for viewing the article, if you find it interesting, you can support us by buying at the link:: https://officerambo.com/shop/
No comments:
Post a Comment