Besides, this is not just a one-time use tool. It will surely come in handy later on.

DriverFix
Think about all the time you're saving by allowing this tool to update all your system drivers.
2. Use IObit Advanced System Care

Installation Failed in Safe_OS Phase With an Error During Apply_image Operation error can appear due to your temporary files, and one way to fix it is to use IObit Advanced System Care.
This is a simple tool that helps you with eliminating useless or invalid registries in order to free up disk space and improve PC performance.
With the free version, you also get to monitor your system condition in real-time.
The premium version of the tool comes with a bunch of advanced cleaning and optimization features that will improve your device’s health.
IObit Advanced System Care
Prepare your device for a smooth Windows installation by deep-cleaning it with this powerful tool.
3. Change your Windows 10 installation
This is a bit complex solution since it requires you to change Windows 10 setup files. This solution is helpful to some users, but make sure that you follow instructions carefully to prevent any damage and unwanted issues.
The main cause of this error is the KB3064209 Intel CPU microcode update. If you don’t use Intel’s CPU, then this doesn’t apply to you.
This was proven to work on Gigabyte GB-BXi3-4010 motherboards with Intel i3 4010U CPU installed, but we assume that it should work with any other motherboard with Intel CPU.
KB3064209 updates the file C:Windowssystem32mcupdate_genuineintel.dll, and in order to install Windows 10 you need to delete this file. To do so, follow these steps:
We’ll use X: as USB drive, C: as our operating system drive letter, and User as the user profile name. When applying this solution, make sure that you change these to match your settings.
- Download Windows 10 ISO and copy its contents to a USB stick.
- Run Command Prompt as administrator.

- Create a new folder on your Desktop and call it mount.
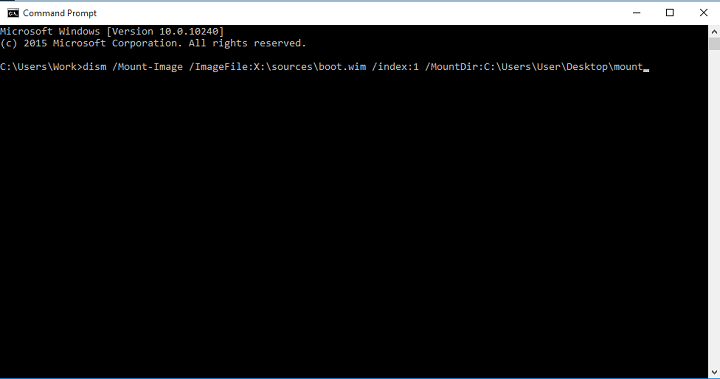
- Mount and edit WIM (Image file:boot.wim, Index 1) by entering into Command Prompt:
dism /Mount-Image /ImageFile:X:sourcesboot.wim /index:1 /MountDir:C:UsersUserDesktopmount
- Use Windows Explorer and navigate to:
C:/Users/User/Desktop/mount/Windows/System32/mcupdate_GenuineIntel.dll
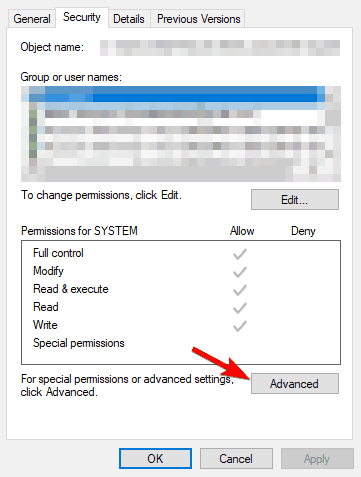
- Right-click mcupdate_GenuineIntel.dll and choose Properties.
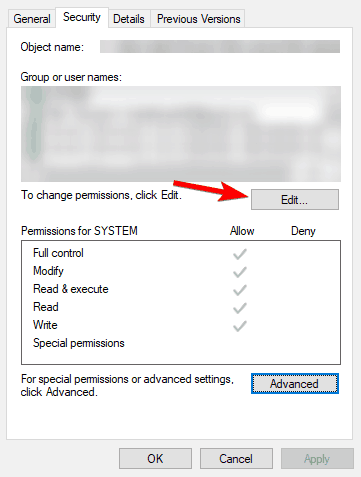
- Go to the Security tab, then click Advanced.
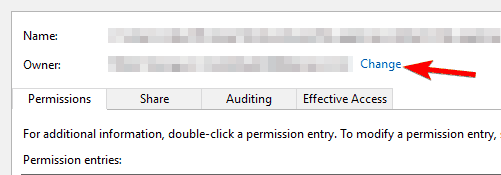
- Next, Change the Owner to your User account. (Enter your user account and click on Check Names button. Click OK to save the changes.)
- In the Security tab click Edit and then Add to add your user account. (Make sure that you check Full Control so you can have maximum privileges. Click Apply and OK to save changes.)
- Now delete mcupdate_GenuineIntel.dll.
- Close all open Windows Explorer windows.
- Go back to Command Prompt and unmount the image by entering:
dism /Unmount-Image /MountDir:C:UsersUserDesktopmount /commit
- Now you’ll have to repeat steps 4-11 for the following files:
boot.wim /index:2install.wim /index:1install.wim /index:2
- If you’re confused, just replace boot.wim /index:1 with the values from the list above.
- Delete the mount folder from your desktop, remove the USB and boot the installer.
This is an advanced solution, so be sure to follow the instructions on the screen carefully in order to perform it properly.
Want a smooth Windows 7 to Windows 10 upgrade? Of course you do! Here is how to do that!
4. Set services to automatic
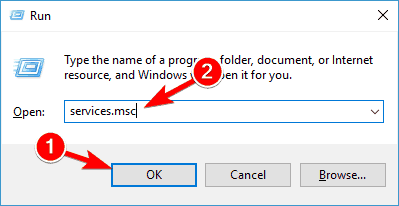
- Press Windows Key + R and type services.msc. Press Enter or click OK.
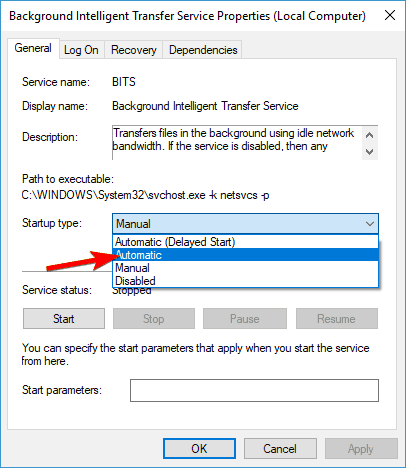
- Find the following services:
- BITS(Background Intelligent Transfer Service)
- Windows Update Service
- Cryptographic Service
- Double-click each of these services to open their Properties.
- Now find the Startup type and set it to Automatic. Click on Apply and OK to save changes.
- Repeat the process for all three services.
- Restart your computer and try to install Windows 10 again.
After enabling all these services, the problem should be resolved and you’ll be able to install Windows 10 without any issues.
5. Unplug all USB devices from your computer / remove your WiFi adapter

Some users report that unplugging all USB devices fixes this issue, so you might want to do that. This applies to your printer, phone, external hard drive etc.
Try using a PS/2 keyboard and mouse instead of a USB keyboard and mouse.
Also, if you’re using a dedicated WiFi card, you might want to remove it from your computer while trying to install Windows 10.
Do this only if you know how it works, or if your device is under warranty. Contact the official repair shop if available.
6. Disable your graphics/network card
If you’re getting Installation Failed in Safe_OS Phase With an Error During Apply_image Operation while installing Windows 10, the problem might be related to your dedicated graphics card.
According to users, sometimes your graphics card might not be fully compatible with Windows 10, and the only solution is to disable it from BIOS.
To do that, first you need to enter BIOS while your PC boots. There are several ways to do that, and if you don’t know how to do it, be sure to check your motherboard manual for detailed instructions.
Once you enter BIOS, you need to find your dedicated graphics card and disable it. If you don’t know how to do that, check your instruction manual for detailed instructions.
Once the dedicated graphics is disabled, you might have to connect your monitor to the onboard graphics on the back of your PC. Now try to install Windows 10 again and check if the issue reappears.
Several users reported that disabling their dedicated graphics fixed the problem for them, so be sure to try that out.
In addition to your graphics card, sometimes the problem might be your network card.
If you’re using a built-in network card to access the Internet, be sure to disable it from BIOS and check if that solves your issue.
Thank you for viewing the article, if you find it interesting, you can support us by buying at the link:: https://officerambo.com/shop/
No comments:
Post a Comment