
DriverFix
DriverFix has the newest drivers in its 18 million + cloud library so your USB 3.0 controller driver is surely among them.
2. Set the new partition on your removable drive
If you’re connecting your hard drive for the first time, there’s a chance that you don’t have any partitions created on it, therefore, Windows 10 won’t recognize it as a hard drive.
Thus, your USB 3.0 external drive will not be detected in Windows 10.
But your disk will be recognized by Windows’ Disk Management tool, so we’re going to check if Disk Management recognizes the external hard drive, and our future actions will depend on the results.
Use the Disk Management tool
- Type diskmgmt.msc in Windows Search and click on Disk Management.

- See if you can find your external drive listed in the Disk Management window.
- If it’s partitioned, you only need to format it by right-clicking on it and selecting Format.

Note: If you are sure that you have data on that drive try to connect it to another computer and back-up the data first. Formating will erase all data from the drive!
Create a new partition on your drive
- Right-click on the Unallocated space, and go to New Simple Volume.
- Set the size of the new volume, and you’re good to go.
- Re-connect your USB 3.0 hard disk drive with your computer, and it should be accessible.

Note: If even Disk Management can’t recognize the hard drive, your problem might be a little complicated.
First, try some basic solutions, like checking if the driver is up to date, or try to plug it into another USB port, in case you have a bad USB port.

If the Disk Management tool seems too complicated to use, there are third-party solutions that you can use to format your drive.
We recommend Paragon Partition Manager Advanced, a simple application that can help you format your drive with ease, so be sure to try it out.
This professional tool features integrated backup functions that allow you to save your data before working on a hard drive. That’s a very handy feature for unpredictable and unpleasant situations.
Partition Manager Advanced comes with many other functions for partitioning but it also optimizes your PC to use its resources efficiently.
Paragon Partition Manager Advanced
It's the best partitioning tool on the market because it's easy to use but will make you look like a pro while using it.
3. Disable the USB selective suspend setting
- Go to Search, type power management, and open Power & sleep settings.
- Go to Additional power settings.
- Click on Change plan settings, next to your selected power plan.
- Go to Change advanced power settings.
- Under USB settings, find USB selective suspend setting, and set it to Disabled. Click Apply and OK to save changes.
- Restart your computer, and see if you’re able to connect your external USB drive again.


Note: Before you change your power settings, create a restore point, just in case something goes wrong.
You don’t know how to create a restore point? Here’s the complete guide for that
4. Edit your registry
- Go to Device Manager.
- Under Universal Serial Bus Controllers, find USB Mass Storage Device. Right-click on it and select Properties.
- Go to Details tab, and from Property, choose Device instance path. Right-click on the path, and choose Copy.
- Open Registry Editor.
- Go to the following path:
ComputerHKEY_LOCAL_MACHINESYSTEMCurrentControlSetEnumUSBVIDDevice Parameters- Note: VID_8564&PID_10005388DW3MEQ8HGRAX is just an example, so you need to use the value that you got in Step 4.
- In the right pane of the Device Parameters key look for the DWORD named EnhancedPowerManagementEnabled which must be showing its Value data as 1. If this value isn’t available, you might have to create it manually.
- Double-click on it, and change its value to 0. Click OK.
- Restart your computer and try to connect your drive again.


Note: If you can’t edit your Windows 10’s registry, read this handy guide and find the quickest solutions to the issue.
5. Disconnect your drive and go to BIOS

If USB 3.0 external drive isn’t detected in Windows 10, you might want to try this simple workaround. According to users, you just have to disconnect your drive, enter BIOS, and reconnect your drive.After doing that, you can exit BIOS and start Windows 10 normally.
This sounds like an unusual solution, but few users reported that it worked for them, so you might want to try it out.
If you don’t know how to access the BIOS, here’s an expert guide on how to do that.
6. Try using a different cable
If your PC can’t detect USB 3.0 external drive, the problem might be related to your cable. According to users, they managed to fix this issue simply by replacing their cable.
If you’re having this problem, your cable might be broken, so be sure to replace it and check if that solves the issue.
7. Update your drive’s firmware

Many users reported that their external drive is recognized only when using a USB 2.0 port. If you’re having this problem, you might want to try updating your device’s firmware.To update your firmware, you need to connect your external drive to a USB 2.0 port, download the latest firmware from the drive’s manufacturer and install it.
Once the firmware is installed, you should be able to use your external drive with a USB 3.0 port.
Keep in mind that firmware update is an advanced and potentially dangerous procedure, and if you don’t do it properly you might cause irreversible damage to your drive.
USB 3.0 not recognized on Windows 10? Don’t worry, we’ve got the right solution for you
8. Update the USB Attached SCSI (UAS) Mass Storage Device driver manually
- Press the Windows Key + X and choose Device Manager from the list.
- Go to View and check Show hidden devices.
- Now locate USB Attached SCSI (UAS) Mass Storage Device, right-click it, and choose to Update Driver.
- Choose to Browse my computer for driver software.
- Click Let me pick from a list of available drivers on my computer.
- Select Show All Devices and click Next.
- Select Mass Storage Device and click Next to install the driver.


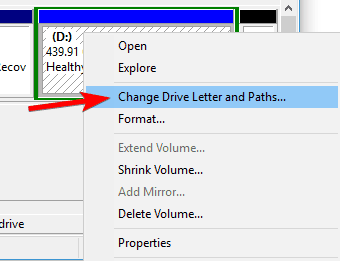
9. Change the drive letter
- Open Disk Management.
- Locate your external drive, right-click it and choose Change Drive Letter and Paths from the menu.
- Click the Change button.
- Select the desired letter from the dropdown menu and click on OK to save changes.


10. Reinstall your drivers
- Connect your device to a USB 2.0 port.
- Open Device Manager.
- Locate the device in Device Manager, right-click it, and choose Uninstall device from the menu.
- Click the Uninstall button to confirm.
- Disconnect your drive and restart your PC.
- Connect the drive to a USB 3.0 port. Windows will now recognize the device and install the appropriate driver for it.


That’s about it, we hope at least one of these solutions helped you to solve the problem with USB 3.0 external hard drive not being detected in Windows 10.
However, if you can connect your external drive to your computer, but it runs slow, check out this article.
If you have any other questions or suggestions, don’t hesitate to leave them in the Comments section below and we’ll surely check them out.
Editor’s Note: This post was originally published in August 2019 and has been since revamped and updated in September 2020 for freshness, accuracy, and comprehensiveness.
Thank you for viewing the article, if you find it interesting, you can support us by buying at the link:: https://officerambo.com/shop/
No comments:
Post a Comment