- The Kindle Fire is one of the most popular ebook readers out there.
- However, it requires PC connectivity at times, and we will be troubleshooting what to do when that is not possible.
- For more articles like the one below, go to our dedicated Windows 10 Error section.
- Even more information about using devices on Windows can be discovered by browsing the Windows 10 Hub.

Kindle Fire is a popular tablet made by Amazon, and due to its solid hardware and affordability, the device quickly gained a lot of popularity.
Even though Kindle Fire is a great device, many users reported that their tablet wasn’t recognized by Windows 10, so today we’re going to show you how to fix that.
Kindle Fire is not recognized by Windows 10, how to fix it?
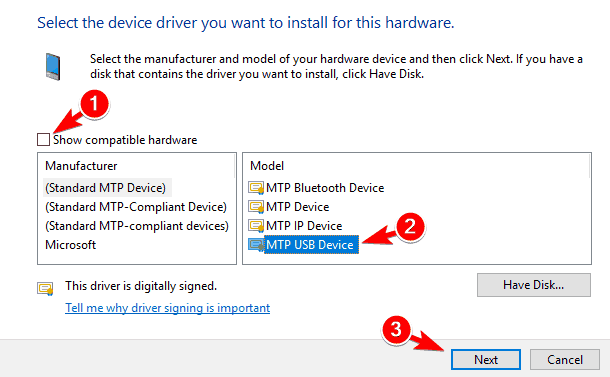
1. Install the MTP USB Device driver
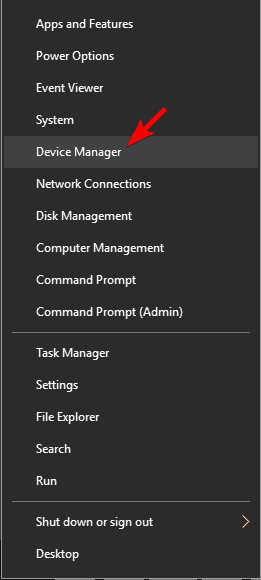
- Press Windows Key + X to open Win + X menu.
- Select Device Manager from the list.
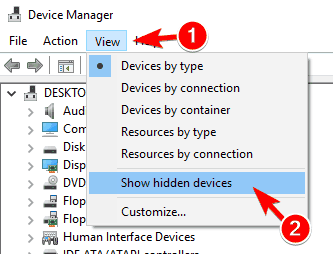
- When Device Manager opens, go to View and check Show hidden devices option.
- Look for your Kindle Fire in Device Manager. If its drivers weren’t installed properly, you should see it as a Portable Device with a yellow exclamation mark next to it.
- Right-click it and choose Update Driver option.

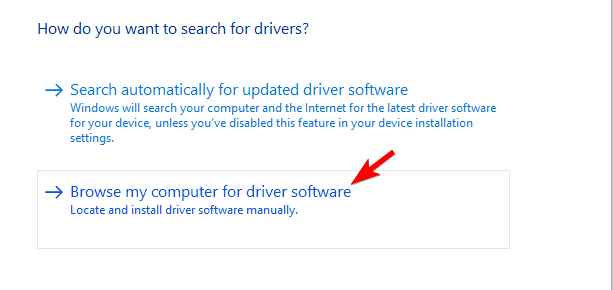
- Select Browse my computer for driver software.
- Choose Let me pick from a list of available drivers on my computer.

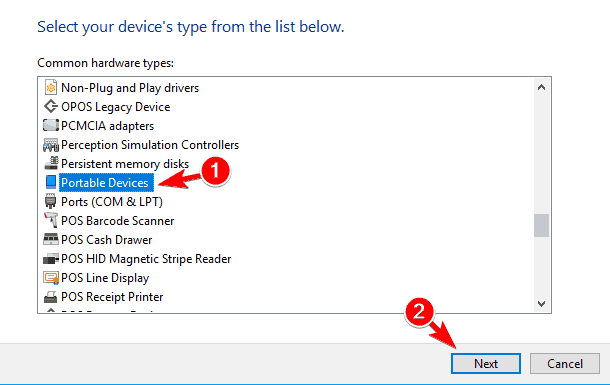
- Select Portable Devices and click on Next.
- Uncheck Show compatible hardware option and select MTP USB Device. Click on Next to install the driver.
If a certain device isn’t detected in Windows, it’s most likely that the problem is a missing driver. This issue can occur with smartphones and tablets, and it can easily affect Kindle Fire as well.
To fix the problem, you need to install the missing driver manually.
After installing the MTP driver, your PC will recognize your Kindle Fire and you’ll be able to transfer files without any problems.
Keep in mind that you might have to try different drivers in some cases in order to resolve this problem.
Update drivers like a pro in just few easy steps described in this article!
Update drivers automatically
By installing a driver manually you can damage your system while downloading the wrong version. In order to prevent this type of problems, we recommend you to do it automatically by using DriverFix.
This tool will help you not damaging your PC by downloading and installing the wrong driver versions.
After several tests, our team concluded that this is the best-automatized solution. Below you can find a quick guide how to do it.
- Download and install DriverFix
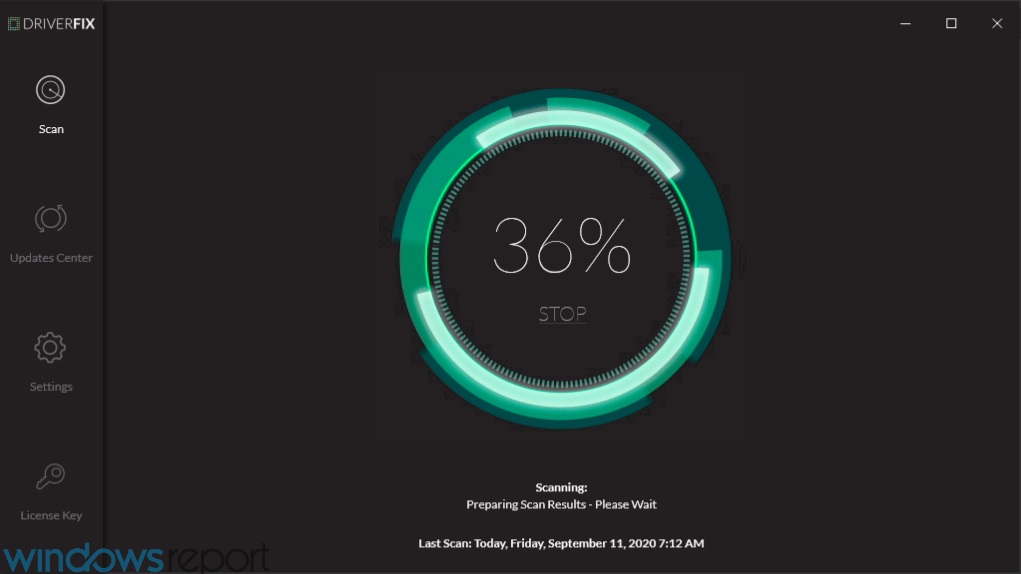
- Launch it and let it perform an initial scan of your PC
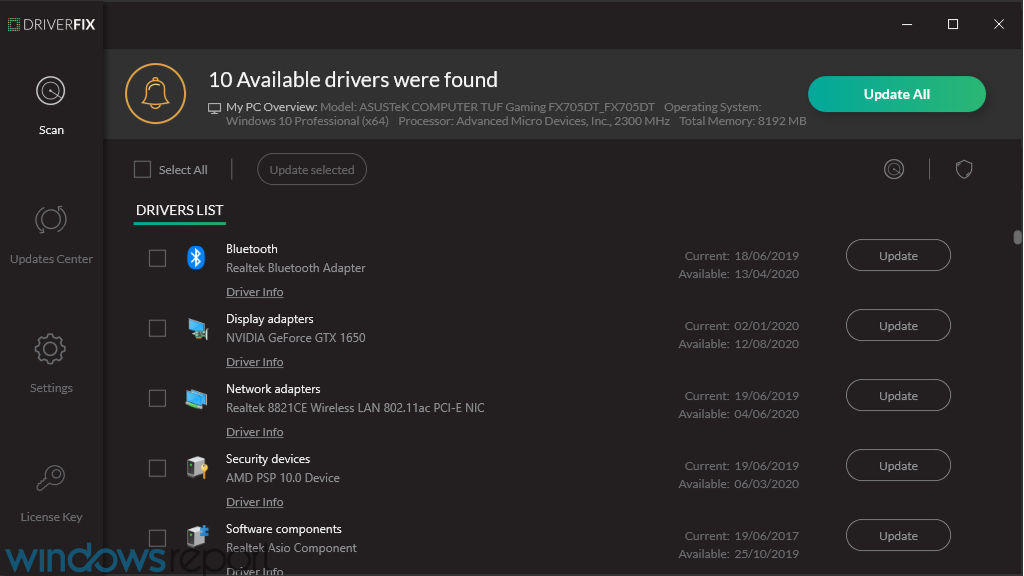
- Select the drivers that need fixing
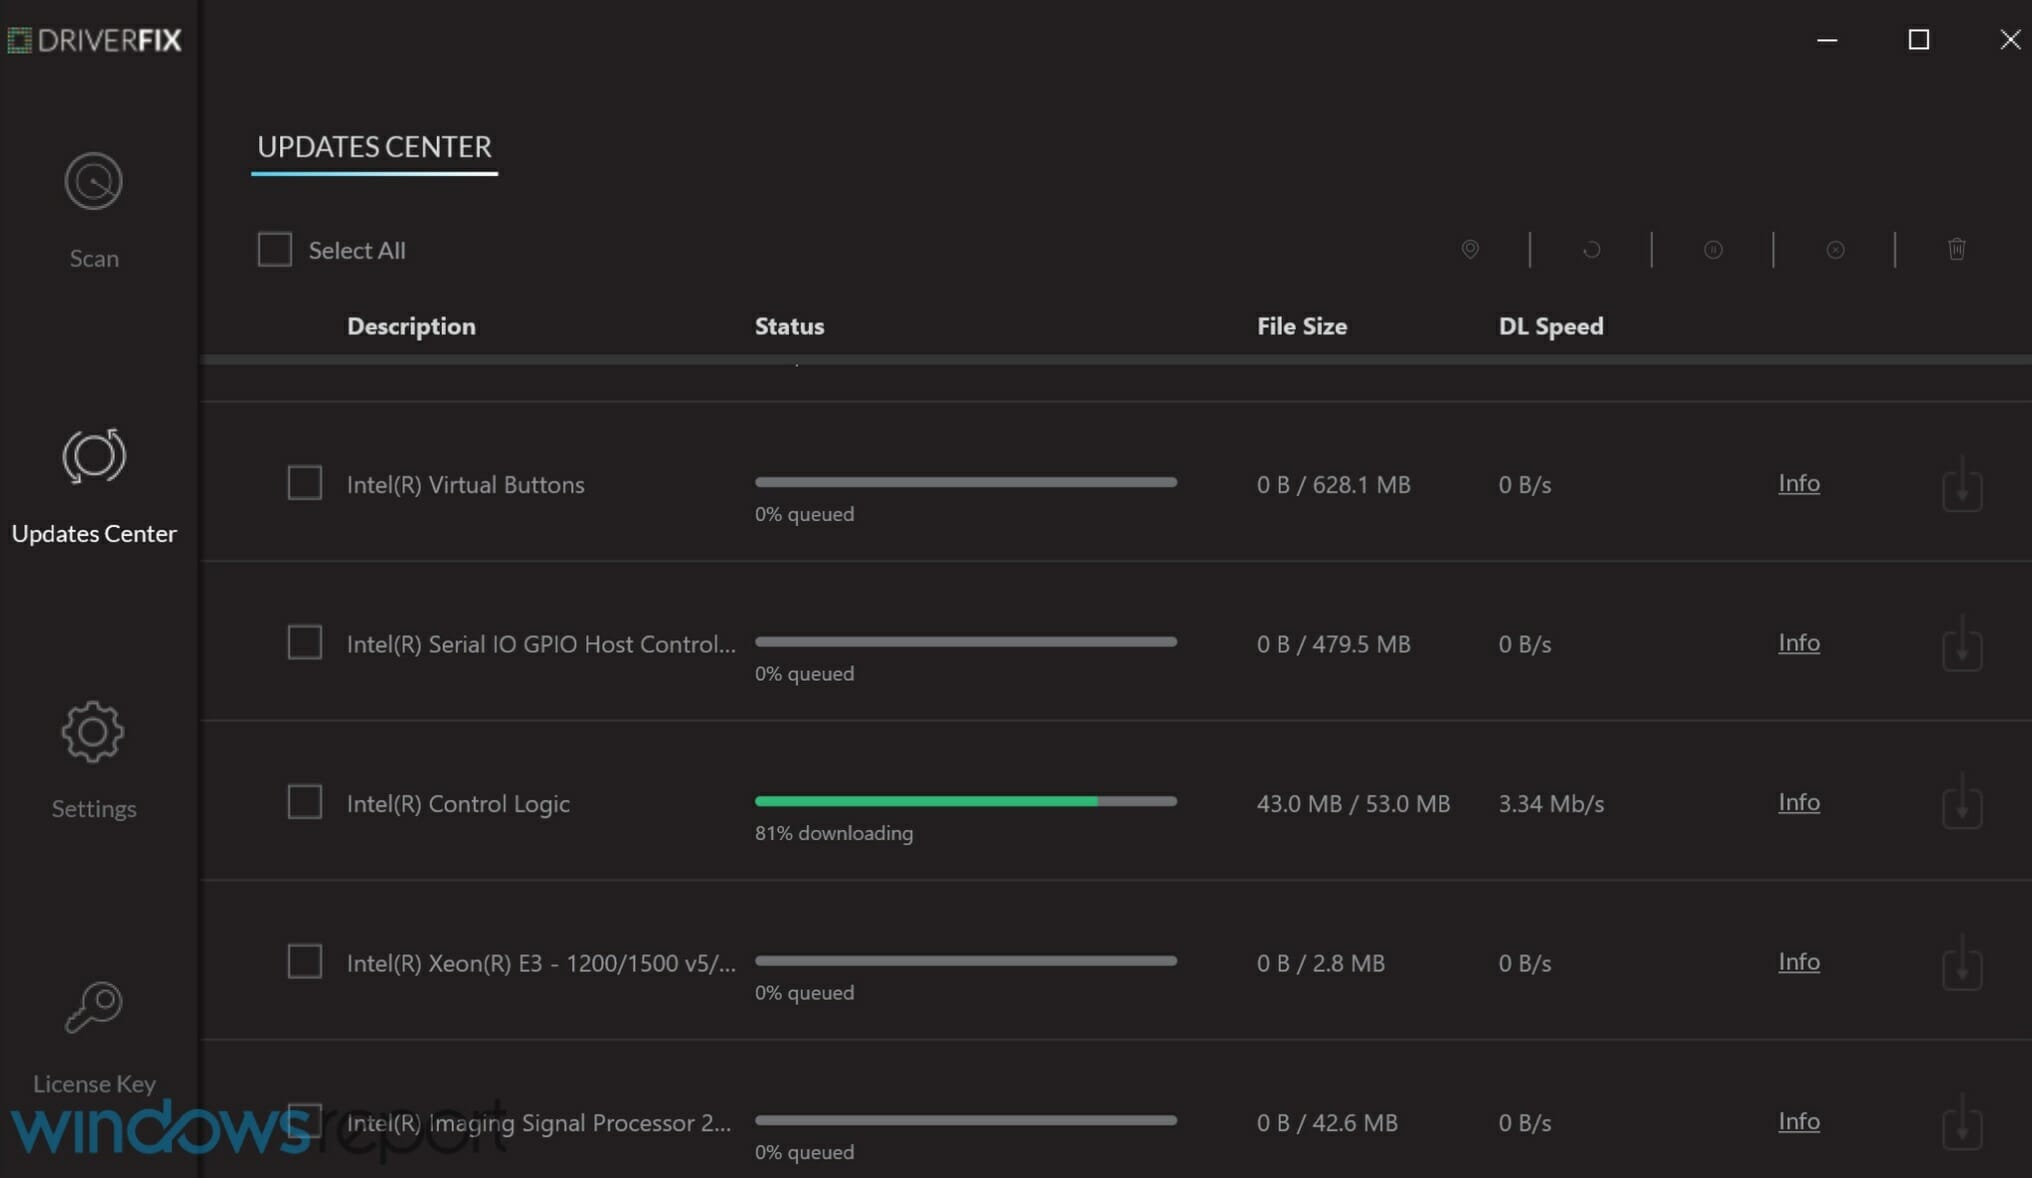
- Wait for DriverFix to handle your outdated, broken, or missing drivers
- Restart your PC for the changes to take effect.

DriverFix
This lightweight and portable tool will detect all of your missing drivers by itself, and update them as soon as possible.
2. Download the latest version of Kindle app

If your Kindle Fire isn’t recognized by Windows 10, it might be due to your Kindle app. Your tablet uses Kindle app for file transfer, and if this application is outdated you might experience certain issues.
Several users reported that installing the latest version of Kindle for their desktop fixed the problem, so be sure to try that.
Even if you have the latest version of Kindle on your PC, be sure to reinstall it and check if that solves the problem.
3. Set your device to connect as a camera

According to users, you can circumvent this problem by connecting your Kindle Fire as a camera. To do that, simply choose to connect your device as a camera from the pull-down menu after connecting Kindle to the PC.
If you can’t find this option in the pull-down menu, you can select it by going to the Settings > Storage section on your tablet.
Other users claim that you can fix the problem by connecting your Kindle Fire as an MTP or USB device. This option is also available from the Storage section or from the pull-down menu, so be sure to try it out.
Keep in mind that you might have to switch between different options several times before Windows can recognize your device.
This is a relatively common problem with Android devices on Windows, however, this isn’t a permanent solution, so you’ll most likely have to repeat it if the problem occurs again.
4. Transfer your files over a Wi-Fi network

If your PC doesn’t recognize Kindle Fire, you might be able to fix the problem by transferring your files over Wi-Fi. To do that, you need to use Amazon Cloud Drive and File Manager.
Other useful applications that can help you with this problem are Send to Kindle and Wi-Fi Explorer, so you might want to try them as well.
With these apps you should be able to transfer files to Kindle over your Wi-Fi network. We have to mention that this is just a workaround, but it might be useful if you need to urgently transfer a couple of files.
Keep in mind that Wi-Fi connection is slower than USB, so it might take you a while to transfer larger files.
5. Try a different cable

If your Kindle isn’t recognized by Windows, it might be due to your cable. Sometimes your cable might stop working due to damage or some other reason, and if that’s the case you should replace it.
After changing your cable, check if Windows recognizes your Kindle.
According to users, they had to try several different USB cables before they found the one that works for them. Some users are also suggesting to use a non-Amazon cable, so be sure to try that.
This solution works in most cases, but it might take a bit of trial and error before you find the cable that works for your device.
Looking for the best USB-C extension cables? Here are our top picks.
6. Connect your Kindle to the PC and restart it

According to users, you might be able to fix this problem simply by connecting Kindle with your PC and restarting it a few times. To do that, follow these steps:
- Connect Kindle with the PC.
- While Kindle is connected, restart it.
- If everything is in order, you’ll hear a connection sound. If not, repeat the previous steps a couple of times until you hear the connection sound.
- After hearing the connection sound, enter your PIN code on the Kindle. You might get a message mentioning a low-capacity charger. If so, just ignore the message.
- Now go to This PC and you should be able to find Fire drive next to My Pictures or My Music.
According to users, Kindle is recognized by their PC only if it’s charging at low capacity. There’s probably a bug causing this issue, but it should be fixed in one of the future updates.
7. Turn off both devices and use Calibre to transfer files

According to users, you might be able to circumvent this problem simply by using Calibre to transfer your files. To do that, do the following:
- Turn off your PC and Kindle and disconnect all cables.
- Turn your PC back on again.
- Now open Calibre and connect the Kindle to the PC.
- Turn on the Kindle.
After doing that, the PC should recognize your device and you’ll be able to transfer files without any problems.
8. Connect your device to a different USB port

Many users reported that their Kindle wasn’t recognized when connected to a USB 3.0 port. USB 3.0 standard is relatively new, and some older devices might not have the necessary capabilities to work with it.
If you’re using a USB 3.0 port, try to connect Kindle to the USB 2.0 port instead. Several users reported that using USB 2.0 port fixed the problem for them, so be sure to try it out.
On the other hand, several users reported that their Kindle was recognized only while connected to a USB 3.0 port.
We have to mention that this solution isn’t always successful, so you might have to repeat it a couple of times before your device is recognized by Windows.
This isn’t a permanent solution so you’ll have to repeat it if the problem reappears.
9. Reinstall the drivers
If a certain USB device isn’t detected by Windows, the common problem might be your drivers. To fix this and many other issues, you need to reinstall your drivers.
This is relatively simple, and you can do it by following these steps:
- Open Device Manager and locate your Kindle. If you can’t find it, you might have to enable Show hidden devices option. For more instructions on how to do that, check Solution 1.
- Once you locate your device, right click it and choose Update Driver.
- Select Browse my computer for driver software.
- Enter C:/Windows/WinSxS in Search for drivers in this location field and check Include subfolders option. Click Next to proceed.
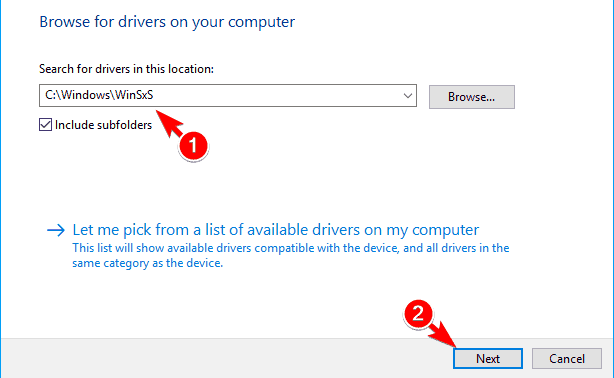
- Windows will now scan the folder and install the necessary drivers.
After the required drivers are installed, the problem with Kindle should disappear.
Can’t install drivers? Check out this guide and solve the issue quickly.
10. Reinstall your Kindle driver
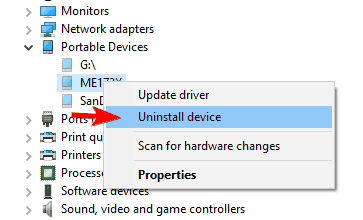
- Make sure your Kindle is connected to the PC.
- Now navigate to Device Manager.
- Locate Kindle on the list, right click it and choose Uninstall device.
- A warning message will appear. Click on Uninstall to remove the driver.
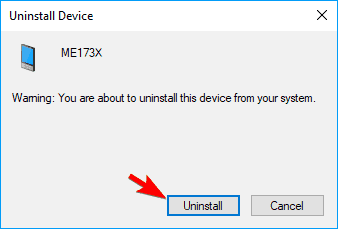
- After removing the driver, disconnect the USB cable and reconnect it again.
- Windows will now install the necessary drivers.
After reinstalling Kindle driver, any problems with Kindle Fire should be fixed.
Sometimes a certain glitch with drivers can cause your device to be unrecognized by Windows 10. However, you can easily fix this problem simply by reinstalling your drivers.
In addition to Kindle driver, some users are suggesting to reinstall USB Mass Storage Device.
This device is located in Universal Serial Bus controllers section, but before you can find it you need to reveal hidden devices.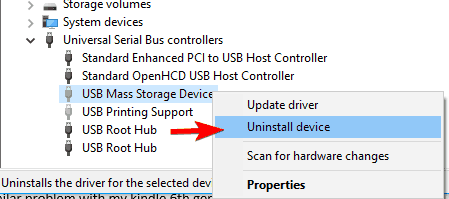
After you remove the driver, you need to disconnect the Kindle and restart both your PC and Kindle. Once both devices restart, connect them and your Kindle will be recognized.
11. Send file as an email attachment

This is just a workaround, but it can be useful if you need to urgently transfer few files. According to users, you can send the necessary files to your Kindle as an email attachment in order to circumvent this problem.
This is a simple workaround that might be helpful, but it’s not suitable if you need to transfer larger files.
Can’t send email attachments in Windows Mail App? Check this guide to fix the problem!
12. Enter your Kindle PIN code

Many users use PIN code to protect their devices from unauthorized access. However, sometimes your PIN can cause Kindle to become unrecognized by the PC.
To avoid this problem, be sure to enter your PIN code once you connect Kindle to the PC. After doing that, the device will be recognized and you’ll be able to transfer files without any problems.
13. Try turning your PC on and off while Kindle is connected

Another way to fix this problem is to simply connect the Kindle to the PC and then turn the PC off. After your computer turns off, wait for a few seconds and turn it back on again.
Once your PC turns on, your Kindle should be recognized. This isn’t the most reliable solution, so you might have to repeat it a few times before Windows detects your Kindle.
14. Run the wpdmtp.inf file
- Open File Explorer and go to C:/WindowsINF directory.
- Locate wpdmtp.inf, right click it and choose Install from the menu.
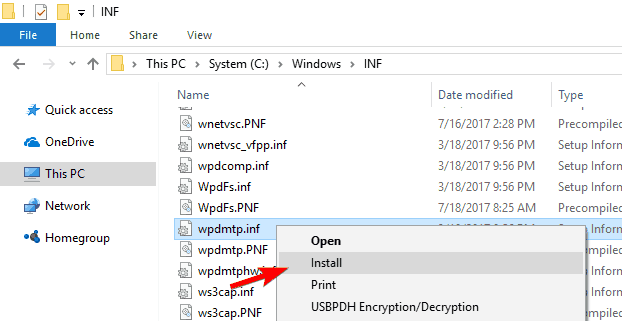
After the installation, you should be able to use Kindle with your PC without any problems.
15. Update Kindle firmware

According to users, you might be able to solve this problem by updating Kindle firmware. Firmware update often fixes compatibility issues, and if your Kindle isn’t recognized by Windows 10, firmware update might fix that.
We have to warn you that firmware update is an advanced procedure, and if you don’t update your firmware properly or if you install a wrong update, you can cause irreversible damage to your Kindle.
If you decide to update your firmware be extra cautious and keep in mind that you’re updating it at your own risk.
16. Enable ADB on your Kindle
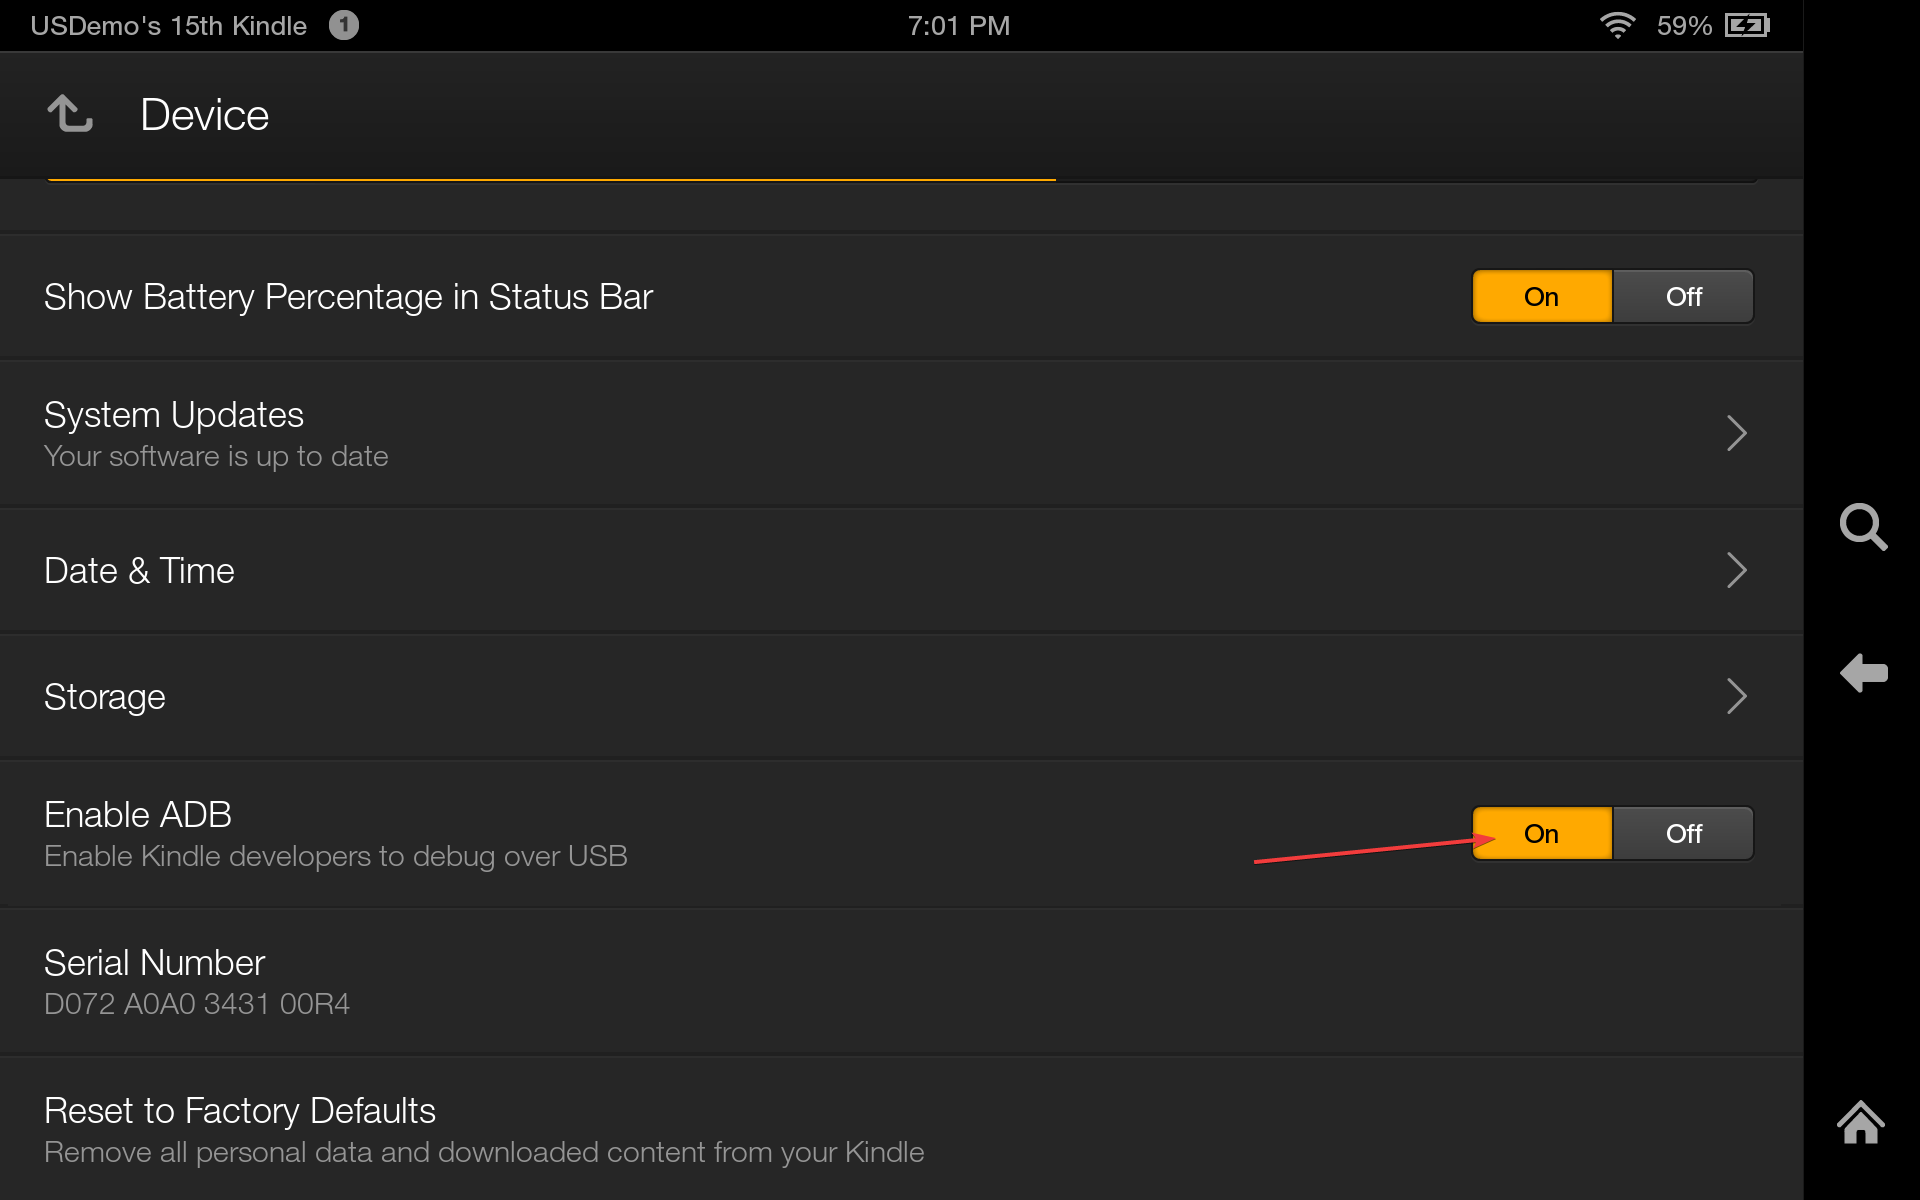
According to users, you might be able to fix this problem by enabling ADB on your Kindle Fire. To fix this issue, simply navigate to Settings > Device and turn on ADB option.
On the other hand, some users claim that ADB is the problem, so if you’re using it, try turning it off and check if that solves the problem. After doing that, your PC should be able to recognize Kindle without any problems.
17. Use a USB hub
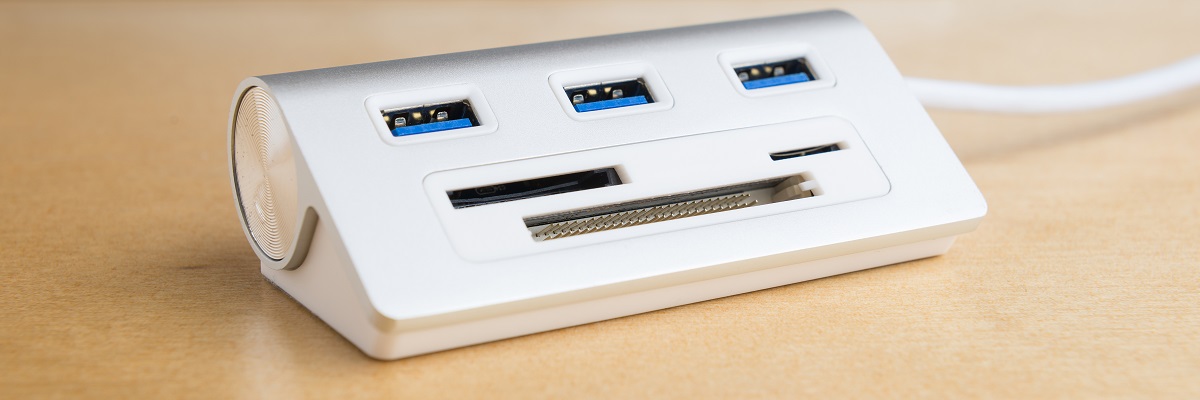
According to users, you might be able to circumvent this problem simply by using a USB hub. USB hubs are useful if you have multiple USB devices but not enough ports on your PC.
Few users claim that using the USB hub to connect their Kindle to the PC fixes the problem, so you might want to try that as a workaround.
Want the best USB hub? Of course you do! Here are our top picks.
18. Leave your Kindle connected for a few minutes

A couple of users reported they fixed the problem simply by leaving their Kindle connected to the PC.
According to them, the device wasn’t originally recognized, but after leaving it connected for a couple of minutes Windows managed to recognize it.
This is an unusual solution, but you still might want to try it out.
19. Check if your device is on the ignore list in Calibre

According to users, in some cases your device might be on the ignore list in Calibre and that can prevent Windows from recognizing it.
To fix the problem, you need to open Calibre and check if your Kindle is on the ignore list. If so, be sure to remove it and the problem should be resolved.
Kindle Fire is a great device, but as you can see certain issues with it can occur on Windows 10. If your device isn’t recognized on a Windows 10 PC, be sure to try any of the solutions from this article.
Editor’s Note: This post was originally published in August 2017 and has been since revamped and updated in September 2020 for freshness, accuracy, and comprehensiveness.
Was this page helpful?
Get the most from your tech with our daily tips
Thank you for viewing the article, if you find it interesting, you can support us by buying at the link:: https://officerambo.com/shop/
No comments:
Post a Comment