- Many users report having their PC constantly restarting due to a BSOD error.
- This error is being caused by a dxgmms.sys file and in this article we will explore some ways that can help you fix it.
- In our dedicated Fix section, you can find more solutions from our trustworthy tech-experts.
- Make sure to check out our Windows 10 Hub for more interesting news and updates.

Windows 10 is a great operating system, but it’s not perfect, and sooner or later you’re going to experience an error.
Users reported a BSOD error on their PC that is caused by dxgmms.sys file. This can be a big problem since your computer will restart every time you encounter this error, but you can fix this problem by using one of our solutions.
In this article, we will explore some ways that can help you fix that, so keep reading.
How to fix Windows 10 dxgmms.sys error?
Table of contents:
- Update your graphics card driver
- Disable hardware acceleration in your browser
- Disable your integrated graphics card
- Use Command Prompt to delete the problematic file
- Delete HID mouse from Device Manager
- Disable your audio controller
- Change the TdrDelay value in your registry
- Delete all USB devices and update your chipset drivers
- Use –disable-gpu parameter
- Update Bluestacks
- Uninstall Windows Updates
- Check for hardware problems
How can I fix the Windows 10 dxgmms.sys error?
1. Update your graphics card driver

Few users reported that dxgmms.sys error is related to your graphics card drivers. To fix this problem, it’s advised to download and install the latest drivers for your graphics card.
The latest drivers usually fix compatibility issues and bugs, so we highly recommend that you download and install them.
Updating your graphics card drivers is quite simple, and you just need to visit your graphics card manufacturer’s website and download the latest drivers for your model.
After doing that, run the setup file and wait for the drivers to install. Users reported that installing the latest drivers fixed the issue for them, so be sure to update your drivers.
Although the latest drivers are usually the best, sometimes they can have new bugs and cause this error to appear. To fix this problem you might have to install an older version of the driver software for your graphics card.
To do that, first, you need to uninstall your graphics card driver. You can do that by following the similar steps like in our previous solution. This is the simplest method, but it might not remove all files and registry entries associated with your drivers.
After removing the drivers, you need to visit your graphics card manufacturer’s website and download an older version of the drivers. After doing that, the issue should be resolved.
Update drivers automatically

If you don’t want the hassle of searching for drivers on your own, you can use a tool that will do this for you automatically.
DriverFix will help you update drivers automatically and prevent PC damage caused by installing the wrong driver versions. After several tests, our team concluded that this is the best-automatized solution.
Once installed, the program will start scanning your PC for outdated drivers automatically.
DriverFix will check your installed driver versions against its cloud database of the latest versions and recommend proper updates. All you need to do is wait for the scan to complete.
Upon scan completion, you get a report on all problem drivers found on your PC. Review the list and see if you want to update each driver individually or all at once.
Additionally, once the system scan is completed, DriverFix compares the found drivers with its built-in database and if fixes the ones broken or corrupted.
DriverFix
Update your graphics drivers to the latest version and fget rid of all system errors. Try it now!
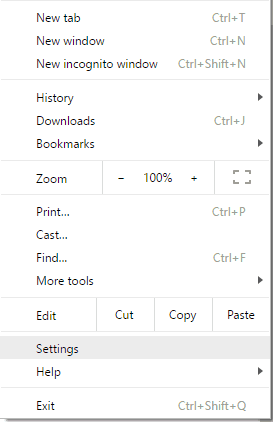
2. Disable hardware acceleration in your browser
- Click the Menu button in your browser’s top right corner and choose Settings.

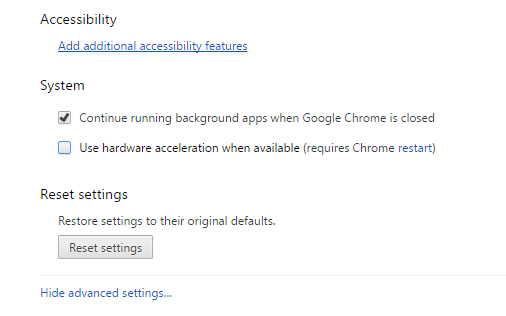
- Scroll all the way down and click on Show advanced settings.
- Scroll down to the System section and uncheck Use hardware acceleration when available option.
- Restart your browser.

Note: We showed you how to disable hardware acceleration in Google Chrome, but every modern browser supports this feature, so be sure to disable it for your browser.
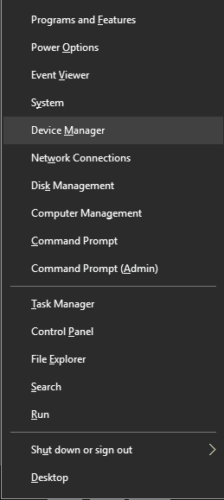
3. Disable your integrated graphics card
- Press Windows Key + X and select Device Manager from the list.
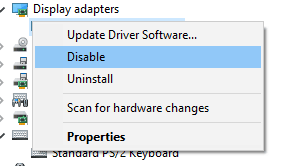
- When Device Manager opens, locate your onboard graphics card.
- Right-click it and choose Disable from the menu.
- After doing that, close Device Manager and check if the problem still persists.
Note: Keep in mind that this solution only applies if you have both dedicated and onboard graphics card. Another way to disable your onboard graphics is to use BIOS. To see how to do that, we advise you to check your motherboard manual for detailed instructions.
4. Use Command Prompt to delete the problematic file
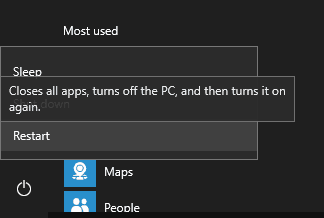
- . Open the Start Menu, click the Power button, hold Shift on your keyboard , and click the Restart option.
- Select Troubleshoot and select Advanced options.
- Next, choose Command Prompt.
- Write and enter the following lines:
C:cd windowsattrib -s -r -h DXGMMS1.sys /sdel DXGMMS1.sys /s /q
- Close Command Prompt and try to start Windows 10 again.
This solution requires you to find and delete the problematic file. Since you’ll be removing a Windows 10 file, you might experience stability issues or in the worst-case scenario prevent Windows 10 from starting.
Before you try this solution, you might want to back up important files and prepare Windows 10 installation media so you can perform a reinstall if you’re unable to boot.
Users reported that this solution worked for them, but keep in mind that this solution has certain risks associated with it. To delete the dxgmms.sys file, do the following:
Note: We have to mention that you can also access Command Prompt by using Windows 10 installation media. Simply boot from Windows 10 media and choose the Repair your computer option. After deleting the problematic file, Windows 10 should download it automatically from the Internet thus fixing your problem.
5. Delete HID mouse from Device Manager
- Press Windows Key + X and choose Device Manger.
- Go to View menu and select Show hidden devices.
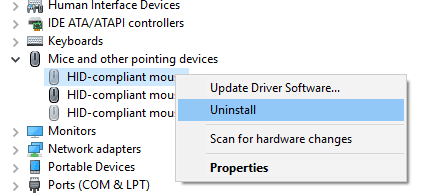
- Expand Mice and other pointing devices section. You should see several HID-compliant mouse devices available.
- Right-click each device and choose Uninstall from the menu.
- When the confirmation menu appears, click OK.
- Repeat these steps until you remove all HID-compliant mouse devices from your PC.
- Unplug your mouse and restart your PC.
- When the PC restarts, connect the mouse again. Windows 10 will automatically find and install the new drivers for it.


Few users reported that this solution worked for them, so we advise you to try it out on your PC and check if it solves your problem.
6. Disable your audio controller
- Open Device Manager.
- Expand the Display Adapters section and double click your graphics card.
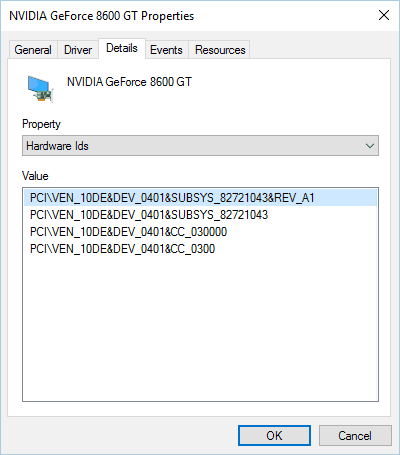
- Go to the Details tab and select Hardware Ids in the Property menu.
- Write down the Value section because you’ll need it later.
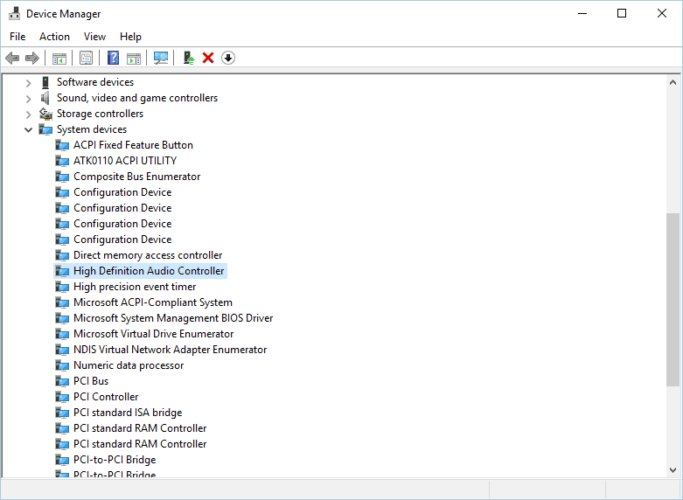
- Expand the System devices section in Device Manager and double click the High Definition Audio Controller.
- Go to the Details tab and select Hardware Ids from the Property menu.
- Check the device’s Value section. If this device has the same values as your graphics card in Step 4, you need to disable this device. To do that, just right-click the device and choose Disable from the menu.
If you have multiple High Definition Audio Controllers, you need to check each of them and disable the one that has the same values as your graphics card.
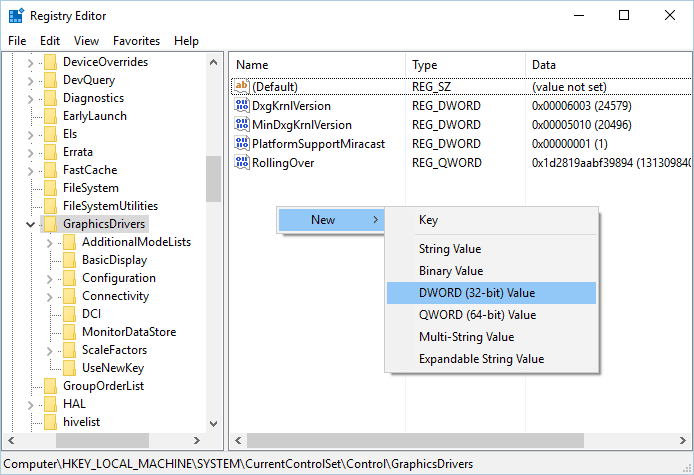
7. Change the TdrDelay value in your registry
- Press Windows Key + R and enter regedit.
- Press Enter or click OK.
- When Registry Editor opens, navigate to
HKEY_LOCAL_MACHINESYSTEMCurrentControlSetControlGraphicsDrivers. - In the right pane, look for TdrDelay value. If this value isn’t available, you need to create it.
- Right-click the empty space in the right pane and choose New and select DWORD (32-bit).
- Enter TdrDelay as the name of the new value.
- Double click TdrDelay and set Base as Decimal and Value data to 10.
- Click OK to save changes.
- Close Registry Editor.

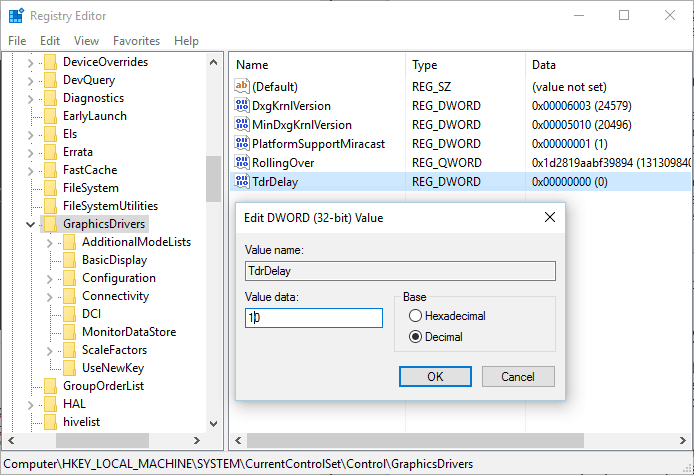
Note: By changing the TdrDelay value, your graphics card will reset only if the driver doesn’t respond after 10 seconds. By making these changes you will prevent the dxgmms.sys error from appearing.
8. Delete all USB devices and update your chipset drivers
- Open Device Manager.
- When Device Manager opens, go to View menu and make sure that Show hidden devices option is checked.
- Expand the Universal Serial Bus controllers section.
- Uninstall all devices from this section.
- Unplug all USB devices from your PC and restart it.
After doing that, you need to visit your motherboard manufacturer’s website and download and install the latest driver for your chipset to fix this error.
9. Use –disable-gpu parameter
- Right-click on Chrome and choose Properties from the menu.
- Go to the Shortcut tab and locate Target field.
- In the Target field add disable-gpu at the end.
- Click Apply and OK to save changes.
- After doing that, start the Chrome using the same shortcut.
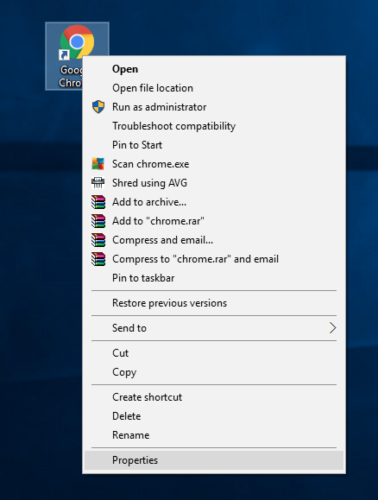
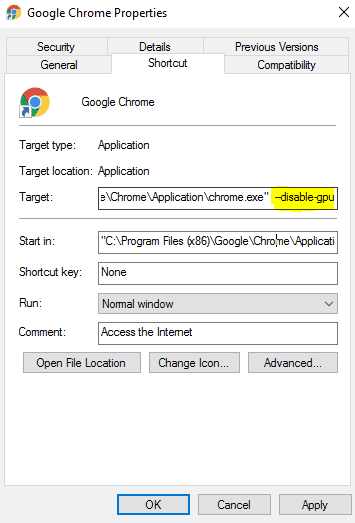
Note: Although this solution will fix dxgmms.sys error, we have to mention that you need to use this shortcut every time you want to start Chrome.
10. Update Bluestacks

Bluestacks is a popular Android emulator for PC that allows you to run Android applications.
This tool is quite useful, but it can also cause dxgmms.sys error to appear. If you have Bluestacks installed and you use it often, you might want to update it to the latest version and check if that fixes the problem.
If the problem still persists, we suggest that you completely remove Bluestacks software from your PC and check if that helps.
Few users reported that this issue occurs if Bluestacks software is running, so it’s most likely that your graphics card driver or your hardware isn’t fully compatible with this software.
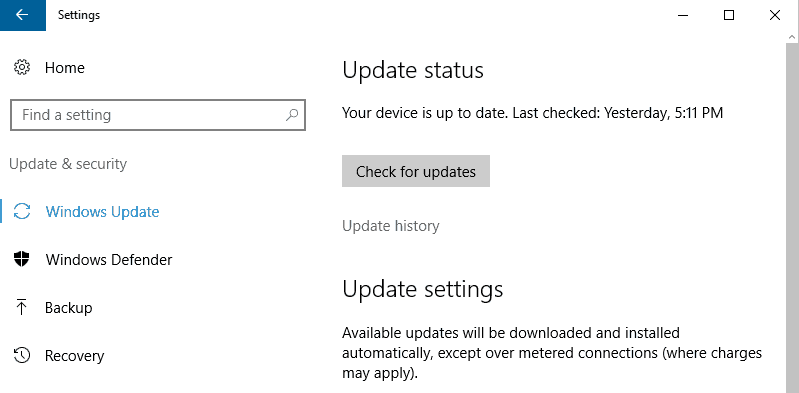
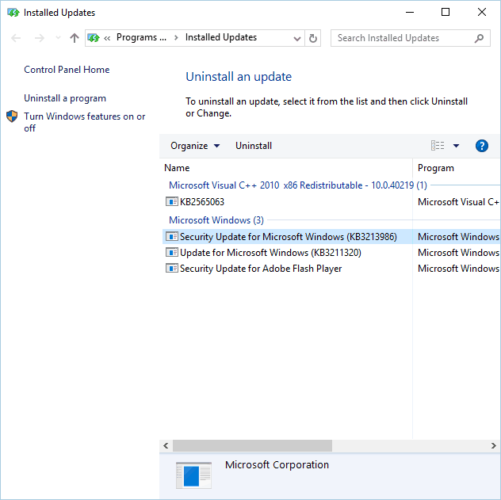
11. Uninstall Windows Updates
- Press Windows Key + I to open the Settings app.
- Once the Settings app opens, navigate to Update & security section.
- Go to Windows Update tab and click on Update history.
- Click on Uninstall updates.
- A list of installed updates will now appear.
- Select the problematic update that you want to remove and click the Uninstall button.
- After removing the update, restart your PC.

We have to mention that Windows 10 will automatically install updates, so if a specific update is causing this problem, you might want to prevent it from downloading. To do that, you need to download and use Show or hide updates troubleshooter package. After downloading this tool, run it and disable the problematic update from downloading.
12. Check for hardware problems

Windows 10 dxgmms.sys error is a Blue Screen of Death error, and these types of errors are often caused by hardware problems.
If you’re getting this error, it’s quite possible that you have a hardware issue that is causing the error to appear.
According to users, this problem can be caused by your graphics card or motherboard, so if you have this error, you might want to replace your graphics card or motherboard.
Another common cause for Blue Screen of Death errors is your RAM. If you suspect that your RAM is the culprit, you can test it using a MemTest86+ tool.
Simply install the tool on your USB flash drive and boot your PC from it. Start the test and let it run for a few hours.
If you have multiple memory modules, you might have to test the modules one by one in order to find the problematic one. In addition, be sure that memory modules are paired and connected properly.
Components such as your CPU can also cause this problem, so be sure to check if your CPU is properly connected. Users reported that resetting their CPU fixed this problem, so be sure to try that as well.
According to some users, you can also fix this problem by connecting your monitor to a different DVI port, so if you have two DVI ports on your graphics card be sure to try that.
We also have to mention that you need to check all power cables in order to be sure that everything is properly powered and connected. According to users, few of them fixed the problem by using a different 6-pin PCI Express power connectors.
Lastly, the issue can be related to your power supply, so you might want to try replacing it. This can be a troublesome error, so if your PC is still under warranty, we suggest that you take it to the official repair center and ask them to check the hardware for you.
Blue Screen of Death errors can be quite serious, and if you’re having Windows 10 dxgmms.sys error on your PC, be sure to try some of our solutions.
If you have additional suggestions or recommendations, please let us know in the comments section below.
Editor’s Note: This post was originally published in September 2018 and has been since revamped and updated in September 2020 for freshness, accuracy, and comprehensiveness.
Was this page helpful?
Get the most from your tech with our daily tips
Thank you for viewing the article, if you find it interesting, you can support us by buying at the link:: https://officerambo.com/shop/
No comments:
Post a Comment