- Looking for a quick solution to the Dxgkrnl.sys BSOD error in Windows 10? Let us help you out.
- Some tips that often proved fruitful include updating the graphics card driver and disabling SLI.
- Another potential solution involves using one of the best troubleshooting tools and software.
- Finally, bookmark this Windows 10 Errors Hub to get access to more tricks like the ones below.

Blue Screen of Death errors can cause you a lot of problems, and users have reported that file dxgkrnl.sys causes these issues on Windows 10.
They’re unpleasant and unlikely to get solved out of the blue. If you happen to experience such an error, let’s see how to easily fix it.
How can I fix the BSOD error caused by Dxgkrnl.sys?
- Keep your Windows 10 and graphics card drivers updated
- Disable SLI
- Turn off Nvidia Surround
- Change graphics memory size in BIOS
- Check for hardware malfunctions
- Run the SFC scan
- Run the Blue Screen Troubleshooter
- Run DISM
1. Keep your Windows 10 and graphics card drivers updated

It has been reported that this issue is caused by the graphics card driver. Do you happen to you use the Nvidia graphic card?
In this case, just make sure that you download the latest Nvidia drivers in order to fix any incompatibility issues that your graphic card might have with Windows 10.
The safer and easier way to update drivers on a Windows computer is by using an automatic tool. For example, DriverFix can update all your drivers within a few clicks.

After all, downloading drivers manually is a process that carries the risk of getting the wrong driver installed, which may lead to serious malfunctions.
In addition, it’s also a good idea to keep Windows 10 up to date with the latest updates in order to fix any potential issues.
DriverFix
Update your drivers right away and fix the annoying Dxgkrnl.sys BSOD error! DriverFix is up for the task!
2. Disable SLI

- Go to Nvidia Control Panel. You can access it by double-clicking its icon in the bottom right corner.
- Go to 3D Settings and click on Set SLI Configuration.
- Make sure that Do Not Use SLI Technology is selected.
- Click Apply to save changes.
Many gamers have two Nvidia graphic cards that they use in SLI mode to get better performance.
Although this sounds great, it has been reported that SLI can cause problems with dxgkrnl.sys and cause Blue Screen of Death error.
Apparently there’s a memory leak in VRAM when you use SLI on Windows 10, so in order to fix this issue it’s advised that you disable SLI.
After disabling SLI on your computer, the Blue Screen of Death error should be fixed.
Can’t open the Nvidia Contol Panel on Windows 10? Fix it now by following the simple steps in this dedicated guide.
3. Turn off Nvidia Surround

Nvidia Surround is a feature on Nvidia graphic cards that lets you enjoy in 3D experience on multiple monitors.
Although this sounds like an amazing feature for gamers, this feature has its issues on Windows 10, and it can cause problems with dxgkrnl.sys and give you System_Service_Exception dxgkrnl.sys BSoD error.
So far, the only solution is to turn off Nvidia Surround in order to fix this error.
We also have to mention that sometimes Nvidia Surround can’t be turned off easily, and users have suggested using the CTRL+ALT+S or CTRL+ALT+R shortcut to turn it off.
If the shortcut isn’t working for you, try unplugging other monitors and booting with only one monitor plugged it.
By booting only with one monitor, Nvidia Surround should be turned off automatically.
4. Change graphics memory size in BIOS

- Restart your computer and keep pressing Del, F2 , or F10 on your keyboard while your computer boots. The key that you need to press might be different on your computer, so look for Press (key) to enter Setup message while your computer is booting, and press the specified key.
- Now you need to find the Advanced, Advanced Chipset, or Advanced Features menu.
- Locate Graphics Settings or Video Settings and change the memory size to 128MB or more.
If you’re using integrated graphics, you might be able to fix this BSoD error by changing the graphics memory size in BIOS.
Users have reported that they have successfully fixed errors caused by dxgkrnl.sys on ASUS laptops with integrated Intel HD 4400 graphics.
This solution should work for any other laptop or any other integrated graphic card. To change this setting you need to do as described above.
We have to mention that changing the memory size for the integrated graphic card isn’t the same for all computers, and the process might be different depending on the type of BIOS that you’re using.
Accessing BIOS seems too big of a task? Let us make things easier for you with the help of this amazing guide!
5. Check for hardware malfunctions

There have been few cases where this issue was caused by a faulty RAM module or motherboard.
If your PC is under warranty, you might want to take it to the repair shop so it can be checked for hardware malfunctions.
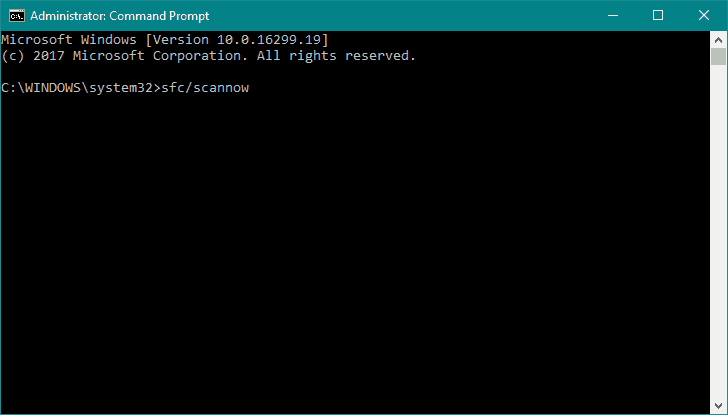
7. Run the SFC scan
- Go to Search, type cmd, and open the Command Prompt as Administrator.
- Type in the following command, and press Enter: sfc/scannow

- Wait for the process to finish.
- Restart your computer.
If none of the solutions from above managed to get the job done, we’re going to try with a few built-in troubleshooters found in Windows 10.
The first troubleshooter we’re going to try is the SFC scan. Use the above steps to run it.
If you’re having trouble accessing Command Prompt as an admin, then you better take a closer look at this handy guide.
scannow command has stopped before the process finished? Don’t worry, we’ve got an easy fix for you.
8. Run the Blue ScreenTroubleshooter
- Go to the Settings app.
- Head over to Updates & Security > Troubleshoot.
- Now, click Blue Screen, and go to Run the troubleshooter.
- Follow further instructions, and let the wizard finish the process.
- Restart your computer.
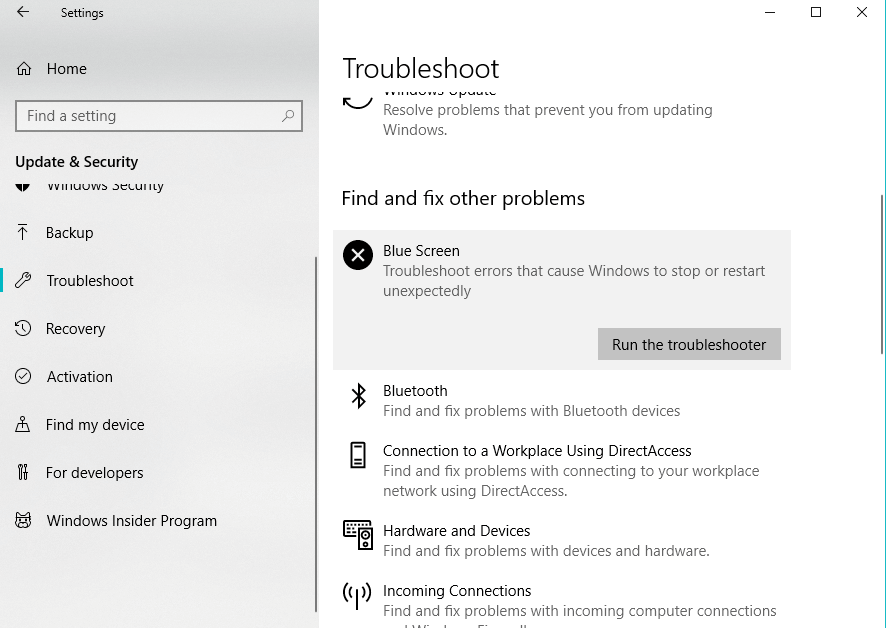
The next troubleshooting tool we’re going to try is Windows 10‘s built-in Troubleshooter from the Settings app.
This tool can be used for dealing with various issues, including our little BSOD problem. Do not hesitate to run the Troubleshooter, as described above.
If you’re having trouble opening the Setting app, take a look at this article to solve the issue.
If the Troubleshooter stops before completing the process, fix it with the help of this complete guide.
8. Run DISM
- Type cmd in the Windows search bar, right-click on the Command Prompt, and run it as an administrator.
- In the command line, copy-paste these lines one by one and press Enter after each:
DISM /online /Cleanup-Image / ScanHealthDISM /Online /Cleanup-Image /RestoreHealth
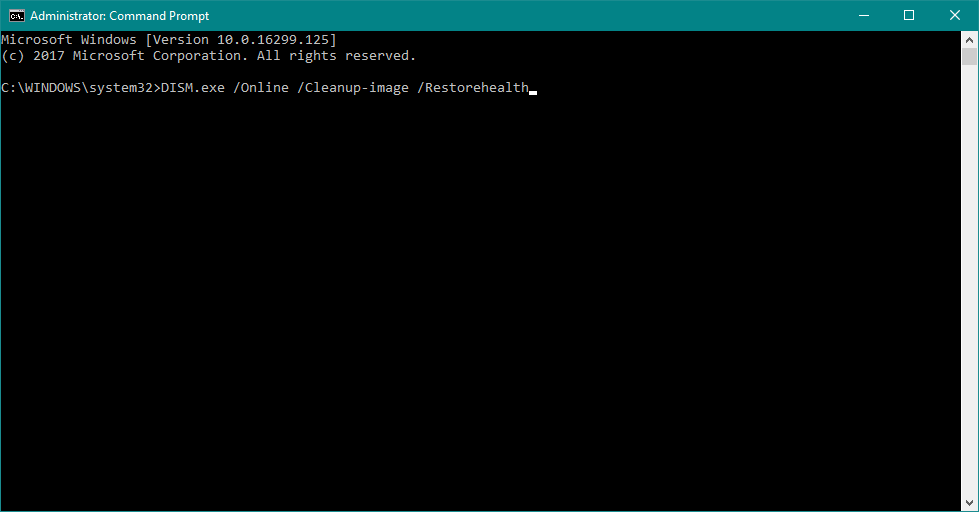
And the last troubleshooter we’re going to try is the DISM (Deployment Image Servicing and Management).
As its name says, this tool deploys the system image all over again, and therefore, it could fix our problem.
Most users don’t know what to do when the Windows search box goes missing. Read this simple article to learn how you can get it back in just a couple of steps.
It seems that everything is lost when DISM fails on Windows? Check out this quick guide and get rid of the worries.
Here are some more examples of this problem:
- dxgkrnl.sys failed – When facing this issue, check if there is any hardware failure that requires your attention.
- dxgkrnl.sys Windows 10 latency – Is this your problem as well? Then, make sure to keep your Windows 10 and graphics card drivers updated.
- dxgkrnl.sys Windows 10 won’t boot – In this case, don’t hesitate to run the SFC scan and get further answers.
- driver_irql_not_less_or_equal dxgkrnl sys – When bothered by this error, the first thing you should do is to turn off Nvidia Surround.
And that’s about it. Hope that one of our solutions helped you get rid of the dxgkrnl.sys BSOD error on Windows 10.
If you have any other questions or suggestions, feel free to leave them in the comments section below and we will certainly check them out.
Editor’s Note: This post was originally published in June 2018 and has been since revamped and updated in September 2020 for freshness, accuracy, and comprehensiveness.
Was this page helpful?
Get the most from your tech with our daily tips
Thank you for viewing the article, if you find it interesting, you can support us by buying at the link:: https://officerambo.com/shop/
No comments:
Post a Comment