2. Try to connect different video outputs to your computer

You can try different video output combinations such as these ones below and see if you can get your desktop screen with a mouse cursor.
- Connect to a different adapter from integrated graphics to a discrete card, or vice versa
- Connect to a different output from HDMI to DVI, DisplayPort to VGA, or any other combination
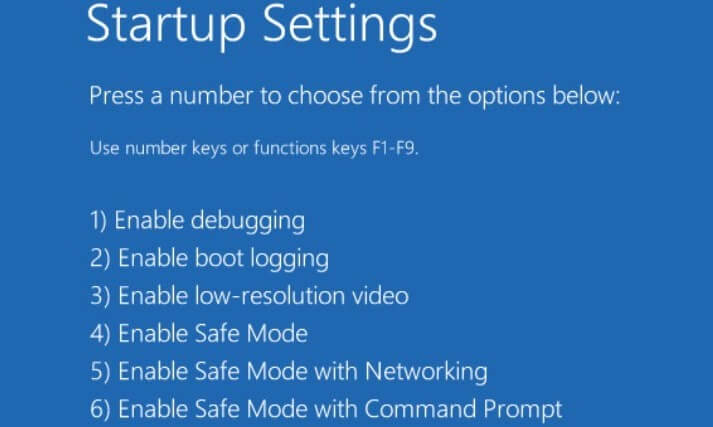
3. Boot in Safe Mode with Networking
- Restart your computer.
- When the sign-in screen is displayed, hold down the SHIFT key while you select Power then Restart.
- After the computer restarts to Choose an option screen, select Troubleshoot.
- Click Advanced options.
- Click Startup Settings.
- Click Restart.
- Once it restarts, you will see a list of options.
- Select 5 or F5 for Safe Mode with Networking.

Once you’re in safe mode, you can perform the following to try and resolve the Windows 10 black screen without cursor issue:
- Run a System File Checker (SFC) scan.
- Run the DISM tool.
How to run an SFC scan
A System File Checker scan checks all protected system files, and then replaces the incorrect versions, with the genuine, correct Microsoft versions.
Here’s how to do this:
- Click Start.
- Go to the search field box and type CMD.
- Right-click and select Run as Administrator.
- Type
sfc/scannow. - Press Enter.

How to run the DISM tool
If you still get the Windows 10 black screen without a cursor, run the DISM tool, or Deployment Image Servicing and Management tool.
The DISM tool helps fix Windows corruption errors when Windows Updates and service packs fail to install due to corruption errors, like if you have a damaged system file.
Here’s how to run the DISM command:
- Click Start and in the search field box, type CMD.
- Click Command Prompt in the search results list.
- Type
Dism /Online /Cleanup-Image /RestoreHealth.

Once the repair is complete, reboot your computer and check if the issue persists.
If Safe Mode is stable, then the issue is most likely with drivers, but your computer could also need disinfection or system file repair as most upgrade problems in Windows 10 are corruption issues passed from previous operating systems.
In this case, while still in Safe Mode, do the following:
- Click Start.
- Go to the search box and type Update to check for and speed up critical updates taking time to install.
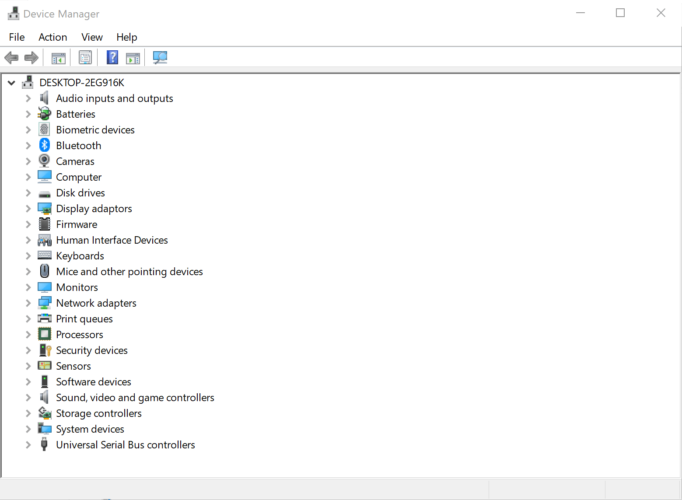
- Right-click the Start button.
- Select Device Manager.
- Import any missing or drivers with errors from the computer or manufacturer’s website
Also still in Safe mode, download, install, and decline the trial version of Malwarebytes and adware cleaners, then update and run full scans.
Make sure you uninstall bloatware antivirus programs and enable built-in Windows Defender to test your PC’s performance.
Once the above is sorted, do the following:
- Right-click on the Task bar.
- Select Task Manager.
- On the Startup tab, disable everything until your install is stabilized.
- Restore only what you need including Windows.
Do the following to exit Safe Mode:
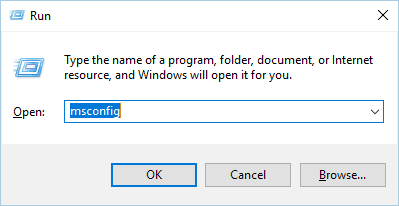
- Right-click the Start button.
- Select Run and type
msconfig. - Go to the Boot tab.
- Deselect or uncheck Safe Boot option box.
- Restart your computer.
4. Perform Automatic Repair

- Insert the Windows Installation disk or USB drive then restart your computer.
- You will see a message requesting you to Press any key to boot from DVD.
- Press any key to boot from DVD.
- Once you see the Install Windows page displayed, click Repair your computer to start the Windows Recovery Environment (WinRE).
- In WinRE, go to Choose an option screen.
- Click Troubleshoot and select Advanced Options.
- Click Automatic Repair.
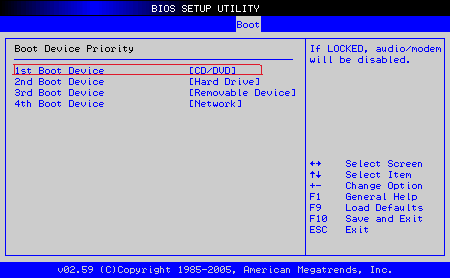
Note: If you don’t see the Press any key to boot from DVD message, you need to change the boot order in your BIOS settings to start from disk or USB.
Be careful when changing BIOS settings as the BIOS interface is designed for advanced computer users because you may change a setting that may prevent your computer from booting properly.
You should only update BIOS when necessary like when solving a compatibility problem. It can be complicated and render your computer inoperable in case of any errors.
Follow the steps below exactly as they are to change boot order then perform a repair:
- In the restart process, check for any instructions on how to interrupt normal startup.
- Enter the BIOS Setup Utility. Most computers use F2, F10, ESC or DELETE key to begin this setup.
- Find a tab in BIOS set up utility labeled Boot Order, Boot Options, or Boot.
- Use the arrow keys to go to Boot Order and press Enter.
- Locate the removable device (CD, DVD, or USB flash drive) in the Boot list.
- Use arrow keys to move the drive upwards to appear as the first in Boot list.
- Press Enter.
- Your boot order sequence has now been changed to boot from DVD, CD, or USB flash drive.
- Press F10 to save changes and exit BIOS Setup Utility..
- Click Yes in the confirmation windows.
After your computer restarts, do the following steps:
- Let the scan proceed for a few minutes to remove any malware infecting your computer.
- Select your preferred language, currency, time and keyboard.
- Click Next and select Repair your computer.
- Choose the operating system you want to repair (in this case Windows 10).
- Click Next and select Troubleshoot.
- Select Advanced Options.
- Click System Restore or Startup Repair.
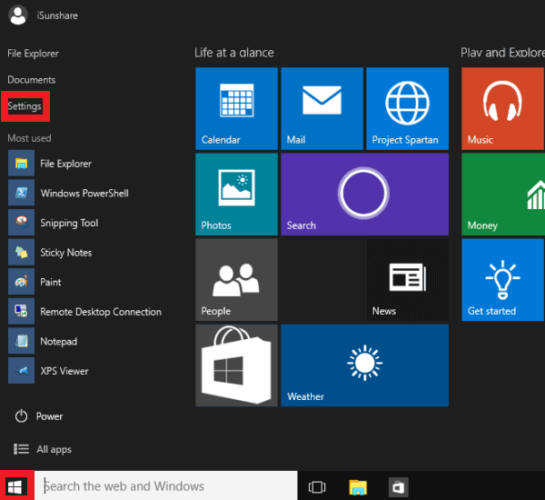
5. Reset your PC
- Click Start
- Go to Settings.
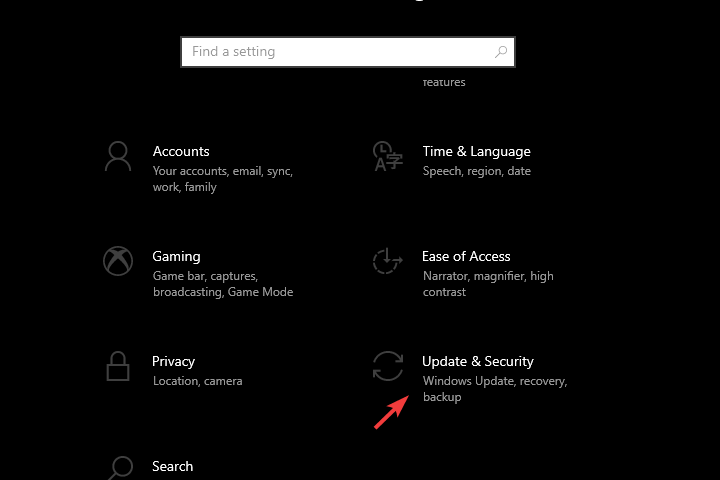
- Click Update & Security.
- Click Recovery on the left pane.
- Click Reset this PC.
- Click Get started
- Select Keep my files option
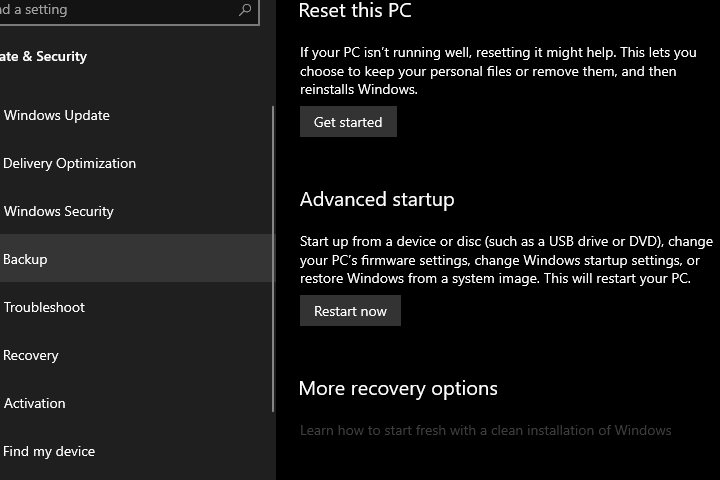
Note: All your personal files will be deleted and settings reset. Any apps you installed will be removed, and only pre-installed apps that came with your PC will be reinstalled.
Did any of these solutions help fix the Windows 10 black screen without cursor issue on your computer? Let us know in the comments section below.
Editor’s Note: This post was originally published in November 2017 and has been since revamped and updated in September 2020 for freshness, accuracy, and comprehensiveness.
Thank you for viewing the article, if you find it interesting, you can support us by buying at the link:: https://officerambo.com/shop/
No comments:
Post a Comment