- Twitch video buffering can cause many problems while watching your favorite streams.
- Follow closely the steps provided below and you'll surely fix them.
- Bookmark our Gaming page and never miss a thing about the gaming world.
- Gaming is also about using the best tools. Find everything you need in the Software Hub!
Twitch is one of the most popular live streaming services for gamers, but despite its popularity, many users reported buffering issues.
On this note, users complained of VoD, playback, or clips buffering, which occurs due to background applications.
Furthermore, Twitch is likely to lag every few seconds in almost any browser or with any WiFi connection.
All these issues will have a massive negative impact on your user experience, affecting the overall gaming dynamics. So today we’re going to show you how to fix these problems.
Quick tip
Before we jump to the solutions, it’s worth mentioning that you could switch to a browser such as Opera GX and get rid of all any buffering issues thanks to the Twitch integration.
Opera GX is a browser designed for gamers, with a lot of features meant to serve exactly this purpose.
So it’s only natural to be able not only to follow your favorite streamers anytime, anywhere but also to be able to communicate easily with the gaming community via the Discord messenger app.
Thanks to a built-in ad blocker, you won’t see any ads, and the video loading speed is optimal because tracking scripts are blocked.
Opera GX
With the seamless Twitch integration in Opera GX, your video streaming won't buffer any second longer.
How do I fix Twitch buffering issues?
- Check for malware
- Check for background applications
- Change your DNS
- Disable your proxy or VPN
- Disable browser extensions
- Clear cache
- Disable hardware acceleration
- Block specific IP range
1. Check for malware

One of the first things to do is to perform a full system scan using your antivirus and be sure to quarantine all malware.
If there’s no malware on your PC, perhaps the issue is your antivirus. To check that, disable some antivirus features and see if that solves the issue.
Alternatively, you can disable your antivirus altogether and check if that helps. If the problem is still there, your next solution would be to remove your antivirus.
However, the preferred way, in this case, would be to switch to an antivirus that doesn’t interfere with your system, such as Bitdefender.
Bitdefender’s Antivirus Plus, for instance, is one of the best anti-malware tools available right now, with an unbeatable cyber-threat detection, optimized performance for speed and battery life preservation, plus multi-layer ransomware protection to keep your files safe.
In the latest tests, the program got the best scores in terms of impact upon other processes. Besides, the tool has a Gaming mode which implies that the antivirus will only keep the real-time protection activated while your gaming, to reduce interference.
Bitdefender Antivirus Plus
With Bitdefender, you'll be able to enjoy all the gaming videos you want, while staying safe from online intruders.
2. Check for background applications

According to users, if you’re encountering Twitch buffering issues, the problem might be background applications. A common cause for this is Steam updating certain games in the background. So be sure that Steam isn’t downloading anything.
In addition, check any other applications that might be using your bandwidth in the background and disable them.
After you disable these applications, check if the problem is still there.
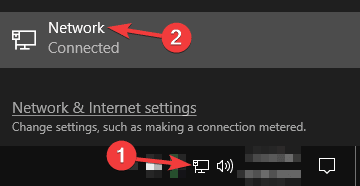
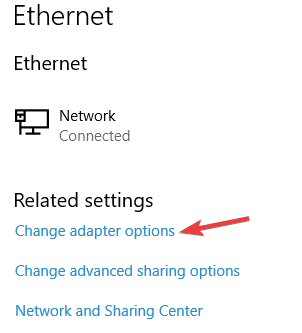
3. Change your DNS
- Click the network icon on your Taskbar. Now select your network from the menu.
- Select Change adapter options from the right pane.
- A list of available network connections will appear. Right-click your network connection and choose Properties from the menu.

- Select Internet Protocol Version 4 (TCP/IPv4) from the list. Now click the Properties.
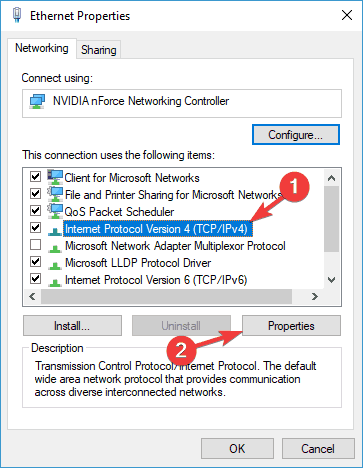
- When the new window appears, select Use the following DNS server addresses Now enter 8.8.8.8 as the Preferred and 8.8.4.4 as the Alternate DNS server. Click the OK button to save changes.
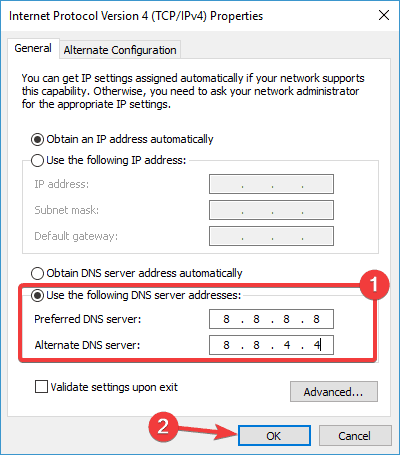
After making these changes, you’ll switch your DNS to Google’s DNS and the issue should be resolved.
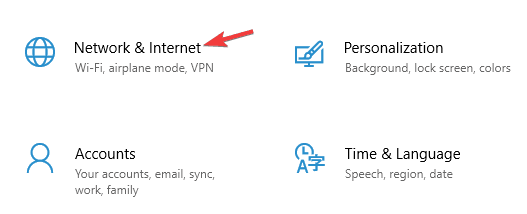
4. Disable your proxy or VPN
- Open the Settings app. (To do that quickly, just use Windows Key + I shortcut.)
- Head over to the Network & Internet section.
- Select Proxy from the left pane. In the right pane, disable all options.
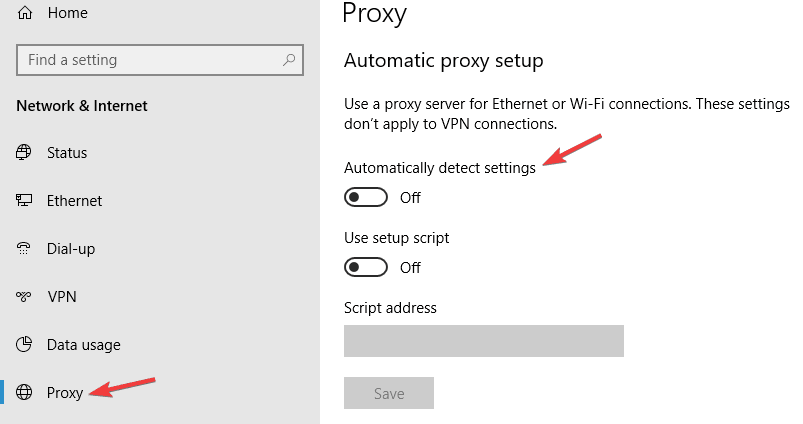
Once you disable all options, the proxy will be disabled and the problem with Twitch should be resolved. If you’re using a VPN, be sure to disable it or uninstall it and check if that solves the issue.
If you’re looking for a good VPN that won’t interfere with Twitch and other websites, we suggest that you try out Private Internet Access.
Besides ensuring that browsing is safe no matter what website you access, this VPN also cleans your traffic and unblocks media content that is geo-location restricted.
Private Internet Access
Keep your Twitch streaming experience private and accessible anywhere with this reliable VPN tool.
5. Disable browser extensions
- Click the Menu icon in the top right corner and choose More tools > Extensions.
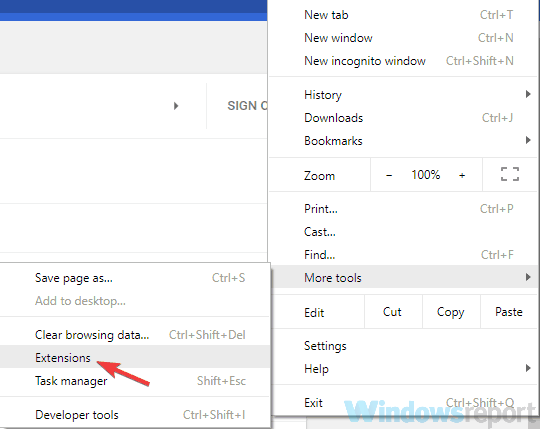
- A list of extensions will now appear. Toggle the button next to the extension’s name to disable it. Repeat this step for all startup applications on the list.
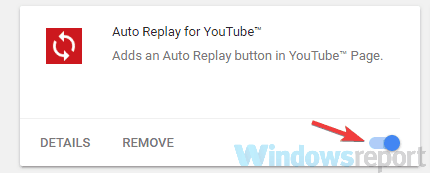
Once you disable all extensions, check if the problem is still there. If the issue doesn’t appear anymore, try enabling the disabled extensions one by one.
Be sure to repeatedly check Twitch to pinpoint the extension causing the problem. Once you find the problematic extension, remove it, or keep it disabled.
Dedicated streaming software can greatly improve your Twitch experience. Here are 4 recommendations
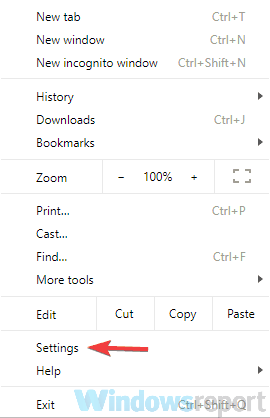
6. Clear cache
- Click the Chrome menu icon in the top-right corner and select Settings.
- When the Settings tab opens, scroll all the way down and click Advanced.
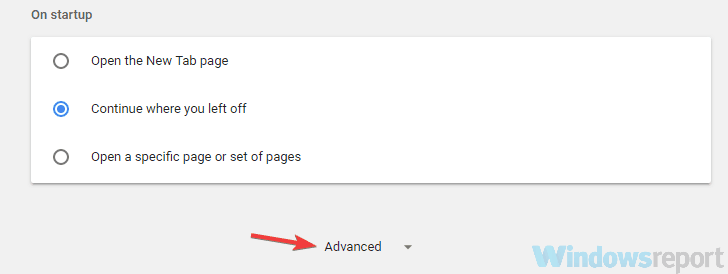
- Click the Clear browsing data.
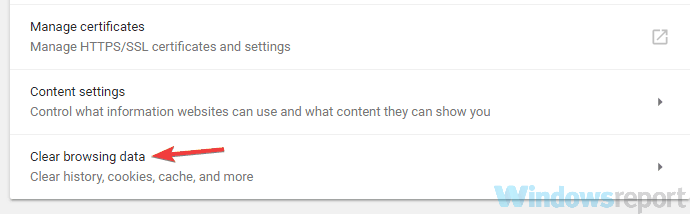
- Set Time range to All time. Click the Clear data button to clear your cache.
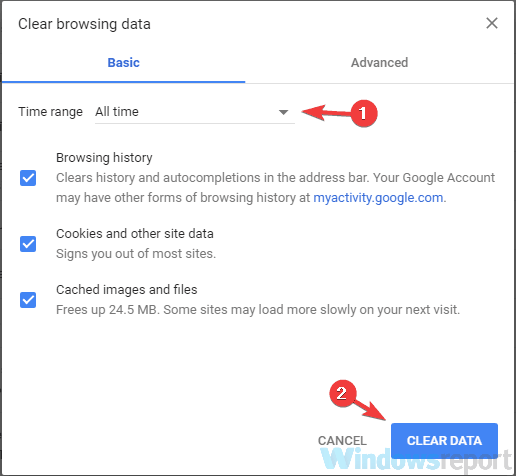
After clearing the cache, check if the problem is still there.
Note: In this example, we’re used Chrome, but the process is similar for any other browser you might be using.
7. Disable hardware acceleration
Certain features of your browser can cause Twitch videos to buffer. One of them is the hardware acceleration feature.
In case you don’t know, the hardware acceleration feature will utilize your GPU in order to process data, and although this feature can be useful, it can also lead to various problems.
To disable this feature, do the following:
- Open the Settings tab and click the Advanced button to expand your settings.
- Locate the Use hardware acceleration when available option and disable it.

- Restart your browser.
After doing that, the hardware acceleration feature will be disabled and the issue should be resolved.
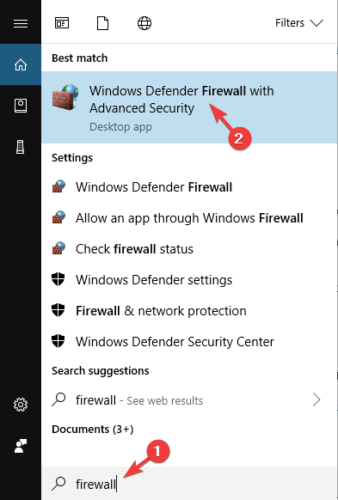
8. Block specific IP range
- Press Windows Key + S and enter Choose Windows Defender Firewall with Advanced Security.
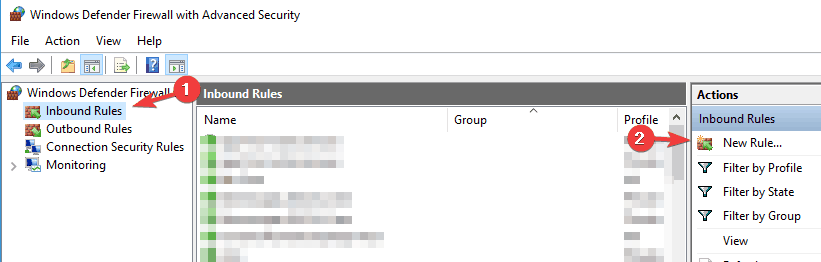
- Go to Inbound rules and click New Rule.
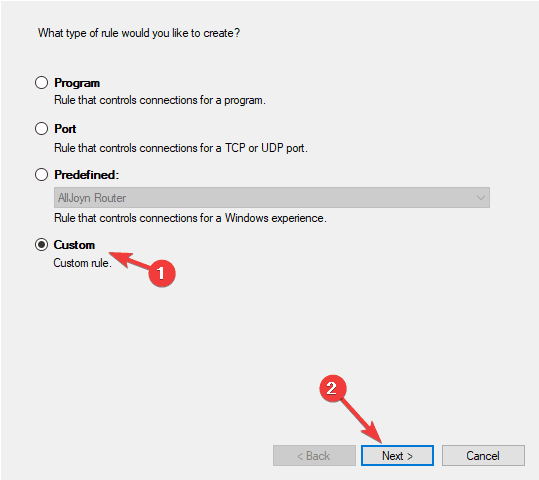
- Select Custom rule and click Next.
- Keep clicking Next until you reach the Scope screen.
- Select These IP addresses and click Add in the Which remote IP addresses does this rule apply to section.
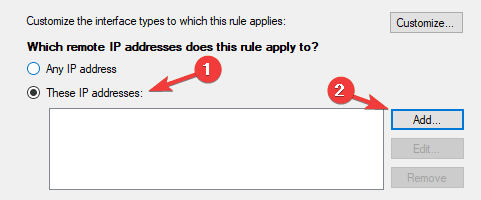
- Select This IP address range and enter the following addresses:
- From: 206.111.0.0
- To: 206.111.255.255
- Click OK to proceed.
- Now repeat steps 5-7, but this time, use the following IP addresses:
- From: 173.194.55.1
- To: 173.194.55.255
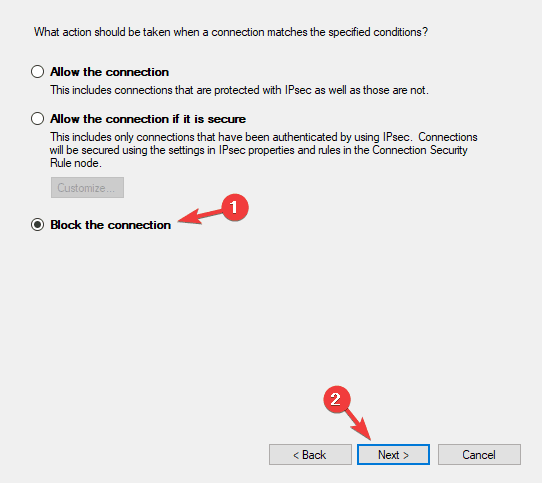
- Once you’re done, click Next.
- Select Block the connection and keep clicking Next to finish the process.
Once you configure your firewall, you just have to run the following command in Command Prompt or restart your PC: ipconfig /flushdns
Once your PC restarts, check if the problem is still there. Many users reported that this solution worked for them, so be sure to try it out. Just follow the instructions carefully and you should be able to complete it without too many problems.
To conclude, Twitch is a great streaming platform, but if you’re having buffering issues with Twitch, be sure to try some of our solutions.
Tell us which one worked for you in the comments below.
Editor’s Note: This post was originally published in December 2018 and was updated and revamped in September 2020 for freshness, accuracy, and comprehensiveness.
Thank you for viewing the article, if you find it interesting, you can support us by buying at the link:: https://officerambo.com/shop/
No comments:
Post a Comment