If you want to use VPN and your printer, you need to connect the printer directly to your PC using the USB cable.
Alternatively, you might be able to fix the problem by adjusting your VPN configuration and granting yourself local network access.
Switching to another VPN solution can also fix this problem and Private Internet Access is the best you can get. It will secure your data before it gets accessed and it doesn’t interfere with your printer.
And while it’s installed and running, it will protect your PC by hiding your IP address and blocking all unwanted remote access to your computer.

Private Internet Access
If you want a strong and secure VPN solution for your printer, Private Internet Access is the key for that and complete privacy for your browsing.
3. Change the printer settings
- Open Control Panel and navigate to your Printers window.
- Check if the correct printer is set to Default (Please watch the video below for more information).
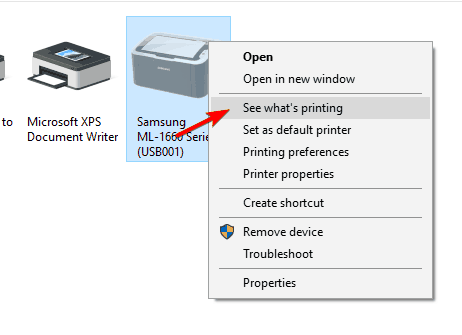
- Right-click on your default printer and select the print queue (See what’s printing).
- If there are any unfinished tasks, remove them from the list.
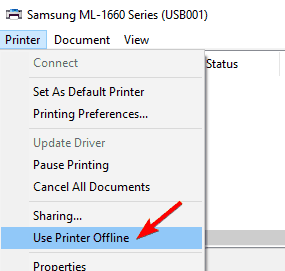
- From the queue window, select Printer and uncheck the Use Printer Offline option (if the Use Printer Offline option is off, check the option, leave it a few seconds, and uncheck it).
- Check if the printer is correctly connected to your computer (unplug the USB cable and plug it in again).
- If you own a network printer, try doing a connection test (also, try restarting your router/switch).
- Turn your printer and computer off and on again.
- If by now the problem isn’t solved, reinstall the printer‘s drivers.
Note: if you are using a wireless printer, then you should try to connect to its IP address. To find its address, go to Control Panel, then click on Devices and Printers, right-click on your printer, and select properties.
Copy the address and write it down in your browser’s address field.
You can’t open Control Panel? Take a look at this step-by-step guide to find a solution
4. Restart the Print Spooler service
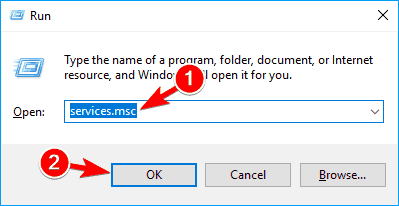
- Press Windows Key + R, type services.msc, and press Enter or click OK.
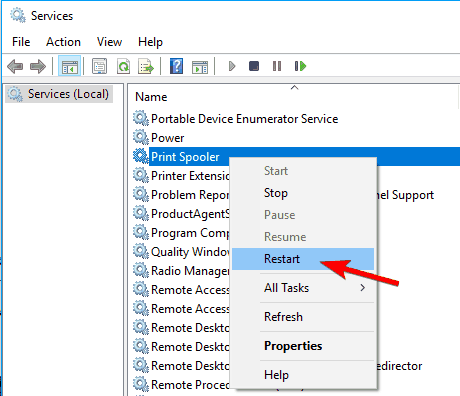
- Locate the Print Spooler service, right-click it and choose Restart from the menu.
Note: Keep in mind that this might not be a permanent solution, so you’ll have to repeat it if the issue reappears.
5. Change the printer properties
- Go to Control Panel > Devices and Printers.
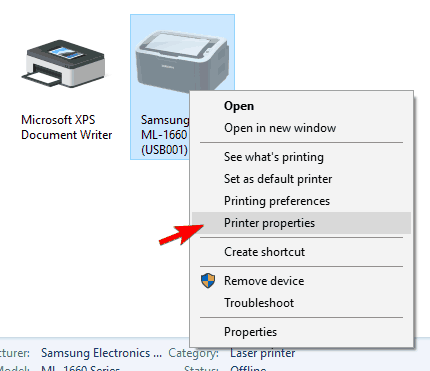
- Right-click your printer and choose Printer properties from the menu.
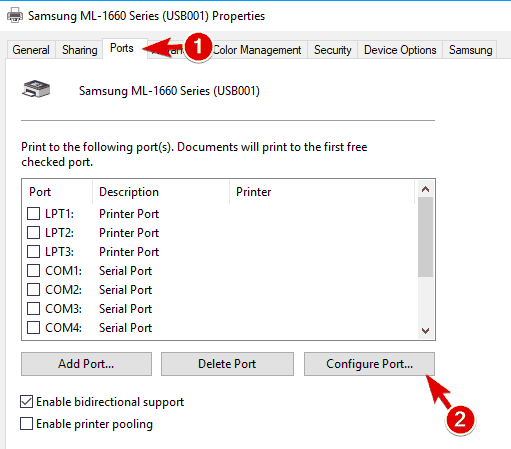
- Go to the Ports tab, select your printer’s IP address from the list and click on the Configure Port button.
- Uncheck SNMP Status Enabled and click on OK to save the changes.
Note: This solution works only if you’re using a network printer. If you encounter any configuration problems with your printer, we’ve prepared a simple guide to help you in that situation.
6. Install the latest updates
- Press the Windows Key + I to open the Settings app.
- Navigate to the Update & security section.
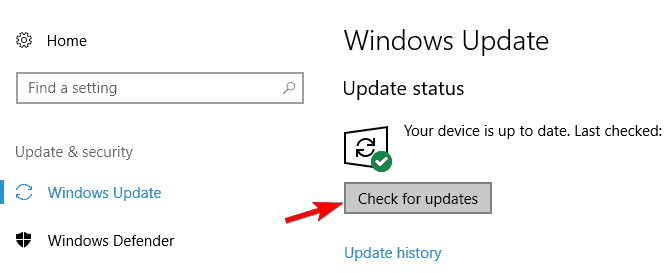
- Click on Check for updates button.
Note: If you can’t open the Setting app, take a look at this article to solve the issue.
7. Add a second printer device
- Follow Steps 1-2 from Solution 5.
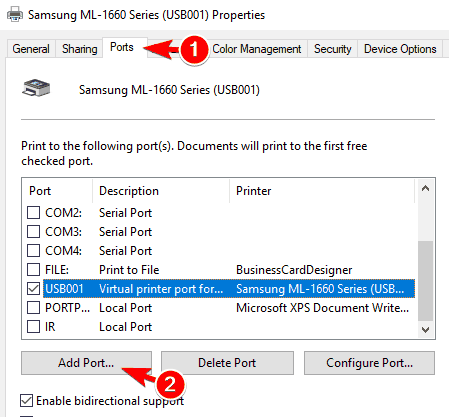
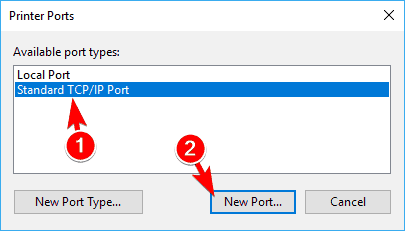
- Select the Ports tab and click on Add Port button.
- Select the Standard TCP/IP Port and click on the New Port button.
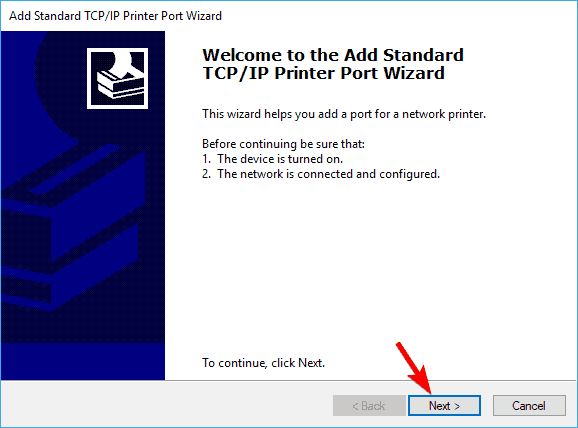
- Click on Next after the Printer Port Wizard starts.
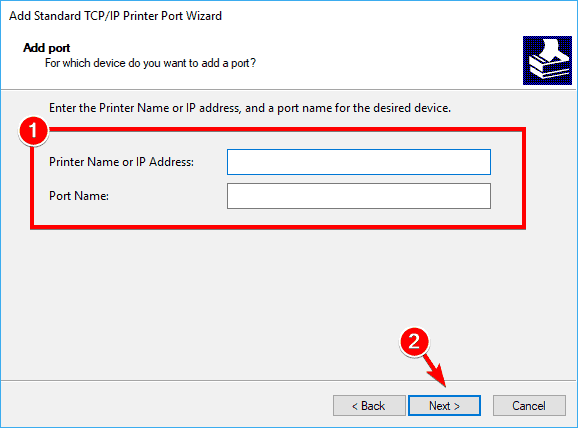
- Enter the required information. You can get them from your printer’s instruction manual. Click on Next.
We hope this guide helped you solve your printer problems in Windows 10. If you’ve tried all of them and your problem still persists, then you might have a hardware-related problem.
In this case, try printing from another computer or try a different printer. Also, if you’re running a wired printer, use a different USB / network cable.
If you have any other questions, feel free to leave them in the comments section below.
Editor’s Note: This post was originally published in March 2019 and has been since revamped and updated in September 2020 for freshness, accuracy, and comprehensiveness.
Thank you for viewing the article, if you find it interesting, you can support us by buying at the link:: https://officerambo.com/shop/


No comments:
Post a Comment