Well, this is not just a simple emulator. For instance, you have a keyboard mapping option accessible with just one click and then you can set the controls on the keyboard, the mouse, or even gamepad.
You can even play more games and use multiple gaming accounts at the same time by running multiple instances at once.
NoxPlayer also has a macro function so you will be able to record some complex combinations and run the script with just one click.
NoxPlayer
NoxPlayer is a solid Android emulator that is fully optimized to work with your Windows 10 PC.
4. Reinstall Bluestacks
If you keep getting a black screen while trying to run Bluestacks, perhaps the problem is related to your installation. Sometimes your Bluestacks installation might be damaged, and that can cause this issue to appear.To fix the problem, it’s advised to uninstall Bluestacks completely from your PC, and then install it again.
Removing an application is quite simple, but if you want to completely remove it, we advise you to use uninstaller software such as IObit Uninstaller.
In case you don’t know, uninstaller software is a special application that will completely remove the selected application along with all of its files and registry entries.
By usingIObit Uninstaller, you’ll ensure that there aren’t any leftover files that can interfere with future installations.

IObit Uninstaller 9 Pro
With IObit Uninstaller you will make absolutely sure that there will be no traces of Bluestacks left on your PC!
5. Run Bluestacks with integrated graphics

Black screen in Bluestacks can sometimes appear if you have both dedicated and integrated graphics processor. Several users reported that they fixed the problem simply by setting Bluestacks to run with integrated GPU.
To do that, you just have to right-click Bluestacks shortcut and choose the option to run it with integrated graphics. If this method works, you’ll have to repeat it every time you want to start Bluestacks.
If you want to configure Bluestacks to run always powered by your integrated GPU, you need to make a couple of changes in your graphics card control panel software.
Simply locate Bluestacks in Nvidia Control Panel or Catalyst Control Center and assign your integrated graphics as the default graphics processor.
Bear in mind that your integrated graphics doesn’t offer the same performance as dedicated graphics, so you might not be able to achieve the same performance in games while using your integrated graphics.
Do you have the BlueStacks Blue Screen of Death errors? Fix it with this guide
6. Turn off the sleep timer

According to users, sometimes a black screen appears simply because Bluestacks goes to sleep. This usually occurs after a minute or two or when loading certain games.To fix this problem, users are suggesting installing the Settings app on Bluestacks and use the app to turn off the sleep timer. Once you disable the sleep timer, check if the problem is still there.
7. Turn off the Threaded optimization
- Open the Nvidia Control Panel.
- Select Manage 3D Settings from the left pane, click the Program Settings tab and select Bluestacks from the list (if it’s not there, click the Add button and select Bluestacks Frontend).
- Locate Threaded optimization on the list and set it to Off. Click Apply to save changes.

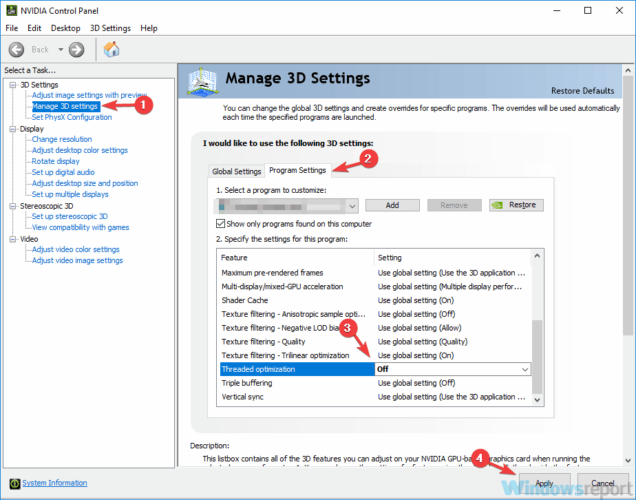
After making these changes, check if the problem is still there. If you’re using AMD graphics, you should have the same options available in the Catalyst Control Center.
8. Reinstall the app you’re trying to run
Sometimes this problem can appear in Bluestacks if there’s a glitch with the application you’re trying to run. To fix the problem, users are suggesting to reinstall that app and check if that helps.
Simply remove the app that is giving you this problem and reinstall it. After doing that, the app should be able to start without any problems.
We hope that one of our solutions helped you fix the problem with Bluestacks. If you have any suggestions or additions, please write them in the Comments section below.
Editor’s Note: This post was originally published in February 2019 and has been since revamped and updated in September 2020 for freshness, accuracy, and comprehensiveness.
Thank you for viewing the article, if you find it interesting, you can support us by buying at the link:: https://officerambo.com/shop/
No comments:
Post a Comment