- Have you received a toast notification message that reads Reconnect your drive when backing up files using the File History utility?
- This backup tool saves copies of your data each hour. Thus, resolving this issue is mandatory.
- Our Hard Drive Errors section gathers more tips for automated file backups on an external drive.
- It's undoubtedly that you should solve all similar problems and get back to using the PC as usual. Our Peripherals Troubleshooting Hub should help you out.

Having a file backup is crucial, and thanks to the File History feature, you can easily create a backup for your files on Windows 10.
Unfortunately, certain issues with File History can occur once in a while, and you might get a notification saying that you need to reconnect your drive on Windows 10.
File History creates backups of your files automatically and stores the backup on an external hard drive. In some cases, certain issues can occur.
You might get an error message saying that you need to Reconnect your drive. Since having a backup is rather important, this can be a big problem, but fortunately, there are several solutions available.
QUICK TIP: A piece of professional automatic backup software is supposed to be error-free and easily keep your personal data secure.
If you are also thinking of trying out a powerful backup solution instead of File History, here we suggest using Ashampoo Win Optimizer.
Besides preventing your operating system from becoming cluttered with junk files, this effective tune-up utility adds further conveniences for users by saving and restoring all changes with Backup Manager.
Even more, you’ll be amazed to discover that it can help your PC easily recognize all connected hard drives.

Ashampoo Win Optimizer
Ashampoo Win Optimizer is a well-designed PC optimization tool that will surprise you with its backup functionality.
What can I do when getting Reconnect your drive error?
- Reconnect your drive and manually start the backup process
- Create a FileHistory folder
- Choose not to copy the remaining files to a saved location
- Delete the File History configuration files
- Format your external hard drive and run File History again
- Make sure your drivers are up to date
- Reconnect your external hard drive
- Delete few files and run File History cleanup
1. Reconnect your drive and manually start the backup process

- Open the Settings app.
- Navigate to Update & security > Backup.
- Click on More options > Back up now.
File History feature requires that an external hard drive is connected to your PC in order to work properly.
If for some reason your external hard drive has been disconnected for too long, you’ll see a message asking you to reconnect your drive.
To fix this problem you just need to reconnect your external hard drive and manually start the backup process. To manually start the backup, complete the above procedure.
In addition to manually starting the backup process, you can just connect your hard drive and wait for the scheduled backup to start automatically.
2. Create a FileHistory folder
- Create a new folder on your computer and name it FileHistory.
- Right-click the newly created FileHistory folder and choose Properties.
- Navigate to the Sharing tab and click the Share button.
- Choose Everyone from the menu and click the Add button.
- Once Everyone has been added to the list, click the permission level, and choose Read/Write.
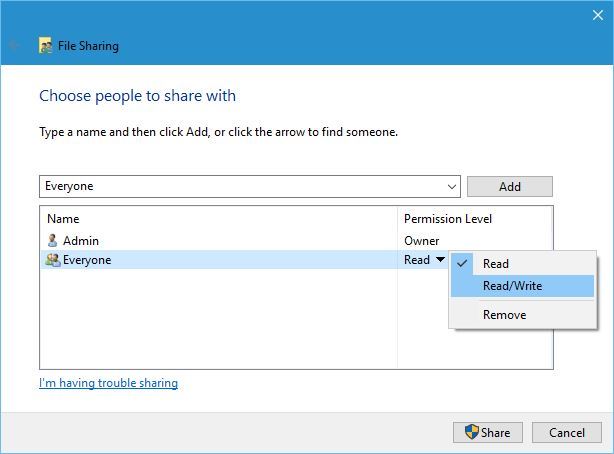
- Click the Share button.
- In addition, you can navigate to the Advanced Sharing section in the Sharing tab and click the Advanced Sharing button.
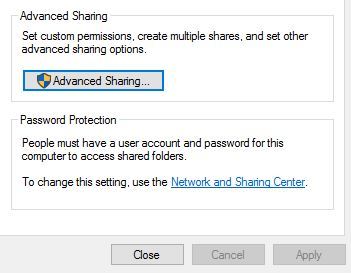
- Click the Permissions button.
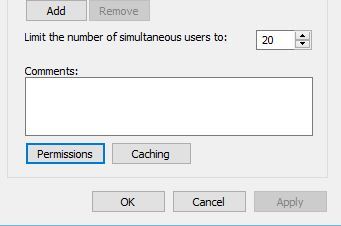
- When the Permissions window opens, make sure you set Permissions for Everyone to Full Control.
- Click Apply and OK.
- After you’ve created and shared the FileHistory folder, go to File History and add the FileHistory folder as a network drive.
- Restart your computer and you’ll be able to select your internal drives again.
If you’re getting a message saying to reconnect your drive, you might want to try creating a new FileHistory folder and adding it to File History.
3. Choose not to copy the remaining files to a saved location

Reconnect your drive message might appear if you delete certain files from File History. If that happens, you’ll be asked if you want to copy the remaining files to the saved location.
If you choose to copy the remaining files, you would receive the same error message.
In order to fix this, it’s important to choose not to copy the remaining files. By choosing this option the entire backup will be created again thus fixing your problem.
4. Delete the File History configuration files
- Press Windows Key + R and enter %localappdata%. Press Enter or click OK.
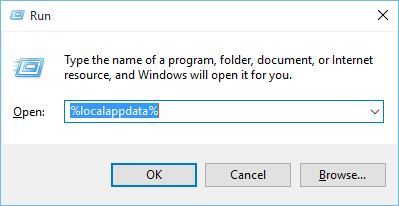
- When the Local App Data folder opens, navigate to the MicrosoftWindowsFileHistoryConfiguration folder.
- After you open the Configuration folder you should see four files in it. Delete them.
- Start File History and you should be able to create backups again.
Before trying this solution make sure to create a backup for your files. This process might delete all the files on your external hard drive that you use for backup.
So, make sure you save them somewhere safe. After you’ve saved your files to a safe location, complete the above procedure.
5. Format your external hard drive and run File History again
- Open This PC and locate your external hard drive. Right-click it and choose Format.
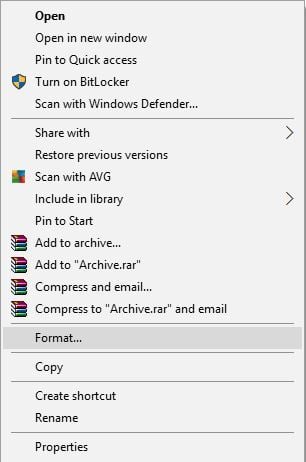
- Click the Start button in order to format your hard drive.
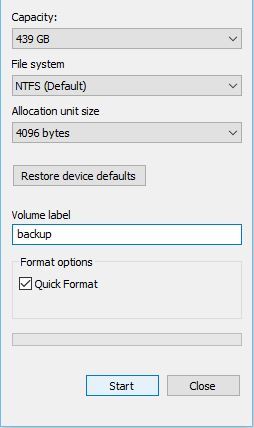
- After the formatting process is completed, start File History again.
- You’ll be asked if you want to save the older version of File History. Choose No and create a new backup.
If you’re getting reconnect your drive error message, you might want to format the external hard drive that you use for backup and recreate your backup again.
Formatting your external hard drive will permanently delete all your files from that external hard drive, so you might want to back up certain files. To format an external hard drive, follow the above steps.
6. Make sure your drivers are up to date
In some cases, reconnect your drive message appears if your external hard drive isn’t fully compatible with Windows 10.
To fix this issue, it advised that you download the latest drivers for your external hard drive.
Update drivers automatically
If you don’t want the hassle of searching for drivers on your own, you can use a tool that will do this for you automatically.
Of course, as you’re not able to connect to the internet at the moment, this tool won’t be useful.
However, once you get online, it will help you to keep all your drivers up to date, so you won’t be in this situation anymore.
Tweakbit’s Driver Updater (approved by Microsoft and Norton Antivirus) will help you update drivers automatically and prevent PC damage caused by installing the wrong driver versions.
After several tests, our team concluded that this is the best-automatized solution. Here is a quick guide on how to use it:
- Download and install TweakBit Driver Updater.
- Once installed, the program will start scanning your PC for outdated drivers automatically. Driver Updater will check your installed driver versions against its cloud database of the latest versions and recommend proper updates. All you need to do is wait for the scan to complete.
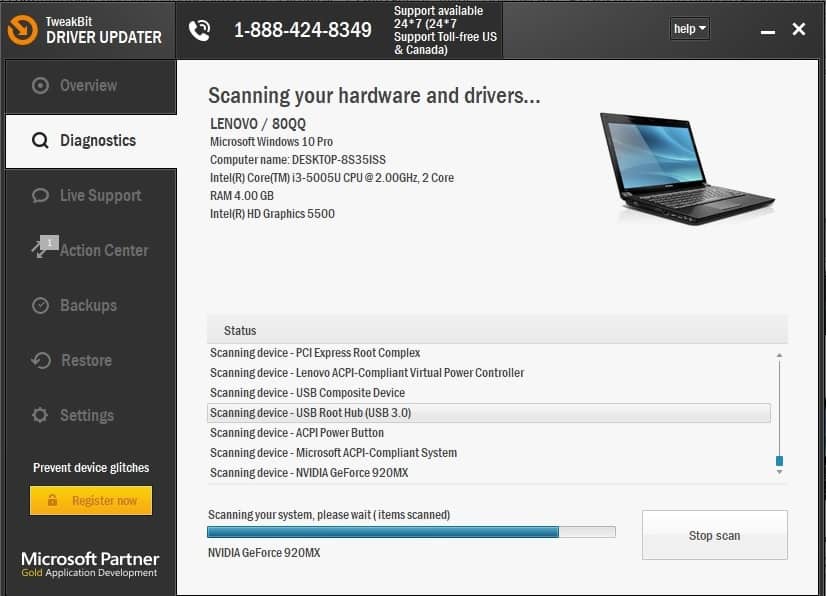
- Upon scan completion, you get a report on all problem drivers found on your PC. Review the list and see if you want to update each driver individually or all at once. To update one driver at a time, click the Update driver link next to the driver’s name. Or simply click the Update all button at the bottom to automatically install all recommended updates.

Note: Some drivers need to be installed in multiple steps so you will have to hit the Update button several times until all of its components are installed.
7. Reconnect your external hard drive

Sometimes reconnect your drive error appears if you switch your external hard drive with another. To fix this issue, it’s advised that turn off your computer and remove your current external hard drive.
After reconnecting your previous external hard drive, start your computer again. Everything should work without any problems and you shouldn’t get reconnect your hard drive message.
Turn off your computer and reconnect your new external hard drive. After your computer boots, everything should be working normally.
8. Delete few files and run File History cleanup

Few users claim that this issue can be fixed by deleting a few files from your external hard drive and performing a File History cleanup.
Several users reported that they managed to fix the problem by using the aforementioned method, so you might want to try it.
As we already mentioned, having a backup is rather important, and if you’re getting the Reconnect your drive message on Windows 10, make sure to try some of our solutions.
FAQ: Learn more about File History drive errors
- What does it mean to reconnect your drive?
Reconnect your drive is a Windows 10 notification that lets you know that certain issues with File History come up.
- How do I reconnect my File History drive in Windows 10?
Deleting the File History configuration files and making sure your drivers are up to date are two confirmed solutions. More tips are found in this guide on how to fix drive errors on Windows 10.
- Is File History a good backup?
File History is a reliable backup feature that takes good care of your Windows 10 system files. Refer to these File History not working troubleshooting solutions in case you need any help.
Editor’s Note: This post was originally published in September 2018 and has been since revamped and updated in July 2020 for freshness, accuracy, and comprehensiveness.
Was this page helpful?
Get the most from your tech with our daily tips
and
If you are looking for a cheap and genuine microsoft product key, warranty for 1 year.
It will be available at the link: https://officerambo.com/shop/
Microsoft Windows Embedded 8.1 Industry Pro : https://officerambo.com/product/windows-embedded-8-1/
Key Windows 7 Professional / Home Base / Home Premium (2 USER) : https://officerambo.com/product/key-windows-7/
Microsoft Windows 8.1 PRO (2 PC) : https://officerambo.com/product/microsoft-windows-8-1-pro/
Windows Server 2012 R2 : https://officerambo.com/product/windows-server-2012-r2/
Visual Studio Enterprise 2019 : https://officerambo.com/product/visual-studio-enterprise-2019/
Windows Server Standard / Datacenter / Essentials : https://officerambo.com/product/windows-server-all-version-standard-datacenter-essentials/
Microsoft Office Professional Plus for Windows : https://officerambo.com/product/microsoft-office-professional-plus-for-windows/
Microsoft Office Home and Student for Windows : https://officerambo.com/product/microsoft-office-home-and-student/
Key Microsoft Access 2016 : https://officerambo.com/product/key-microsoft-access-2016/
Microsoft Visio Professional : https://officerambo.com/product/microsoft-visio-professional/
Microsoft Project Professional : https://officerambo.com/product/microsoft-project-professional/
Account Microsoft Office 365 Profestional Plus 2020 Update For 5 Devices : https://officerambo.com/product/account-microsoft-office-365/
Key Microsoft Windows 10 Profestional / Profestional N : https://officerambo.com/product/key-microsoft-windows-10/
Key Microsoft Windows XP Pro : https://officerambo.com/product/key-microsoft-windows-xp-pro/
Microsoft Office Home and Business for Mac : https://officerambo.com/product/microsoft-office-home-and-business-for-mac/
No comments:
Post a Comment