- E drive low disc space notifications are not the end of the world since you only use this partition for recovery purposes.
- But it's also not something to ignore. Here's how to tackle this issue quickly and easily.
- Check out more useful tips on our Disk Drives Hub.
- Don't be shy to explore our Removal Guides for more handy solutions.
When you get E drive low disc space notifications on your computer, which usually appear periodically in desktop view or while trying to open your recovery drive, it could be that the drive is full and you can’t store any more files on it.
The E drive is a recovery drive that lets you store files needed during an emergency recovery, like when your system is unstable. It is a partition on the main hard drive, with less available space than the local C: drive.
If you store files in recovery E drive, or a backup program uses it to store files, it gets full quickly which can cause problems when you want to use the system recovery function.
This is why you shouldn’t store files in there, except those related to a system recovery.
Windows has drawn a 200MB threshold line for optimal performance, so when your system falls below this, it takes automatic actions to maintain minimum performance capabilities.
If it goes below 80MB, then you’ll get a strong warning message as the system tries to free up drive space by deleting restore points.
But if it goes below 50MB, it self-preserves and this is when you get urgent warning messages saying E drive low disc space delivered almost every four minutes until you free up some disk space.
In order to resolve the E drive low disc space warning, there are some fixes you can perform to get some free space back.
One of them is to first find out how much space is in your operating system and what data or apps are taking up space, then decide what to remove or delete.
How to fix E drive running out of space?
1. Turn off System Protection
- Create a set of recovery discs first
- Right-click Start and select System

- Scroll down and find Related settings
- Click System info
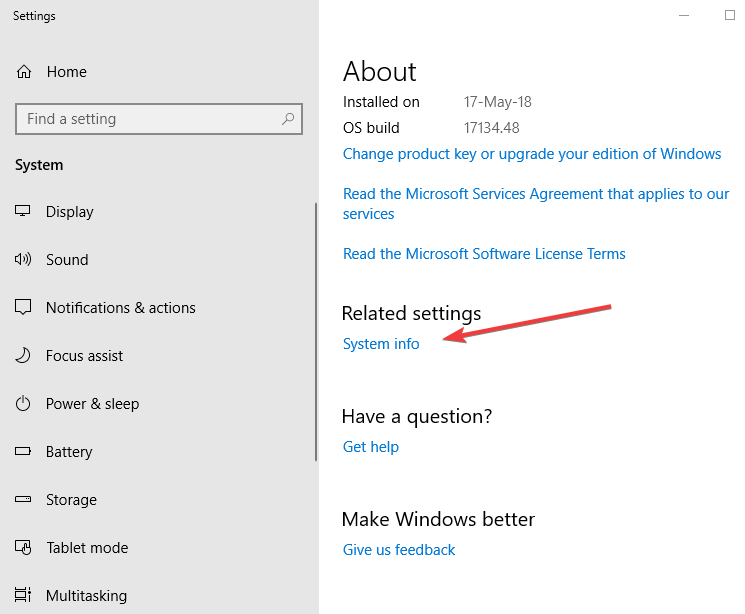
- On the right pane of the open window, click System Protection
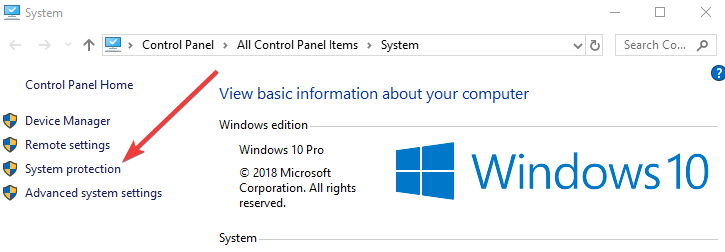
- Go to Protection Settings
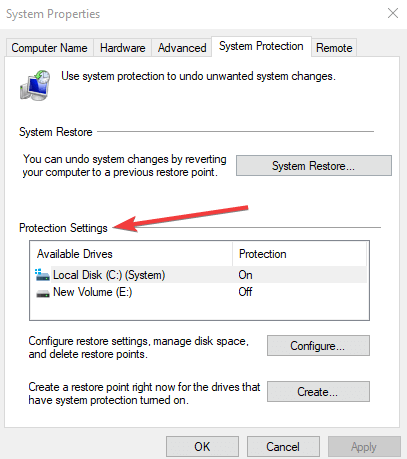
- Look for Recovery Drive in the list of available drives. If E drive is listed, check if the protection is turned off or on
- If it is turned Off, close the window. If it is On, click the recovery drive name to highlight it and click Configure.
- Select Disable system protection and click OK, then click Yes/OK to confirm the message
- Click Start and select File Explorer
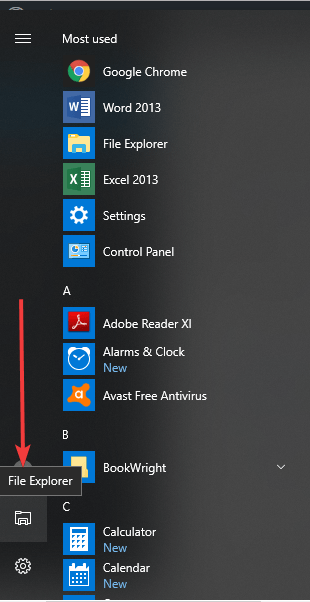
Encountering problems with File Explorer? Solve them quickly with the help of our detailed guide!
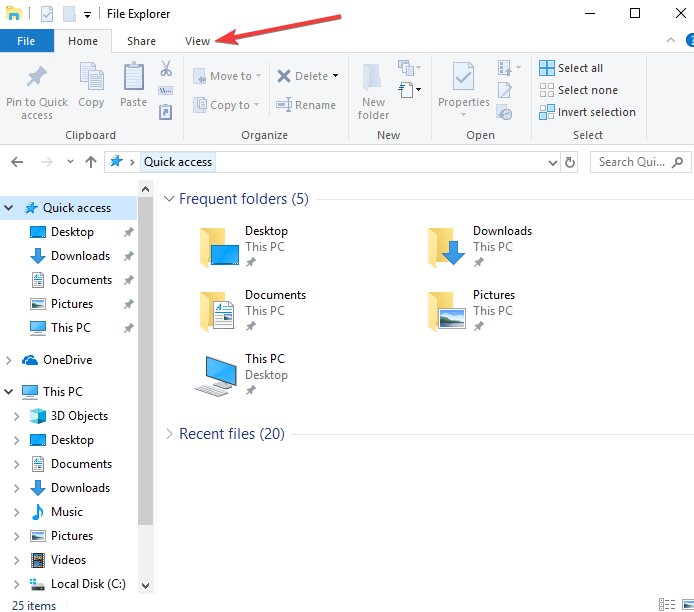
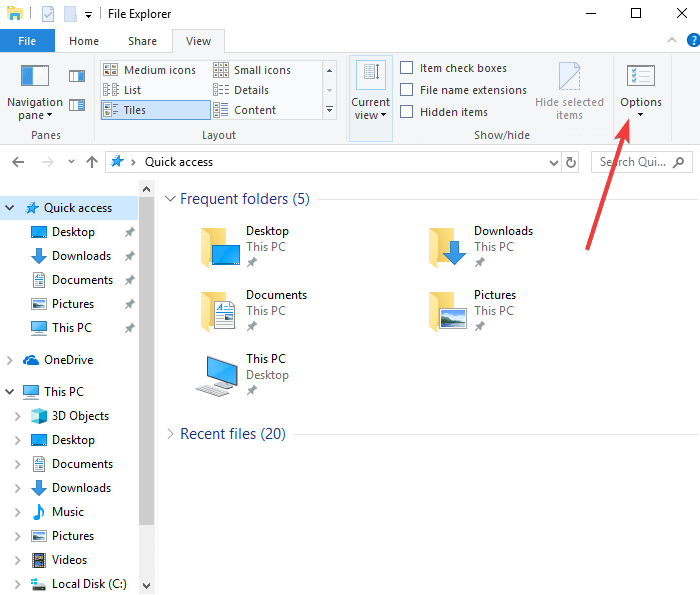
- Select Show Hidden files, folders and drives
- Remove the selection from Hide protected operating system files
- From Explorer window, double click Recovery drive
- If you get a window saying You don’t currently have permission to access this folder click Continue
- Copy the files to another drive if you created or copied any of them to the recovery drive and want to keep them
- Find and delete files saved previously in the recovery drive by selecting them and pressing Shift+Delete to remove them permanently
2. Use a system optimizer tool
Another great way to reclaim precious space on your E drive or any hard drive for that matter is by using a specialized system optimization tool.

The WinOptimizer is a complete tuneup, cleaning, repair, and optimization suite that comes packed with 37 powerful modules designed to take care of all your Windows parameters in just one click.
Remove junk data, useless temp files, web browsing traces, fix superfluous Registry entries, broken shortcuts and disable unnecessary services to boost jour PC’s performances, reclaim your system resources, free up precious disk space and get more available memory to enjoy faster startup and loading times.
Let’s quickly look at its key features:
- Accurate and comprehensive dashboards presenting valuable details on all system components in one single location
- SSD-ready next-gen Defrag tool (merge free space, automate drive analysis and defragmentation)
- Sophisticated algorithms to detect junk files more efficiently
- Reclaim precious disk space by eliminating web browsing traces, redundant files, and useless Registry entries
- monitor all running background processes and get instant notifications on bottlenecks plus potential enhancements
- Auto-Clean function to reduce clutter before it impacts your system automatically
- Live Tuner to provide a smart launch boost to all applications and allow custom fine-tuning
- Integrated Browser Extension Manager

Ashampoo WinOptimizer
Reclaim precious space on your E drive and optimize all Windows components with just 1 click!
Note: Do not delete files associated with system recovery as this can prevent a future system recovery from the hard drive. These include $RECYCLE.BIN, boot, hp, EFI, Factory Update, preload, Recovery, RM_Reserve, system.sav, bootmgr, RMCStatus.bin, BT_HP.FLG, CSP.DAT, DeployRp, HP_WSD.dat, HPSF_Rep, language, or RPCONFIG.
- You will get some confirmation windows open, click Continue then click Yes until all files and folders are deleted.
- Set Windows Folder Options by clicking View tab in File Explorer and select Options.
- Go to Folder Options>View tab>Select Don’t show hidden files, folders, or drives>Select Hide protected operating system files
- Close File Explorer
The E drive low disc space error should no longer appear after this.
Did this solution help fix the E drive low disc space? Let us know in the comments section below.
FAQ: Learn more about E drive and disk space issues
- Why is my disk space running low?
This notification usually pops when your drive is full. Clutter or junk data piles up over time so you could try to clean your registry or compress your drives to save some disk space.
The E drive is a recovery drive that lets you store files needed during an emergency recovery. Although it is a partition on the main hard drive, it is considered removable media.
- How do I clean up my local disk E?
You could use a disk utility like the Windows native Disk Cleanup or third-party optimization tools. Check out this article for step-by-step guidance.
Editor’s Note: This post was originally published in May 2018 and has been since revamped and updated in July 2020 for freshness, accuracy, and comprehensiveness.
Was this page helpful?
Get the most from your tech with our daily tips
and
If you are looking for a cheap and genuine microsoft product key, warranty for 1 year.
It will be available at the link: https://officerambo.com/shop/
Microsoft Windows Embedded 8.1 Industry Pro : https://officerambo.com/product/windows-embedded-8-1/
Key Windows 7 Professional / Home Base / Home Premium (2 USER) : https://officerambo.com/product/key-windows-7/
Microsoft Windows 8.1 PRO (2 PC) : https://officerambo.com/product/microsoft-windows-8-1-pro/
Windows Server 2012 R2 : https://officerambo.com/product/windows-server-2012-r2/
Visual Studio Enterprise 2019 : https://officerambo.com/product/visual-studio-enterprise-2019/
Windows Server Standard / Datacenter / Essentials : https://officerambo.com/product/windows-server-all-version-standard-datacenter-essentials/
Microsoft Office Professional Plus for Windows : https://officerambo.com/product/microsoft-office-professional-plus-for-windows/
Microsoft Office Home and Student for Windows : https://officerambo.com/product/microsoft-office-home-and-student/
Key Microsoft Access 2016 : https://officerambo.com/product/key-microsoft-access-2016/
Microsoft Visio Professional : https://officerambo.com/product/microsoft-visio-professional/
Microsoft Project Professional : https://officerambo.com/product/microsoft-project-professional/
Account Microsoft Office 365 Profestional Plus 2020 Update For 5 Devices : https://officerambo.com/product/account-microsoft-office-365/
Key Microsoft Windows 10 Profestional / Profestional N : https://officerambo.com/product/key-microsoft-windows-10/
Key Microsoft Windows XP Pro : https://officerambo.com/product/key-microsoft-windows-xp-pro/
Microsoft Office Home and Business for Mac : https://officerambo.com/product/microsoft-office-home-and-business-for-mac/
No comments:
Post a Comment