- Windows 10 Mail is not different from other apps when it comes to glitches that you can’t get rid of.
- You may apply the below tips when the Windows 10 Mail app fails to function properly or try out Mailbird to see if it's worth being your new email client.
- Visit our Windows 10 Mail section with no hesitation for other tips and full solutions to your issues.
- For similar comprehensive guides, feel free to bookmark this Windows 10 Apps Hub.

Even though the ways we communicate are changing, emails are still a massive part of our everyday lives.
Microsoft included the UWP Mail and Calendar app in Windows 10 to meet those needs, but the app is far from perfect, and even intrusive.
Some of the issues are minor, while others render it completely unusable. The one we singled out today prevents sending emails. All sent messages are stuck in the outbox.
Since this is the main purpose of the given app, we decided to tackle the issue in detail. If you’re unable to send emails with Windows 10 Mail app, the steps below should help you overcome the error.
How can I fix Windows 10 Mail app stuck in outbox?
- Sign out and sign in again
- Try out a different email client
- Run the dedicated troubleshooter
- Reset Mail app settings
- Re-register Mail app with PowerShell
- Allow Mail and Calendar app through Windows Firewall
- Update Windows
- Tweak Privacy settings
1. Sign out and sign in again
- Open the Mail app.
- Click on the cog-like settings button at the bottom.
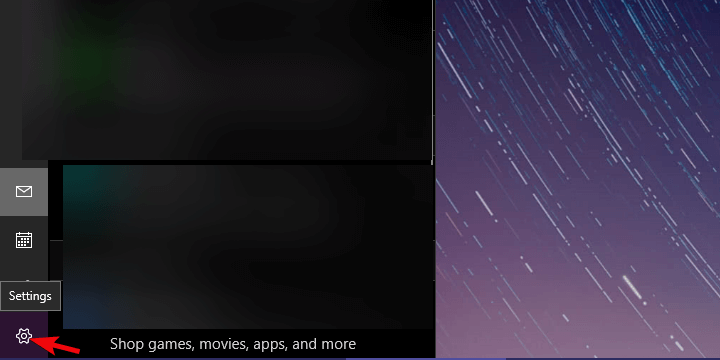
- Choose Manage accounts.
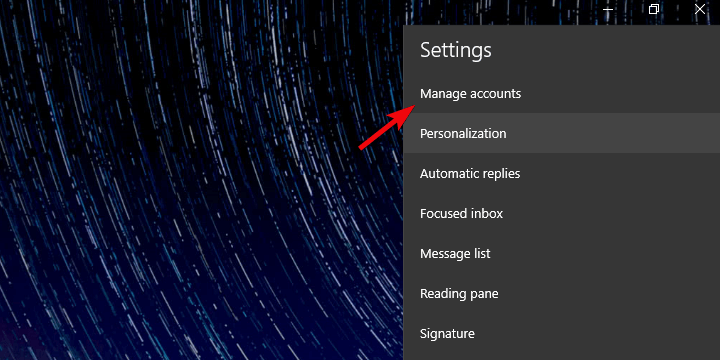
- Select the troubled account.
- In the next dialog box, click Delete account from this device.
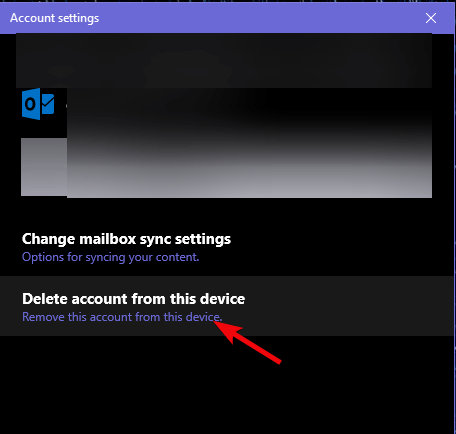
- Restart your PC.
- Navigate to the same destination and, within the Manage accounts section, add a new account.
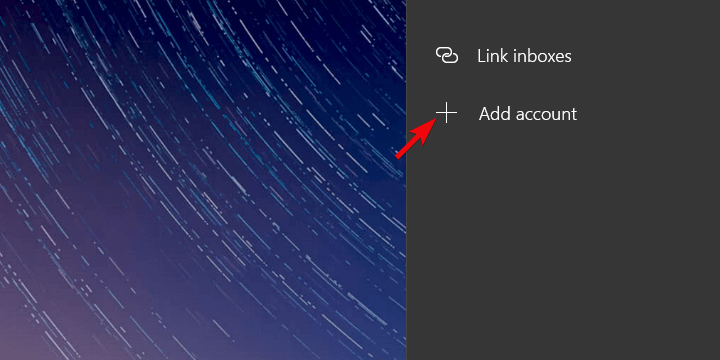
- Enter your credentials and try sending emails stored in the outbox again.
First things first. Before we move to more complex solutions, we suggest trying to sign out and sign in with the affected account.
Sometimes, the bug-ridden nature of the Mail app for Windows 10 comes to light. And the best way to resolve these minor stalls is to simply sign out of the affected account.
After that, restart your PC and sign in again. That should help and the outbox messages should finally get sent. Also, deleting the account and re-establishing it might help.
As a side note, don’t forget to check the Internet connection and confirm that everything works as intended. If your messages are still stuck in the outbox, continue with the steps below.
Getting the same There is no Internet connection message? Count on us to solve the problem.
2. Try out a different email client

Luckily enough, there’s no rule saying that you need to stick with applications Microsoft forced upon you.
Quite the opposite, there are so many third-party alternatives and one of them will most likely end up checking most of the boxes you need, if not even all of them.
If you’re not sure what third-party e-mail client to use, factors that need to be considered are ease of use, if it integrates with apps like WhatsApp, and Response Management features.
That’s why you can’t go wrong with Mailbird. It comes with an attractive design, it integrates with popular services, and it basically unifies all your communication into one intuitive place.

Mailbird
Try out Mailbird and get ready for a comprehensive email experience. You’ll forget all about the Windows 10 Mail app in no time!
3. Run the dedicated troubleshooter
- Press Windows key + I to open Settings.
- Choose Update & Security.
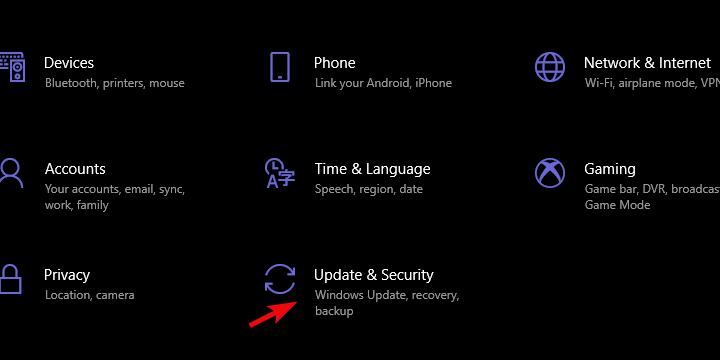
- Select Troubleshoot from the left pane.
- Scroll down until you reach Microsoft Store apps.
- Expand the Microsoft Store apps troubleshooter and click Run the troubleshooter.
Windows 10 is, for all intents and purposes, packed with various features. Some of them are rather useful and perform admirably.
Others, like the aforementioned Mail app, is just a pale shadow of Windows Live Mail. And a lot of its lackluster nature it owes to its UWP nature.
Luckily, amongst those numerous features, there are more than a few dedicated troubleshooting tools. And, in this case, the one intended for Microsoft apps should help you fix the outbox bug.
Use the above steps to run this troubleshooter.
4. Reset Mail app settings
- Open the Settings app.
- Choose Apps.
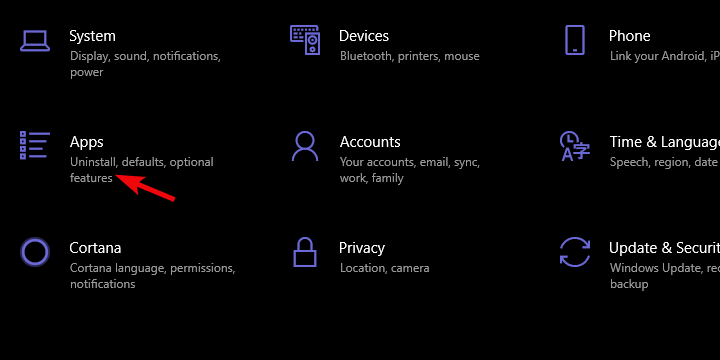
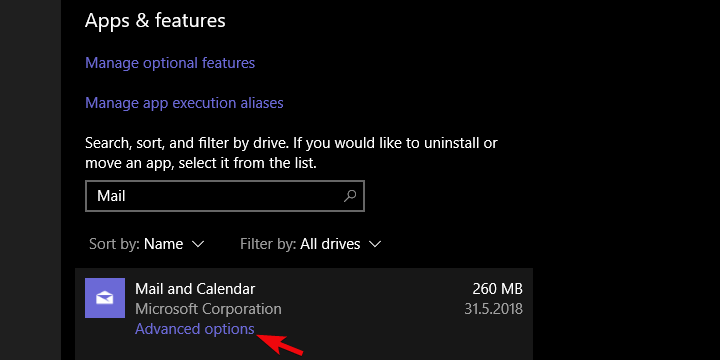
- Under the Apps & features, search for the Mail and Calendar app.
- Expand the Mail and Calendar app and open Advanced options.
- Scroll down and click on the Reset button.
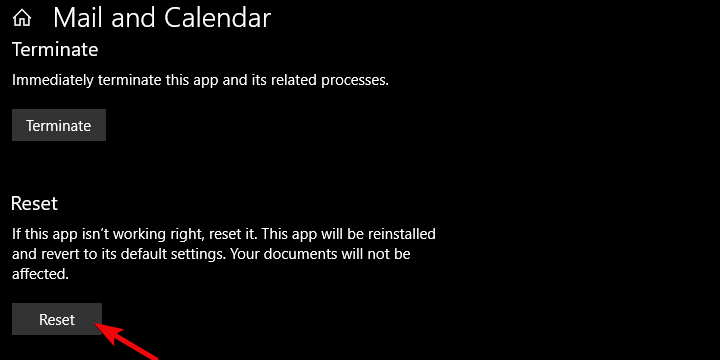
- Open the Mail app and sign in with your credentials.
As with any other app, the Mail and Calendar app stores cache in order to speed up the loading process. Besides that, it keeps locally all your emails so you can access them offline.
This might, over time, even slow down the performance and cause some inexplicable behavior.
The inability to send emails is a good example. In comparison to standard Windows 32 apps, you can reset the Mail and Calendar app within the System settings interface.
Have in mind that you’ll need to re-establish your account as this action restore it to factory values.
5. Re-register Mail app with PowerShell
- Right-click Start and open PowerShell (Admin).
- In the command-line, copy-paste the following command and press Enter: Get-AppxPackage Microsoft.windowscommunicationsapps | Remove-AppxPackage
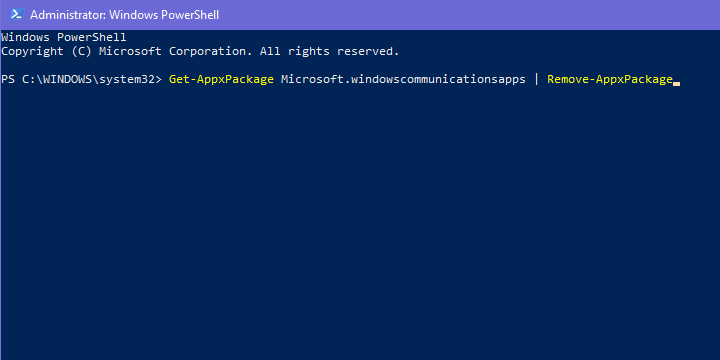
- Wait until the procedure ends and restart your PC.
- Run the Mail app and access your account.
- Open Outbox and try resending the messages.
The reinstallation of the Mail app is not an option. At least not in a standard way. It’s a built-in part of Windows 10 and thus can’t be removed.
You can, on the other hand, re-register the Mail app and, hopefully, it’ll finally allow you to get the messages out of the outbox. In order to do so, you’ll need to use the PowerShell elevated command-line as admin.
Follow the above steps to reinstall the Mail and Calendar app with PowerShell.
6. Allow Mail and Calendar app through Windows Firewall
- In the search bar, type Allow and open Allow an app through Windows Firewall.
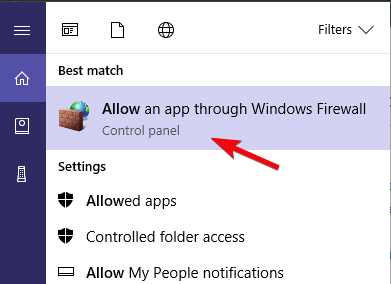
- Click on the Change settings button. You’ll need the administrative permission to access settings.
- Scroll down and confirm that Mail and Calendar can freely communicate through Firewall. Make sure both Public and Private networks are enabled.
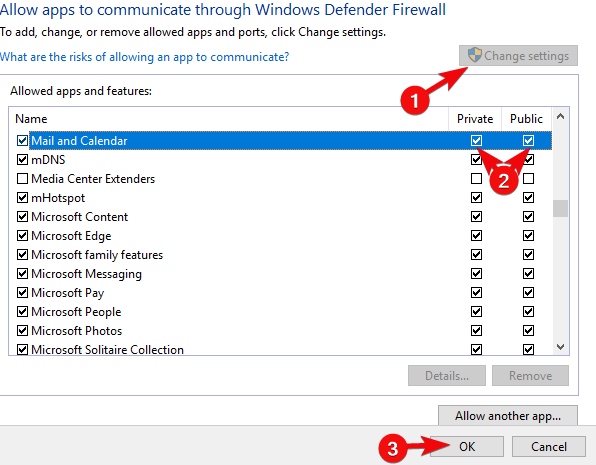
- Confirm changes if needed, and try sending emails again.
It’s well within our expectations for a Windows 10 native app to freely communicate through Windows Firewall. And more times than not that’s just the case.
However, we advise you to navigate to the list of allowed programs and confirm that the Mail app indeed has unobstructed traffic to public networks.
Additionally, if you have a third-party antimalware suite which includes an active firewall, make sure to allow Mail the safe passage, too.
7. Update Windows
- Open Settings.
- Open Update & Security.

- Under Windows Update, click Check for updates.
Windows Updates on Windows 10 cover everything. Besides the common security patches and various fixes, they cover all built-in applications.
For that reason, if something’s wrong with the current Mail iteration, the update might fix it. Chances are that you already keep your system up to date, but checking for updates manually won’t cost you a thing.
In addition, try navigating to Microsoft Store and updating the app from there. Follow these instructions to check for updates in Microsoft Store.
Do you know to enable automatic updates for sideloaded apps in Windows 10? Here you‘ll find the detailed procedure!
8. Tweak Privacy settings
- Open Settings.
- Click Privacy.
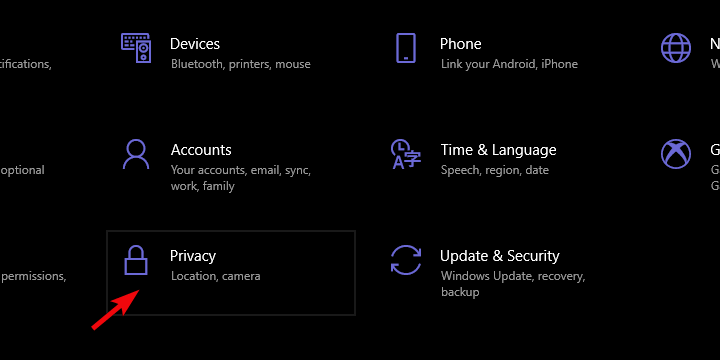
- Select Email from the left pane.
- Under the Allow access to email on this device, click Change and confirm that the option is enabled.
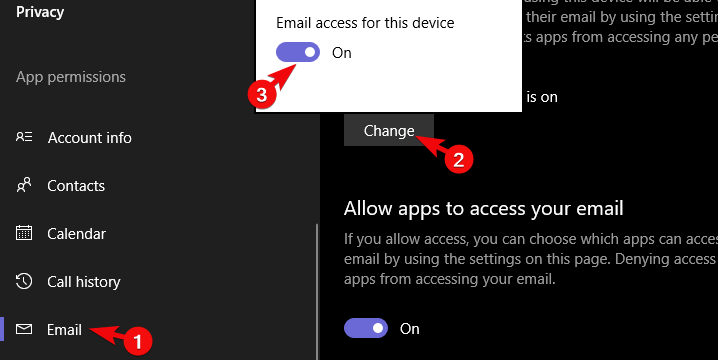
- Same for the Allow apps to access your email.
- Under that section, make sure that the Mail and Calendar app is toggled on.
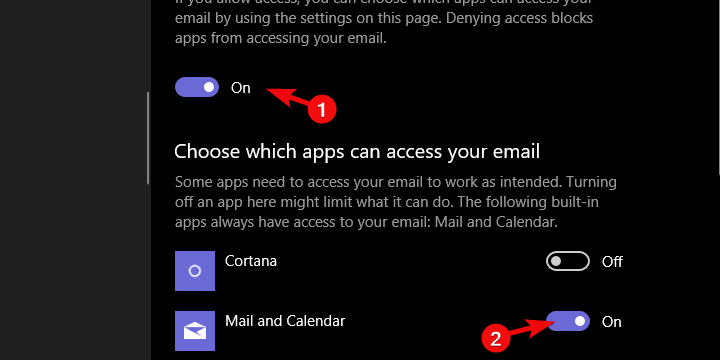
Finally, the last thing we need to mention is Privacy settings permission. In order to allow the system and respective third-party apps to access your sensitive data, you need to grant them permission.
For emails, for example, these are granted by default. However, it’s worth checking those out and confirming everything is as it’s supposed to be.
If these are, for some reason, revoked you won’t be able to use the Mail app fully. Follow the above instructions to inspect the email-related Privacy option.
With that, we can call it a wrap. Hopefully, one of those steps works out for you, so you can send emails again. Also, don’t forget to comment on this matter in the comments section below.
Before leaving, do note that the above guide contains instructions to fix the following errors too:
- Windows 10 Mail not sending emails – The Windows 10 mail working poorly and not sending emails comes as no surprise. In case you’re keen to try out alternatives to the rather subpar Mail app, check out the best Windows 10 email clients.
- Windows 10 mail app won’t send – If facing this issue, our mission is to walk you through professional fixes. You’ll find them all listed above.
Editor’s Note: This post was originally published in June 2018 and has been since revamped and updated in July 2020 for freshness, accuracy, and comprehensiveness.
and
If you are looking for a cheap and genuine microsoft product key, warranty for 1 year.
It will be available at the link: https://officerambo.com/shop/
Microsoft Windows Embedded 8.1 Industry Pro : https://officerambo.com/product/windows-embedded-8-1/
Key Windows 7 Professional / Home Base / Home Premium (2 USER) : https://officerambo.com/product/key-windows-7/
Microsoft Windows 8.1 PRO (2 PC) : https://officerambo.com/product/microsoft-windows-8-1-pro/
Windows Server 2012 R2 : https://officerambo.com/product/windows-server-2012-r2/
Visual Studio Enterprise 2019 : https://officerambo.com/product/visual-studio-enterprise-2019/
Windows Server Standard / Datacenter / Essentials : https://officerambo.com/product/windows-server-all-version-standard-datacenter-essentials/
Microsoft Office Professional Plus for Windows : https://officerambo.com/product/microsoft-office-professional-plus-for-windows/
Microsoft Office Home and Student for Windows : https://officerambo.com/product/microsoft-office-home-and-student/
Key Microsoft Access 2016 : https://officerambo.com/product/key-microsoft-access-2016/
Microsoft Visio Professional : https://officerambo.com/product/microsoft-visio-professional/
Microsoft Project Professional : https://officerambo.com/product/microsoft-project-professional/
Account Microsoft Office 365 Profestional Plus 2020 Update For 5 Devices : https://officerambo.com/product/account-microsoft-office-365/
Key Microsoft Windows 10 Profestional / Profestional N : https://officerambo.com/product/key-microsoft-windows-10/
Key Microsoft Windows XP Pro : https://officerambo.com/product/key-microsoft-windows-xp-pro/
Microsoft Office Home and Business for Mac : https://officerambo.com/product/microsoft-office-home-and-business-for-mac/
No comments:
Post a Comment