- Programming your device to shut down automatically can be done in a couple of steps.
- In this article, we're showing you how to do this, using certain commands or apps.
- Curious to learn more tips&tricks about Windows 10? Go to our Windows 10 Guides Hub for some interesting articles.
- Don't leave without checking out the How-To area, for useful tutorials about everything concerning your electronic devices.

Sometimes you might want to schedule certain tasks, especially if you don’t have enough time to do them manually.
If you want to learn more about scheduling on Windows 10, today we’re going to show you how to schedule shutdown on Windows 10.
If you can’t shut down your computer manually for some reason, you might want to schedule a shutdown. This is extremely useful if you leave your computer to do something during the night, or if you have to leave your computer for a few hours while you do some errands.
So, let’s see how to schedule a shutdown in Windows 10.
How to schedule shutdown in Windows 10?
1. Use Run dialog, Command Prompt or PowerShell
To start the Run dialog just press Windows key + R. If you want to run Command Prompt or PowerShell you can search it in the search bar.
Now, all that you have to do is type the following command into Run dialog, Command Prompt or PowerShell and press Enter:
shutdown –s –t 600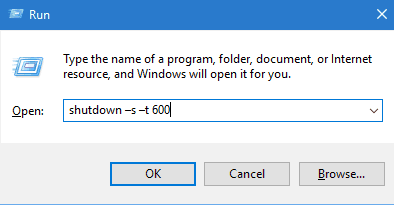
We have to mention that 600 represents the number of seconds, so in this example, your computer will turn off automatically after 10 minutes. You can experiment with different values and set the one you want.
If you’re having trouble accessing Command Prompt as an admin, then you better take a closer look at this guide. There’s a similar article about Powershell problems and how to fix them.
2. Use Task Scheduler
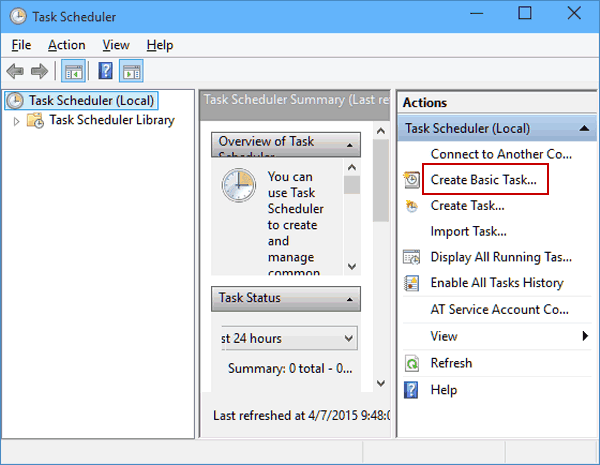
- Start Task Scheduler by going to the Start Menu, typing schedule in the Search bar, and choosing Schedule tasks.
- When Task Scheduler opens, click the Create Basic Task.
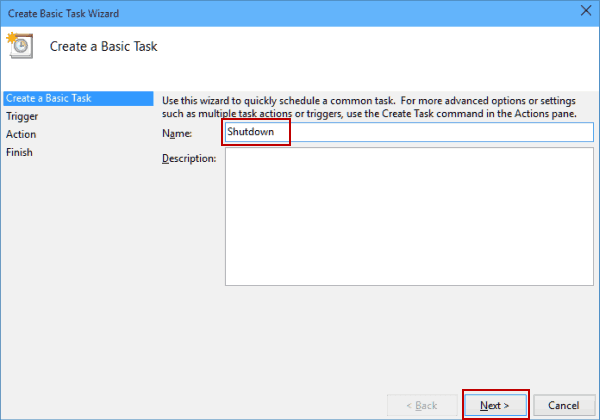
- Enter the name for your task, for example, Shutdown.
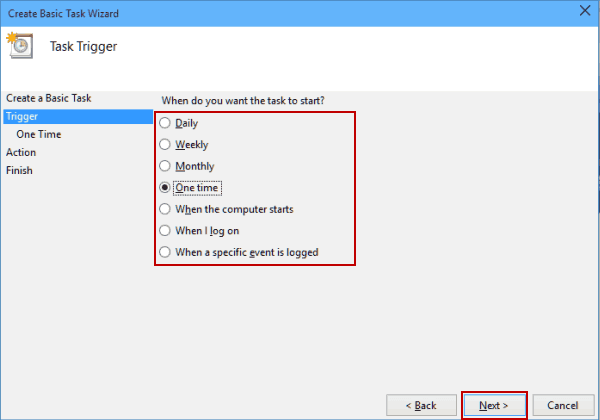
- Now choose When do you want the task to start. In our case, we’ll choose One time.
- Now enter the time and date when the task will be executed.
- Next, choose Start a program.
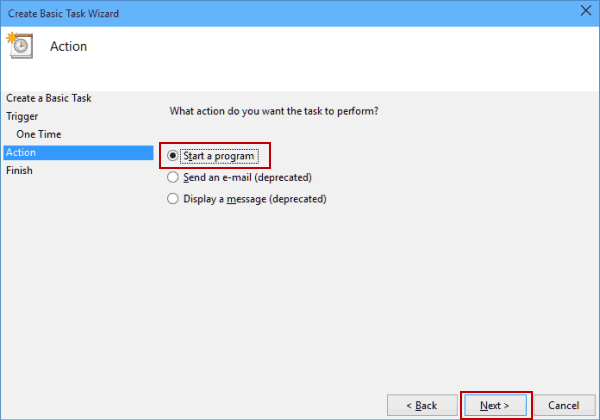
- Click the Browse button and go to
C:WindowsSystem32and select a file called shutdown. Then click Open.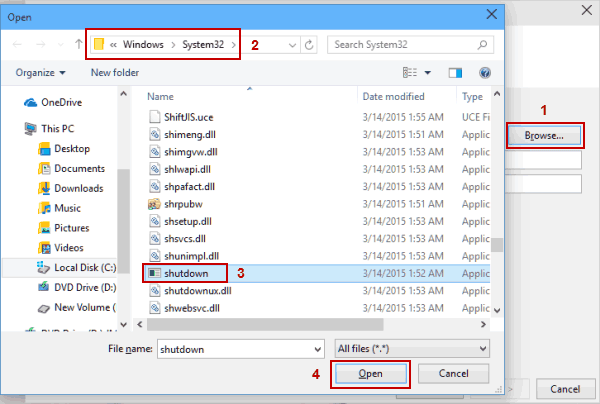
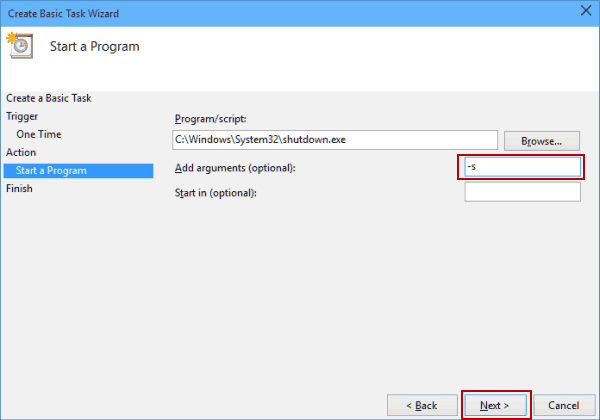
- Now just in the Add arguments field add -s, and then click Next.
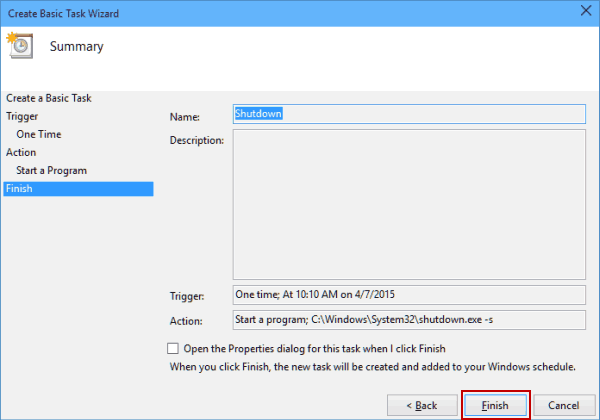
- Now you should see the task information. You can check it one last time, and if you’re pleased with your settings click Finish to schedule a shutdown.
If Task Scheduler doesn’t work, follow this complete guide to fix it.
3. Use a dedicated software to help with shutdown
Windows Shutdown Assistant is a software that allows you to shut down your PC at the set time automatically. You can also set it to shut down in other situations such as system idle, excessive CPU usage, or low battery.
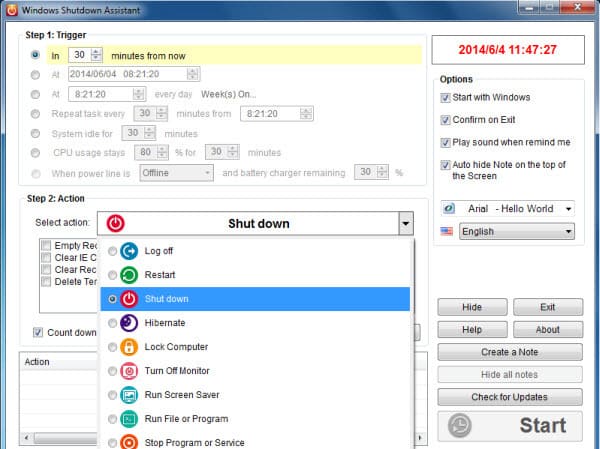
It can also support computer log off, restart, and lock up, all automatically. Thus, we recommend you download the free version of the program before deciding whether it’s worth your money or not.
That’s it, you now know how to schedule a shutdown in Windows 10. If you have any questions, just reach for the comments below.
FAQ: Learn more about scheduling tasks
- How do you schedule tasks?
Windows has a built-in app, Task Scheduler, specifically for scheduling tasks and we’re showing you just how to use it so that you maximize your productivity results.
- What can you do with Task Scheduler?
Task Scheduler is a tool that allows you to create and automatically run virtually any task , from starting up a program, or sending emails, to programming the device to shut down.
- Does Windows 10 have a task scheduler?
Indeed, Windows 10 has a built-in task scheduler; alternatively, you can use a third-party app that performs similar actions.
Editor’s Note: This article was originally published in December 2015 and was revamped and updated in July 2020 for freshness, accuracy, and comprehensiveness.
Was this page helpful?
Get the most from your tech with our daily tips
and
If you are looking for a cheap and genuine microsoft product key, warranty for 1 year.
It will be available at the link: https://officerambo.com/shop/
Microsoft Windows Embedded 8.1 Industry Pro : https://officerambo.com/product/windows-embedded-8-1/
Key Windows 7 Professional / Home Base / Home Premium (2 USER) : https://officerambo.com/product/key-windows-7/
Microsoft Windows 8.1 PRO (2 PC) : https://officerambo.com/product/microsoft-windows-8-1-pro/
Windows Server 2012 R2 : https://officerambo.com/product/windows-server-2012-r2/
Visual Studio Enterprise 2019 : https://officerambo.com/product/visual-studio-enterprise-2019/
Windows Server Standard / Datacenter / Essentials : https://officerambo.com/product/windows-server-all-version-standard-datacenter-essentials/
Microsoft Office Professional Plus for Windows : https://officerambo.com/product/microsoft-office-professional-plus-for-windows/
Microsoft Office Home and Student for Windows : https://officerambo.com/product/microsoft-office-home-and-student/
Key Microsoft Access 2016 : https://officerambo.com/product/key-microsoft-access-2016/
Microsoft Visio Professional : https://officerambo.com/product/microsoft-visio-professional/
Microsoft Project Professional : https://officerambo.com/product/microsoft-project-professional/
Account Microsoft Office 365 Profestional Plus 2020 Update For 5 Devices : https://officerambo.com/product/account-microsoft-office-365/
Key Microsoft Windows 10 Profestional / Profestional N : https://officerambo.com/product/key-microsoft-windows-10/
Key Microsoft Windows XP Pro : https://officerambo.com/product/key-microsoft-windows-xp-pro/
Microsoft Office Home and Business for Mac : https://officerambo.com/product/microsoft-office-home-and-business-for-mac/
No comments:
Post a Comment