- Once upon a time, Microsoft was forced to rename its cloud storage service.
- Since then, OneDrive has come a long way. Here's how to change it's Sync Settings in Windows 10.
- Speaking of cloud storage, you might also want to check out this guide on the Best Cloud Storage Apps or Top Decentralized Cloud Storage Solutions.
- To use OneDrive to it’s fullest potential, take a look at our OneDrive Guides.

Some time ago, Microsoft was forced to renamed its cloud storage service SkyDrive into OneDrive.
Besides the branding change, there were some new options added, and today we’re going to talk about synchronizing settings.
Since OneDrive is the default cloud storage, Microsoft has decided to embed it deeply inside Windows 10, and earlier Windows 8.1 especially.
Check out this easy guide to start downloading documents and pictures from OneDrive in no time.
How do I change OneDrive sync settings?
Change OneDrive sync settings on Windows 8.1
- Open the Search charms bar, go to the right top corner or press the Windows logo + W key
- Type there PC Settings
- Then choose OneDrive
- From there, choose Sync settings
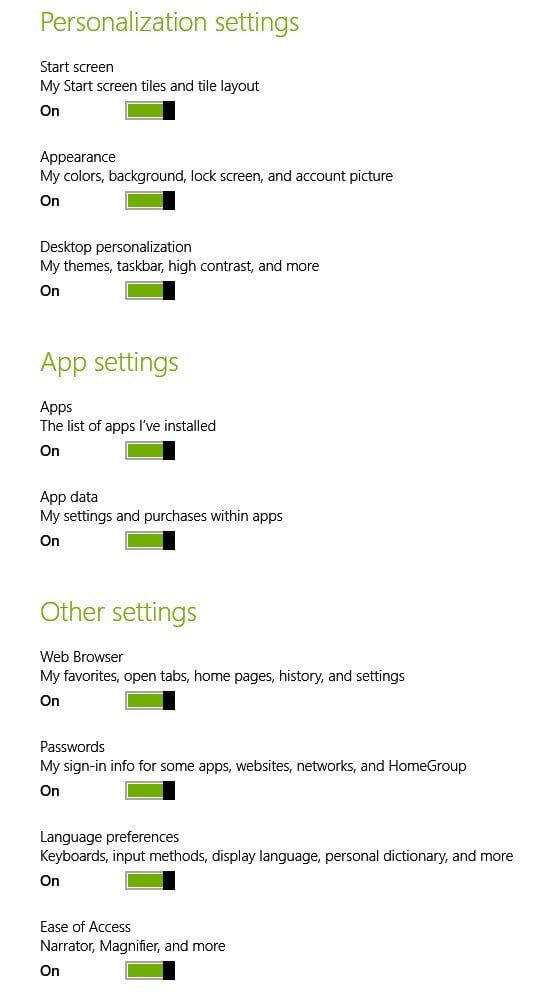
Now, you will have access to a lot of features that you can choose to turn off, or leave them on, as they are, by default. So, from here, you can synchronize to your OneDrive account a bunch of things, and here they are enlisted:
- PC settings – you can synchronize your Windows 8.1 desktop or tablet settings across all of your devices.
- Start screen – your tiles and layouts
- Appearance – Colors, background, lock screen and pictures
- Desktop personalization – themes, taskbar, high contrast
- Apps – a list of apps you have installed, as well as your settings and purchase within apps
- Web browser – favorites, open tabs, home pages, history, and page settings
- Passwords – sign-in information for apps, websites, networks, and HomeGroup
- Language preferences – keyboard input, display language, personal dictionary
- Ease of access – narrator, magnifier
- Other Windows settings – File Explorer, mouse, printers
Change OneDrive sync settings on Windows 10
Let’s see how we can change OneDrive settings on Windows 10. Here are the steps to follow:
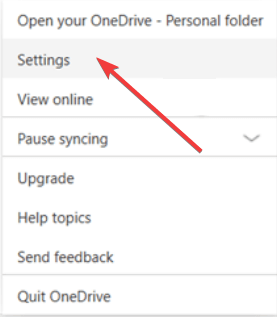
- Select the OneDrive icon in the taskbar
- Select More > go to Settings

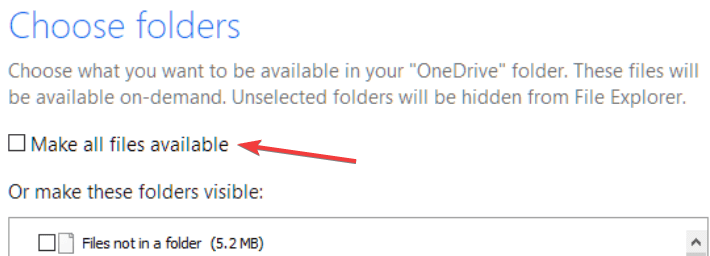
- Click on the Account tab > Choose folders.
- The Sync your OneDrive files to this PC dialog box should now be available on the screen
- Uncheck the folders you don’t want to sync to your PC > hit OK. If you want to sync absolutely all your folders, then check the Make all files available option.

Also, besides all this, you can choose to back up your files to your OneDrive account, as well.
Use Sync.com

Since we are talking about synchronization, we simply cannot omit this incredible tool that will keep your files synced across all of your devices with no risk of data loss or leakage.
Keeping all of your assets synchronized has never been easier thanks to Sync, the tool that allows you to store, share, and access all of your files from any location.
The best part is that you get up to 5 GB to store all those important files in the cloud absolutely free of charge.
But Sync delivers more than storage, it also protects your data with end-to-end encryption, acts as a realtime backup solution, and delivers strong data recovery features.
Let’s quickly look at its key features:
- Storage space of up 4TB in premium plans
- Realtime backup and sync options
- End-to-end encryption and data protection
- File history and recovery features included
- Two-factor authentification (2FA)
- Mobile apps, desktop apps, and integration

Sync.com
Sync, backup, store, and share all your files effortlessly with this powerful privacy-oriented cloud-based solution!
We hope this has been of great help to you, so stay subscribed for more useful tips. As always, feel free to share your personal experience with us via the comments section below.
Editor’s Note: This post was originally published in August 2018 and has been since revamped and updated in July 2020 for freshness, accuracy, and comprehensiveness.
and
If you are looking for a cheap and genuine microsoft product key, warranty for 1 year.
It will be available at the link: https://officerambo.com/shop/
Microsoft Windows Embedded 8.1 Industry Pro : https://officerambo.com/product/windows-embedded-8-1/
Key Windows 7 Professional / Home Base / Home Premium (2 USER) : https://officerambo.com/product/key-windows-7/
Microsoft Windows 8.1 PRO (2 PC) : https://officerambo.com/product/microsoft-windows-8-1-pro/
Windows Server 2012 R2 : https://officerambo.com/product/windows-server-2012-r2/
Visual Studio Enterprise 2019 : https://officerambo.com/product/visual-studio-enterprise-2019/
Windows Server Standard / Datacenter / Essentials : https://officerambo.com/product/windows-server-all-version-standard-datacenter-essentials/
Microsoft Office Professional Plus for Windows : https://officerambo.com/product/microsoft-office-professional-plus-for-windows/
Microsoft Office Home and Student for Windows : https://officerambo.com/product/microsoft-office-home-and-student/
Key Microsoft Access 2016 : https://officerambo.com/product/key-microsoft-access-2016/
Microsoft Visio Professional : https://officerambo.com/product/microsoft-visio-professional/
Microsoft Project Professional : https://officerambo.com/product/microsoft-project-professional/
Account Microsoft Office 365 Profestional Plus 2020 Update For 5 Devices : https://officerambo.com/product/account-microsoft-office-365/
Key Microsoft Windows 10 Profestional / Profestional N : https://officerambo.com/product/key-microsoft-windows-10/
Key Microsoft Windows XP Pro : https://officerambo.com/product/key-microsoft-windows-xp-pro/
Microsoft Office Home and Business for Mac : https://officerambo.com/product/microsoft-office-home-and-business-for-mac/
No comments:
Post a Comment