
This blog series will examine and test-drive SharePoint Syntex, a powerful new Microsoft 365 service announced by Microsoft at Ignite 2020.
SharePoint Syntex consists of content understanding, processing, and compliance services that provide the ability to capture and scale expertise using advanced AI and machine learning.
SharePoint Syntex brings the power of automation to content processing and transforms your content into knowledge.
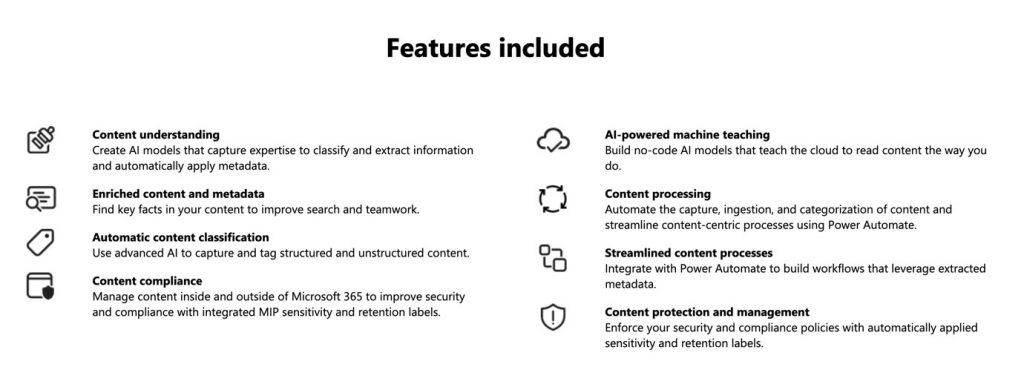
The features included with SharePoint Syntex are shown in the image below, taken from the Microsoft SharePoint Syntex overview page:
Description automatically generated" class="wp-image-49775" srcset="https://practical365.com/wp-content/uploads/2021/01/1.png-1024x387.jpg 1024w, https://practical365.com/wp-content/uploads/2021/01/1.png-300x113.jpg 300w, https://practical365.com/wp-content/uploads/2021/01/1.png-768x291.jpg 768w, https://practical365.com/wp-content/uploads/2021/01/1.png.jpg 1380w" sizes="(max-width: 1024px) 100vw, 1024px"/>
In Part I, we explain the licensing requirements for SharePoint Syntex and then show you how to license and set up SharePoint Syntex in your Microsoft 365 environment.
Part II will explore adding document understanding models into our newly created Syntex Content Center and then show you how to add, classify and train documents with SharePoint Syntex.
Lastly, in Part III, we look at creating forms processing models from SharePoint document libraries using AI Builder, a feature of Microsoft PowerApps.
Setting up the licenses for SharePoint Syntex
To set up SharePoint Syntex within your Microsoft 365 tenant, you will first need to acquire the required licenses by completing the following steps:
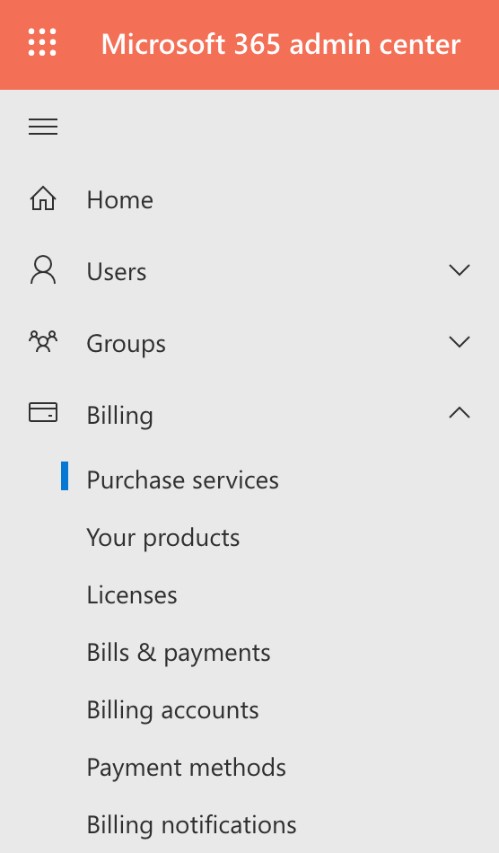
- Log in to the Microsoft 365 admin center at https://admin.microsoft.com as a Global Administrator, User Administrator, or Billing Administrator, and navigate to Billing | Purchase services as shown below:
Description automatically generated" class="wp-image-49777" srcset="https://practical365.com/wp-content/uploads/2021/01/2-1.jpg 499w, https://practical365.com/wp-content/uploads/2021/01/2-1-175x300.jpg 175w" sizes="(max-width: 499px) 100vw, 499px"/>
- From the right-hand pane of the Purchase services section, go to the search box as shown below, type in “syntax,” and hit enter:

- The following process shows options where you can either click on ‘Next’ to purchase the required number of SharePoint Syntex licenses, or you can choose the option of ‘Start a free trial,’ which provides 25 SharePoint Syntex licenses you can use for 30 days:

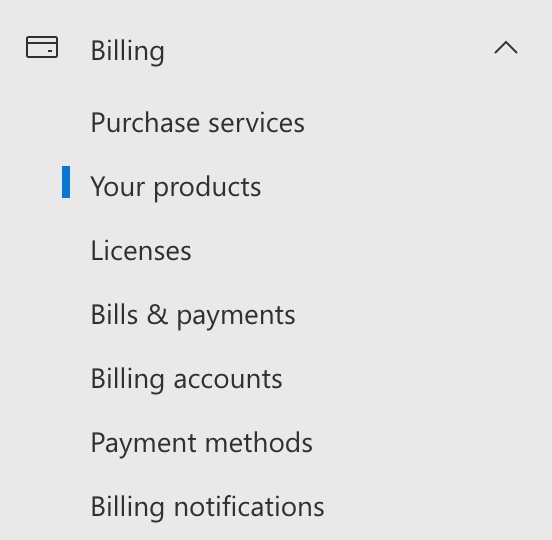
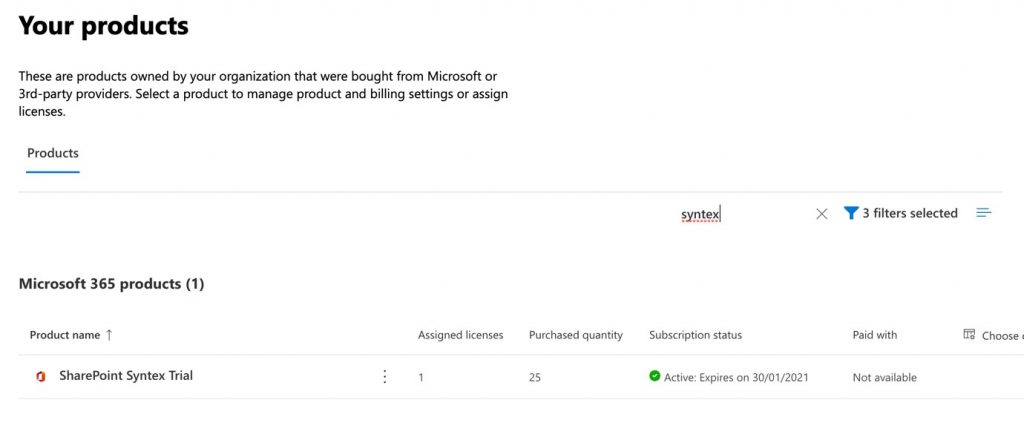
- For the purposes of demonstrating SharePoint Syntex in this article, we chose the free trial option. Once completed, you can view the licenses in the Microsoft 365 admin center under Billing | Your products, as shown below:
Description automatically generated" class="wp-image-49780" srcset="https://practical365.com/wp-content/uploads/2021/01/5.jpg 552w, https://practical365.com/wp-content/uploads/2021/01/5-300x293.jpg 300w" sizes="(max-width: 552px) 100vw, 552px"/>
- The 25 SharePoint Syntex Trial licenses can be seen in the image below:
Description automatically generated" class="wp-image-49781" srcset="https://practical365.com/wp-content/uploads/2021/01/6-1024x423.jpg 1024w, https://practical365.com/wp-content/uploads/2021/01/6-300x124.jpg 300w, https://practical365.com/wp-content/uploads/2021/01/6-768x317.jpg 768w, https://practical365.com/wp-content/uploads/2021/01/6.jpg 1380w" sizes="(max-width: 1024px) 100vw, 1024px"/>
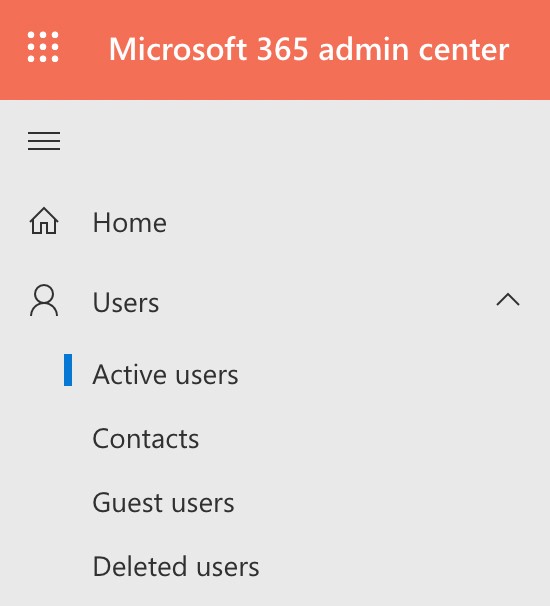
- Next, we must assign a SharePoint Syntex license to each Microsoft 365 user who will be using any SharePoint Syntex features. This can be done from the Microsoft 365 admin center under Users | Active Users:
Description automatically generated" class="wp-image-49782" srcset="https://practical365.com/wp-content/uploads/2021/01/7.jpg 550w, https://practical365.com/wp-content/uploads/2021/01/7-272x300.jpg 272w" sizes="(max-width: 550px) 100vw, 550px"/>
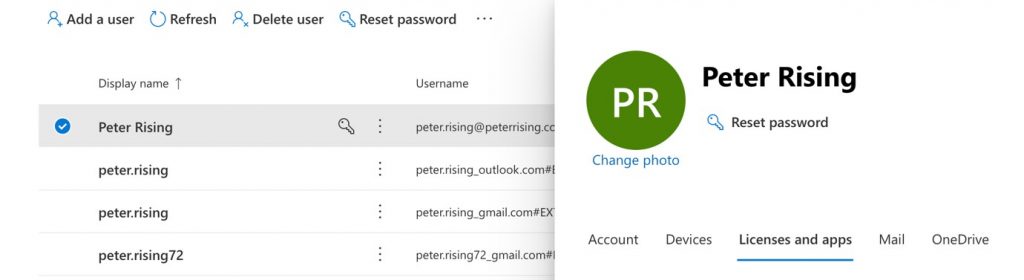
- Select the required user(s) and choose the Licenses and apps tab:
Description automatically generated" class="wp-image-49783" srcset="https://practical365.com/wp-content/uploads/2021/01/8-1024x280.jpg 1024w, https://practical365.com/wp-content/uploads/2021/01/8-300x82.jpg 300w, https://practical365.com/wp-content/uploads/2021/01/8-768x210.jpg 768w, https://practical365.com/wp-content/uploads/2021/01/8.jpg 1380w" sizes="(max-width: 1024px) 100vw, 1024px"/>
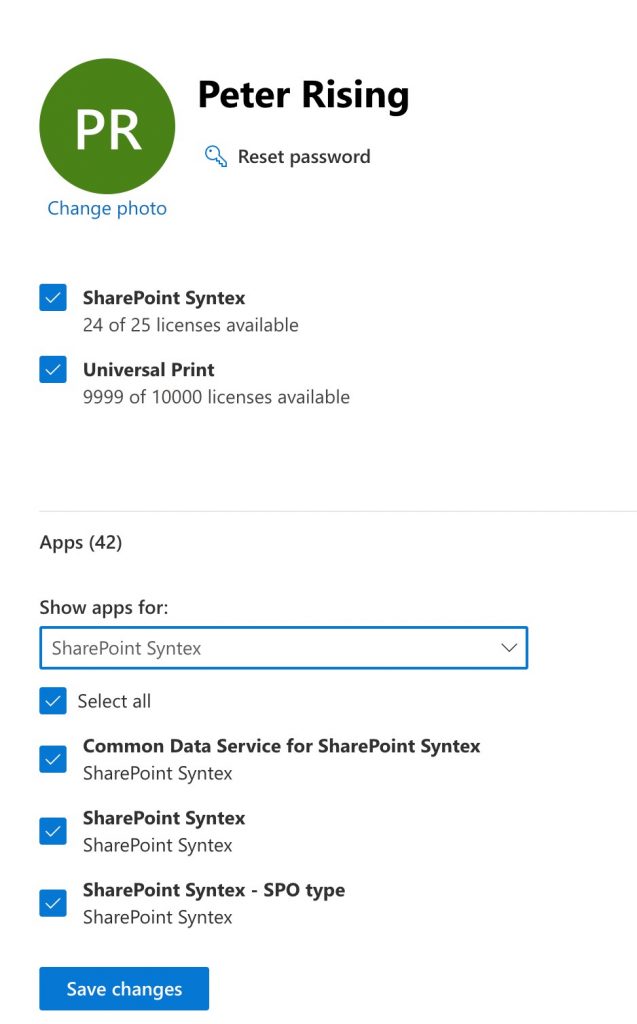
- Scroll through the list of available licenses and check the box next to SharePoint Syntex. Scroll down further, and under Apps, choose the dropdown under Show apps for, and select SharePoint Syntex. Ensure that the checkboxes for Common Data Service for SharePoint Syntex, SharePoint Syntex, and SharePoint Syntex – SPO type are all selected, and then click on Save changes:
Description automatically generated" class="wp-image-49784" srcset="https://practical365.com/wp-content/uploads/2021/01/9-637x1024.jpg 637w, https://practical365.com/wp-content/uploads/2021/01/9-187x300.jpg 187w, https://practical365.com/wp-content/uploads/2021/01/9-768x1235.jpg 768w, https://practical365.com/wp-content/uploads/2021/01/9.jpg 938w" sizes="(max-width: 637px) 100vw, 637px"/>
Now that we’ve secured the licenses needed to use SharePoint Syntex, we can set up the program accordingly in our Microsoft 365 environment.
Setting up SharePoint Syntex in Microsoft 365
To setup SharePoint Syntex, we need to complete the following steps:
- Log in to the Microsoft 365 admin center at https://admin.microsoft.com as a Global Administrator or SharePoint Administrator, and navigate to Setup:

Description automatically generated with medium confidence" class="wp-image-49785" srcset="https://practical365.com/wp-content/uploads/2021/01/10.jpg 550w, https://practical365.com/wp-content/uploads/2021/01/10-239x300.jpg 239w" sizes="(max-width: 550px) 100vw, 550px"/>
- Scroll down to the Files and content section and click on Automate content understanding:

Description automatically generated" class="wp-image-49786" srcset="https://practical365.com/wp-content/uploads/2021/01/11-1024x147.jpg 1024w, https://practical365.com/wp-content/uploads/2021/01/11-300x43.jpg 300w, https://practical365.com/wp-content/uploads/2021/01/11-768x110.jpg 768w, https://practical365.com/wp-content/uploads/2021/01/11.jpg 1380w" sizes="(max-width: 1024px) 100vw, 1024px"/>
- Below you’ll see the At a glance and User impact information for Automating content understanding:
Description automatically generated" class="wp-image-49787" srcset="https://practical365.com/wp-content/uploads/2021/01/12-1024x559.jpg 1024w, https://practical365.com/wp-content/uploads/2021/01/12-300x164.jpg 300w, https://practical365.com/wp-content/uploads/2021/01/12-768x419.jpg 768w, https://practical365.com/wp-content/uploads/2021/01/12.jpg 1377w" sizes="(max-width: 1024px) 100vw, 1024px"/>
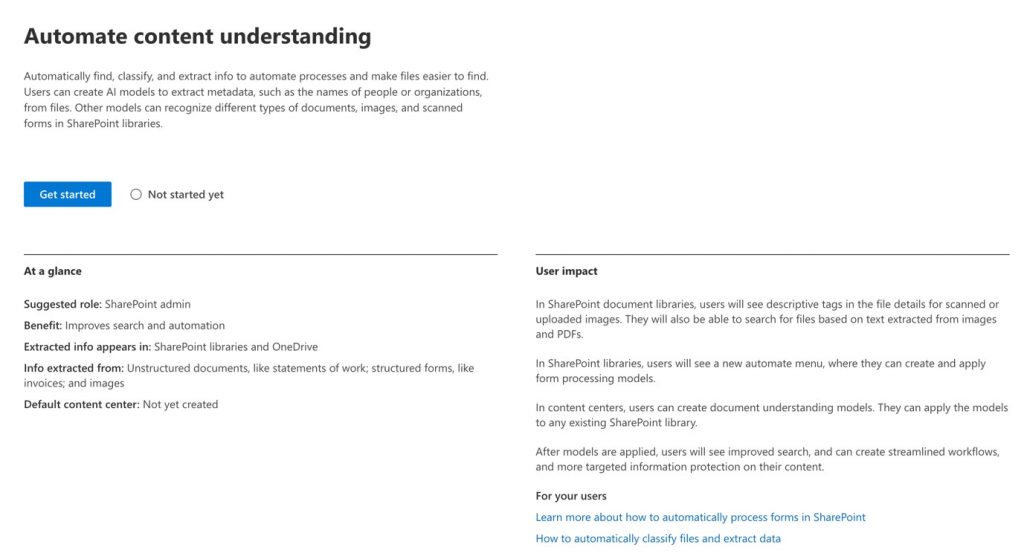
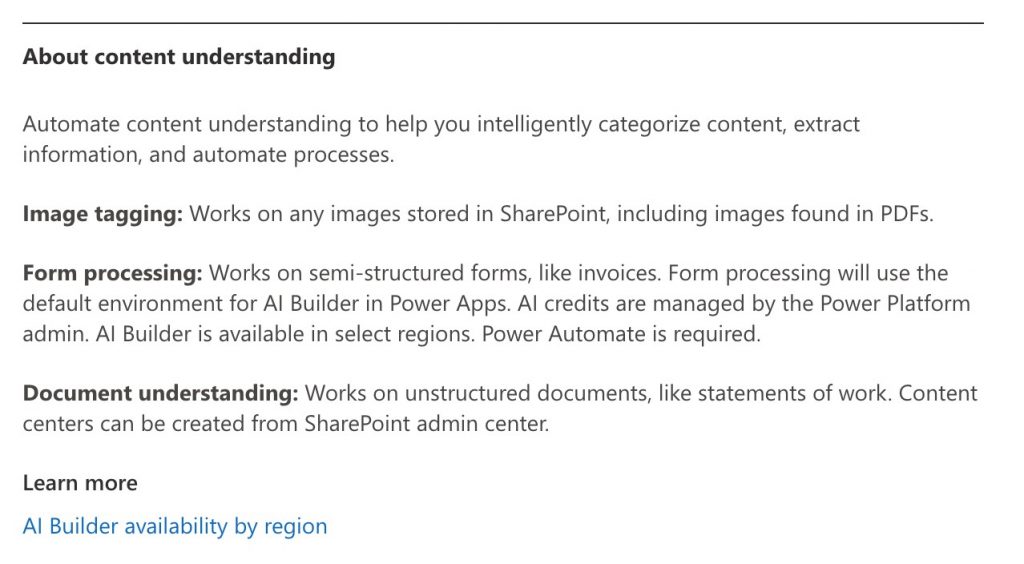
- Scroll down, and you will see further information About content understanding, which explains the three main functions: Image tagging, Form processing, and Document understanding:
Description automatically generated" class="wp-image-49788" srcset="https://practical365.com/wp-content/uploads/2021/01/13-1024x564.jpg 1024w, https://practical365.com/wp-content/uploads/2021/01/13-300x165.jpg 300w, https://practical365.com/wp-content/uploads/2021/01/13-768x423.jpg 768w, https://practical365.com/wp-content/uploads/2021/01/13.jpg 1278w" sizes="(max-width: 1024px) 100vw, 1024px"/>
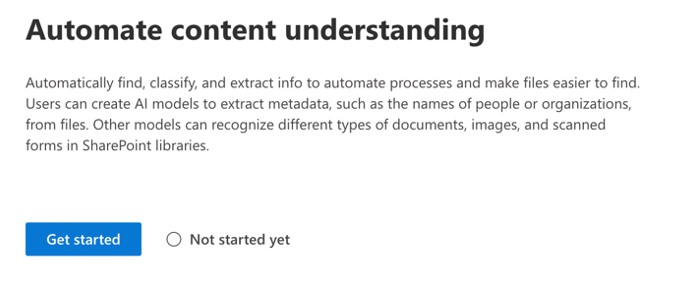
- Scroll back to the top and click on Get started:
Description automatically generated" class="wp-image-49789" srcset="https://practical365.com/wp-content/uploads/2021/01/14.jpg 698w, https://practical365.com/wp-content/uploads/2021/01/14-300x121.jpg 300w" sizes="(max-width: 698px) 100vw, 698px"/>
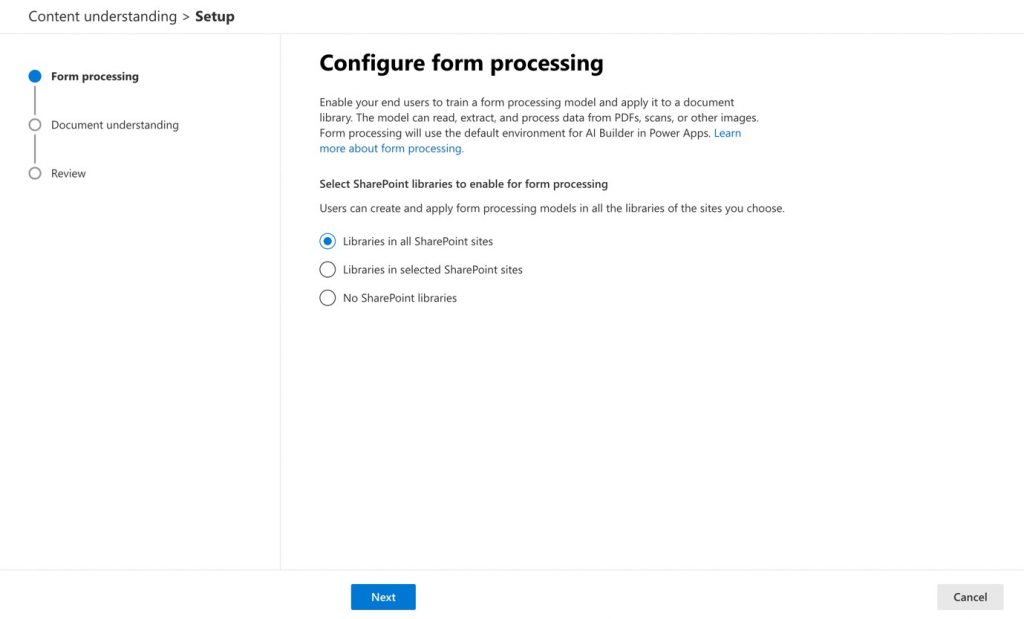
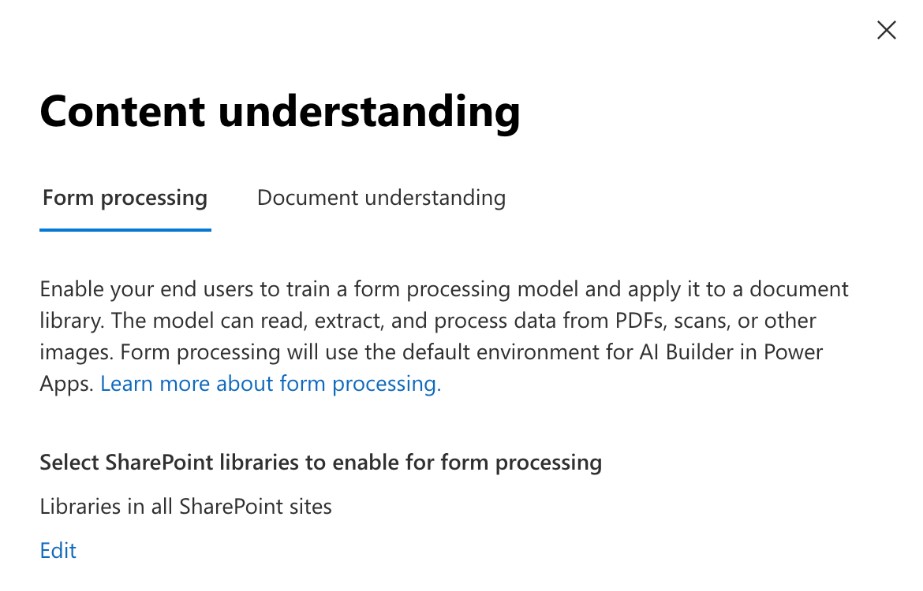
- The Content understanding setup begins, and the first step is to select your preferred settings for form processing. You may choose to Select SharePoint Libraries to enable for form processing. We will leave the default option selected, Libraries in all SharePoint sites, and then click Next:
Description automatically generated" class="wp-image-49790" srcset="https://practical365.com/wp-content/uploads/2021/01/15-1024x619.jpg 1024w, https://practical365.com/wp-content/uploads/2021/01/15-300x181.jpg 300w, https://practical365.com/wp-content/uploads/2021/01/15-768x464.jpg 768w, https://practical365.com/wp-content/uploads/2021/01/15.jpg 1379w" sizes="(max-width: 1024px) 100vw, 1024px"/>
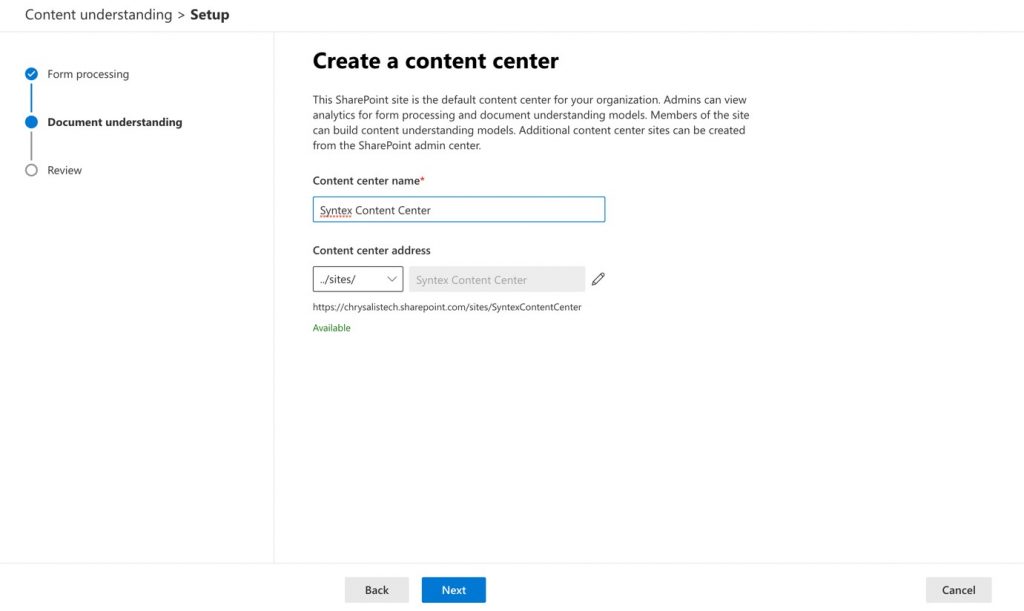
- The Document understanding function of SharePoint Syntex requires creating a Content center. In this example, we will start our content center with Syntex Content Center’s name, which automatically generates a site name for the content center, https://tenantname.sharepoint.com/sites/SyntexContentCenter, as shown below. Click Next:
Description automatically generated" class="wp-image-49791" srcset="https://practical365.com/wp-content/uploads/2021/01/16-1024x611.jpg 1024w, https://practical365.com/wp-content/uploads/2021/01/16-300x179.jpg 300w, https://practical365.com/wp-content/uploads/2021/01/16-768x458.jpg 768w, https://practical365.com/wp-content/uploads/2021/01/16.jpg 1381w" sizes="(max-width: 1024px) 100vw, 1024px"/>
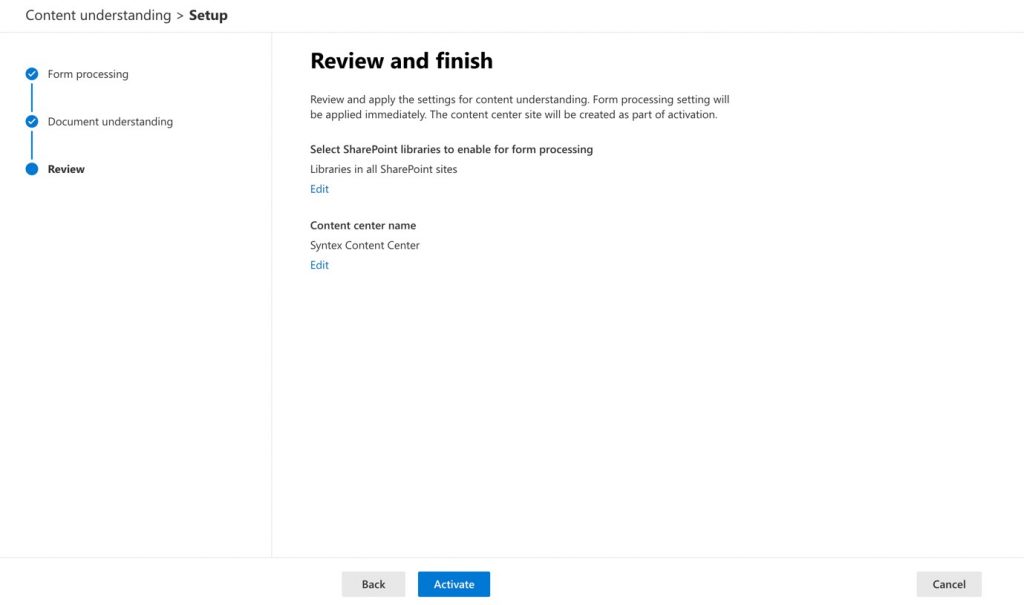
- Under the Review section of the setup process, you have the option to make any last-minute edits. When you are happy with your chosen settings, click Activate:
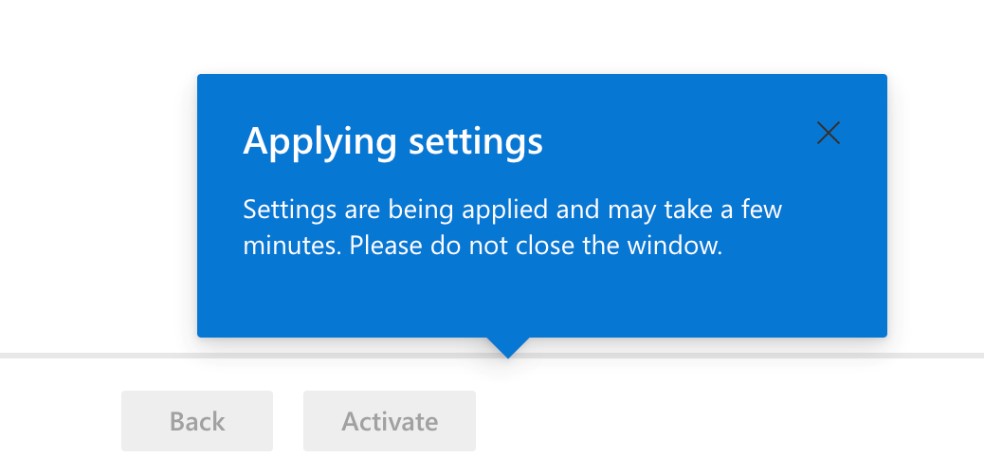
- The setup may take a few minutes to complete, and you should see the notification below:
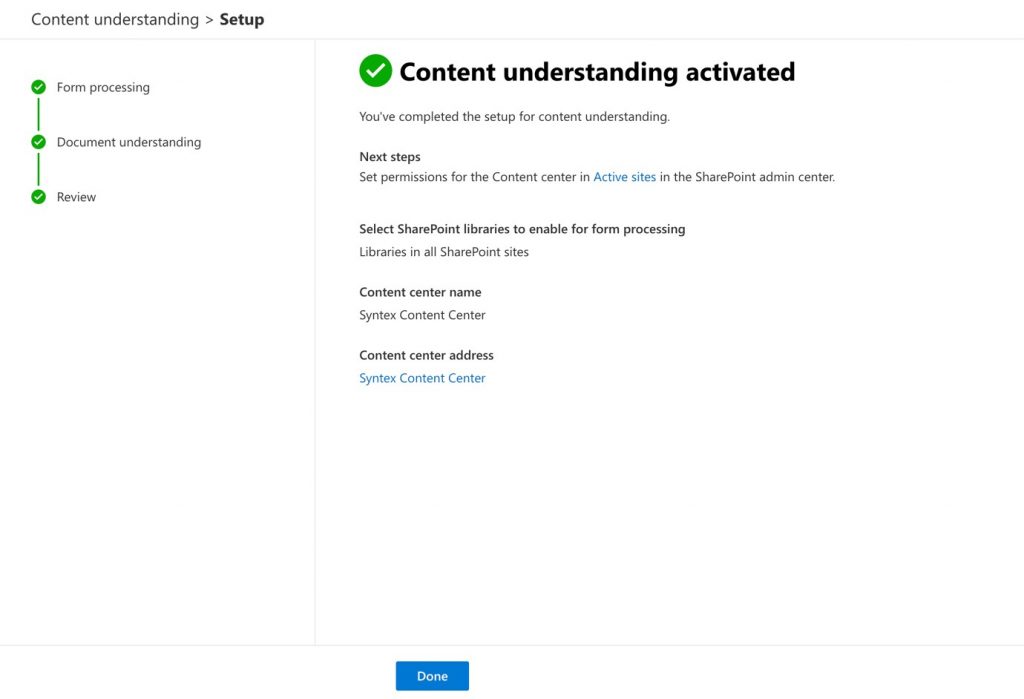
- When the setup is completed, click Done:
Description automatically generated" class="wp-image-49794" srcset="https://practical365.com/wp-content/uploads/2021/01/20-1-1024x699.jpg 1024w, https://practical365.com/wp-content/uploads/2021/01/20-1-300x205.jpg 300w, https://practical365.com/wp-content/uploads/2021/01/20-1-768x524.jpg 768w, https://practical365.com/wp-content/uploads/2021/01/20-1.jpg 1380w" sizes="(max-width: 1024px) 100vw, 1024px"/>
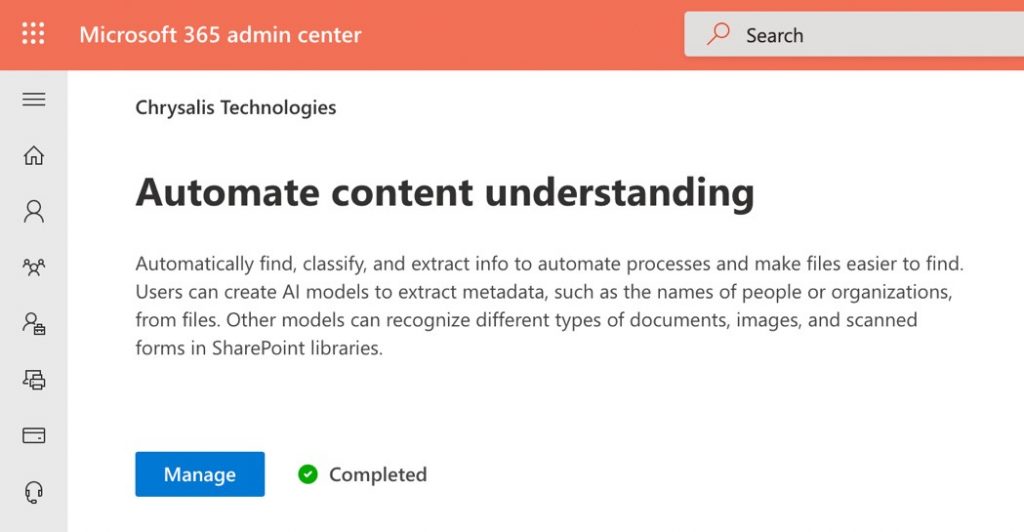
- You will then be routed back to the Automate content understanding page, where you’ll click on Manage:
Description automatically generated" class="wp-image-49798" srcset="https://practical365.com/wp-content/uploads/2021/01/21-1024x532.jpg 1024w, https://practical365.com/wp-content/uploads/2021/01/21-300x156.jpg 300w, https://practical365.com/wp-content/uploads/2021/01/21-768x399.jpg 768w, https://practical365.com/wp-content/uploads/2021/01/21.jpg 1049w" sizes="(max-width: 1024px) 100vw, 1024px"/>
- Clicking on Manage will allow you to edit the settings you completed in the initial setup for both Form processing and Document understanding:
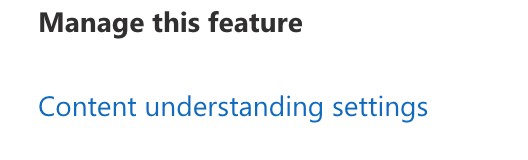
- If you scroll further down the Automate content understanding page, you will see the option to Manage this feature. Click on Content understanding settings:
Description automatically generated" class="wp-image-49800" srcset="https://practical365.com/wp-content/uploads/2021/01/23.jpg 528w, https://practical365.com/wp-content/uploads/2021/01/23-300x91.jpg 300w" sizes="(max-width: 528px) 100vw, 528px"/>
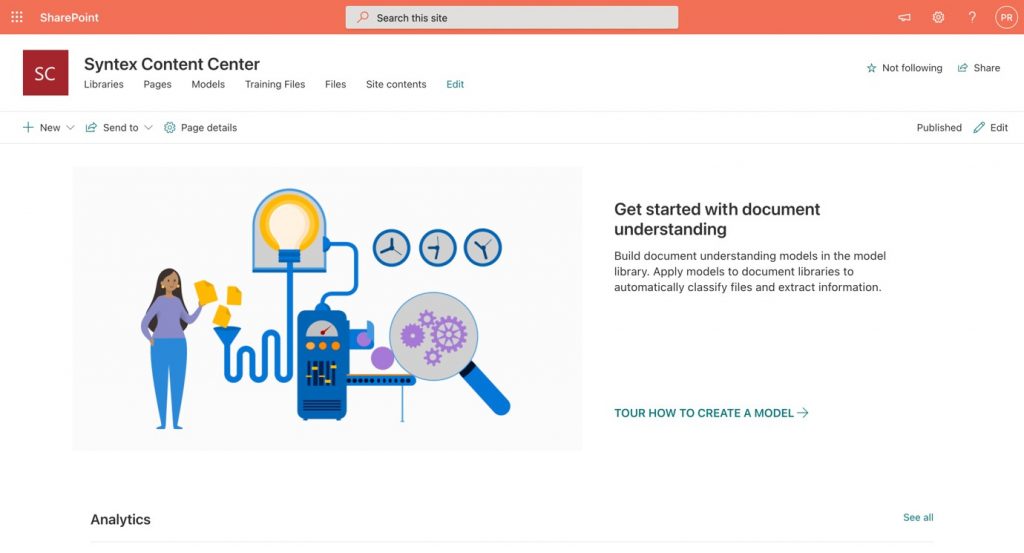
- Content understanding settings will take you into your newly created Syntex Content Center, as shown below. **At this point, it is also important to point out that it is possible to create multiple content centers for SharePoint Syntex within Microsoft 365:
Description automatically generated" class="wp-image-49801" srcset="https://practical365.com/wp-content/uploads/2021/01/24-1024x553.jpg 1024w, https://practical365.com/wp-content/uploads/2021/01/24-300x162.jpg 300w, https://practical365.com/wp-content/uploads/2021/01/24-768x415.jpg 768w, https://practical365.com/wp-content/uploads/2021/01/24.jpg 1380w" sizes="(max-width: 1024px) 100vw, 1024px"/>
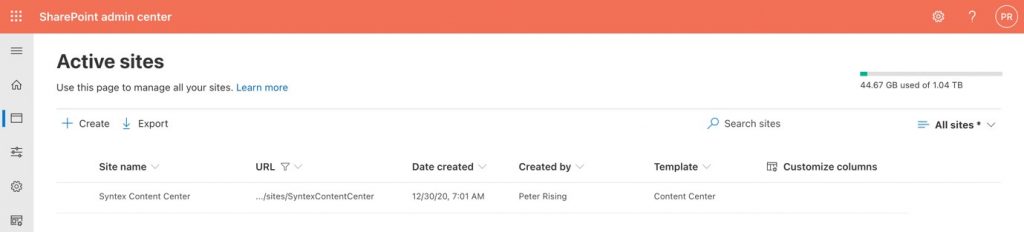
- It is also possible to locate your SharePoint Syntex Content centers by searching for them from the SharePoint admin center, as shown below. The SharePoint admin center is accessed from the bottom left of the Microsoft 365 admin center under Admin centers | SharePoint, or by navigating to https://tenantname-admin.sharepoint.comin your browser:
Description automatically generated with medium confidence" class="wp-image-49802" srcset="https://practical365.com/wp-content/uploads/2021/01/25-1024x232.jpg 1024w, https://practical365.com/wp-content/uploads/2021/01/25-300x68.jpg 300w, https://practical365.com/wp-content/uploads/2021/01/25-768x174.jpg 768w, https://practical365.com/wp-content/uploads/2021/01/25.jpg 1379w" sizes="(max-width: 1024px) 100vw, 1024px"/>
And that’s it! SharePoint Syntex is now licensed (albeit with a trial for now) and configured correctly in our Microsoft 365 tenant.
In this post, we introduced you to the principles of SharePoint Syntex within Microsoft 365. We showed you how to acquire licenses to use SharePoint Syntex in your environment and how to assign these to your users.
In Part II of this blog series, you’ll learn how to configure and use the Document understanding feature of SharePoint Syntex. This will involve adding a Document understanding model to your SharePoint Syntex Content center; adding example files; classifying your files, running training; optionally creating and training extractors for the information needed within columns in your SharePoint libraries; and lastly, how to apply your Document understanding model to selected libraries within SharePoint Online.
Thank you for viewing the article, if you find it interesting, you can support us by buying at the link:: https://officerambo.com/shop/
No comments:
Post a Comment